Before you start
- BI Connector is installed and your license is activated. If not, start with installation of Desktop Edition (in PC clients) or Server Edition (in Server clients).
- You have your Oracle Fusion instance URL handy.
- You have your Oracle Fusion credentials (username and password for Basic auth, or JWT details if your organization uses JWT authentication).
- The user must have the following Oracle Fusion roles to configure and access BICC data: BIACM_ADMIN and BICC_UCM_CONTENT_ADMIN
Part A — Create the Data Source
Step 1 — Open the Data Sources section
Open BI Connector and click Data Sources on the left pane.
Step 2 — Create a new Data Source
Click New Data Source. Enter a name for your connection — for example, Fusion BICC PVOs.
Set the Data Source Type to BICC and pick the appropriate Oracle Analytics Application from the drop-down.
Step 3 — Enter your Oracle instance URL
Login to your Oracle Fusion instance in a browser. After successful authentication, copy the URL up to oraclecloud.com. The URL typically looks like:
https://______.oraclecloud.com
Step 4 — Set up authentication
Fill in the authentication fields based on your auth type:
- Basic auth: enter your Username and Password.
- JWT auth: enter the Client ID, Client Secret, and other required JWT details.
Step 5 — Test and save the Data Source
Click Test & Save. If the details entered in the BI Connector app are validated immediately, a success message appears at the top right and your data source is saved.
Instead, if a browser authentication is prompted, just go through the login flow on the browser, including MFA if applicable. If the browser authentication is successful, a success message appears at the top right and your Data Source is saved.
1. Enter Service Account credentials if setting up the connection on a Gateway/Integration Runtime/Tableau Bridge Server
(or)
2. Enter your user credentials if setting up the connection on your PC
Part B — Create the Table
- Option 1 — Use Existing Job: Select a PVO from an existing BICC job configured in Oracle Fusion.
- Option 2 — Create New Job : Select a PVO and create a new BICC job through BI Connector.
Option 1 — Use Existing Job
Step 6 — Open the Tables section
Click Tables on the left pane, then click Add Table.
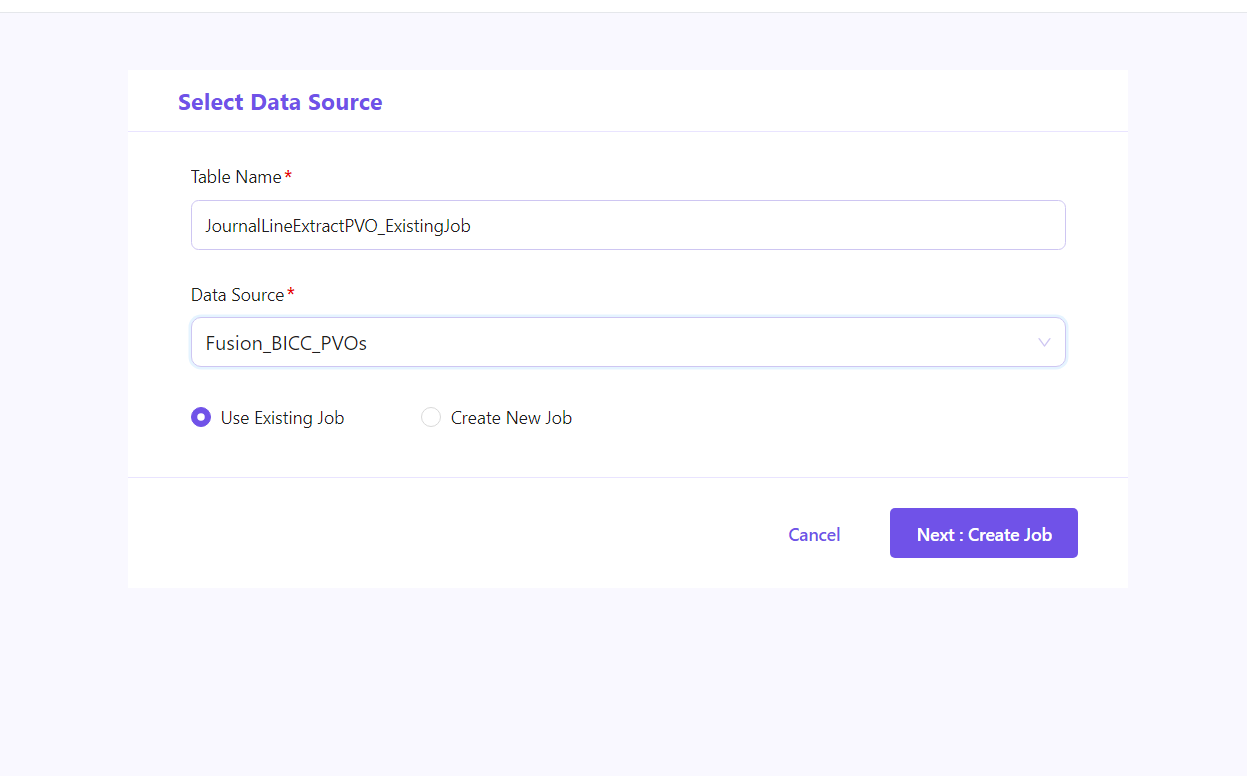
Step 7 — Name the Table and select the Data Source
Enter a name in the Table Name field.
Pick the Data Source you created in Part A from the drop-down. Select Use Existing Job and click Next: Create Job
Step 8 — Select the Job and PVO
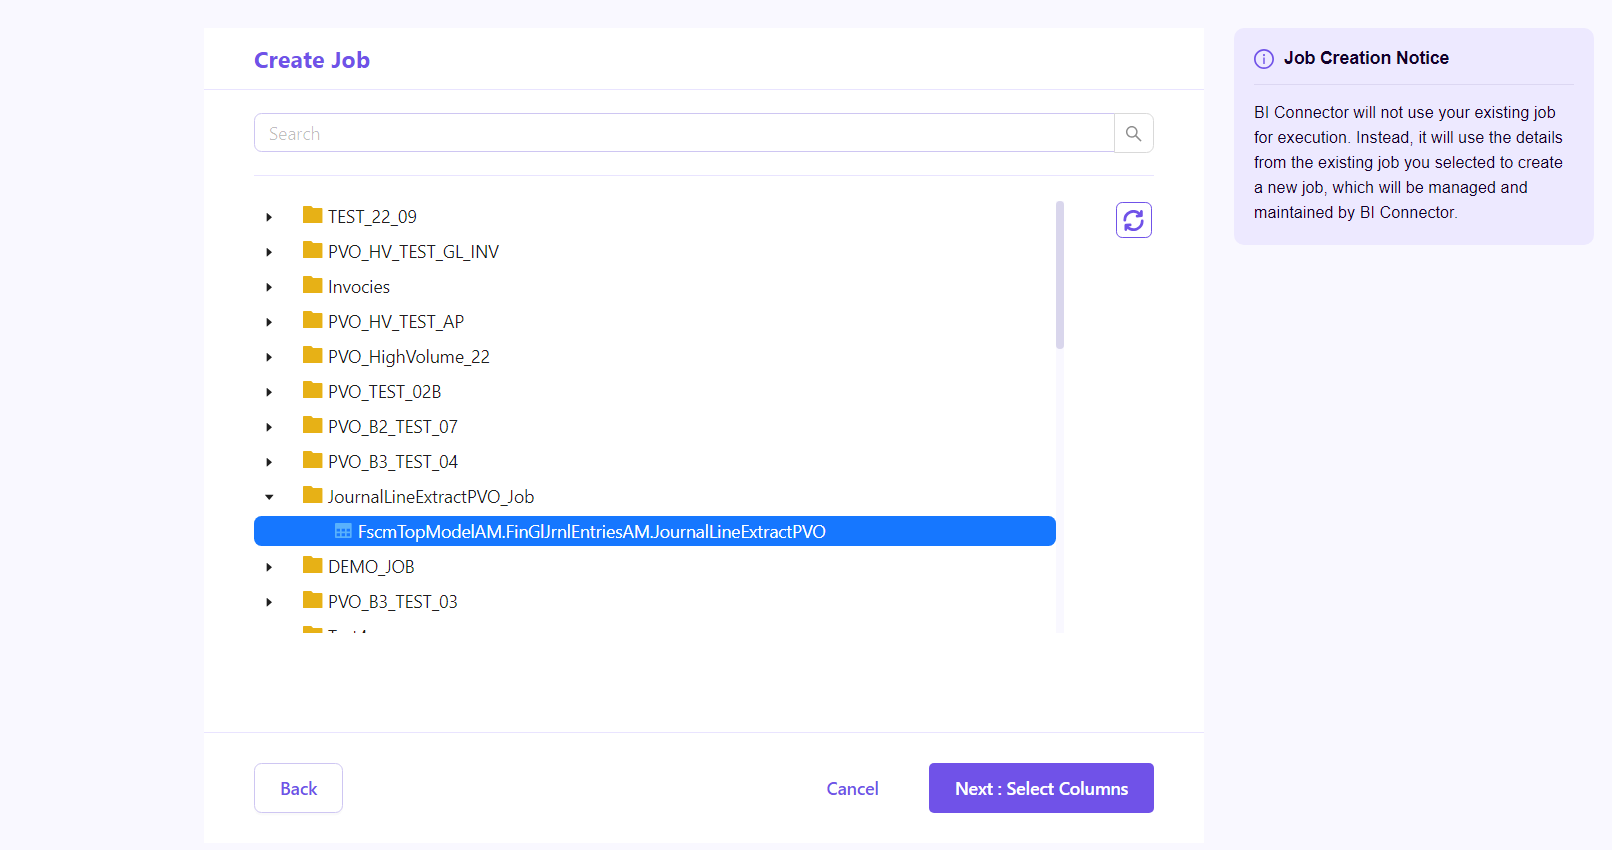
- BI Connector fetches and displays all the BICC jobs available in the configured Oracle Fusion instance, along with the PVOs associated with each job.
- Navigate through the list of BICC jobs, select the Job of your interest, then select the PVO associated with that job, and click Next: Select Columns.
Step 9 — Select the Columns
- All columns available in the selected PVO are displayed.
- By default, the columns that are already selected in the BICC job for the selected PVO are pre-selected. You can select or deselect columns based on the data you want to extract and use in your data pipelines.
- The column list also provides filters to help identify specific types of columns, such as:
- Primary keys — Displays columns identified as primary key columns for the selected PVO.
- Incremental columns — Displays columns that can be used for incremental data extraction.
- Data Type — Filter columns based on their data type.
- Search Column Name — Search for a specific column by name.
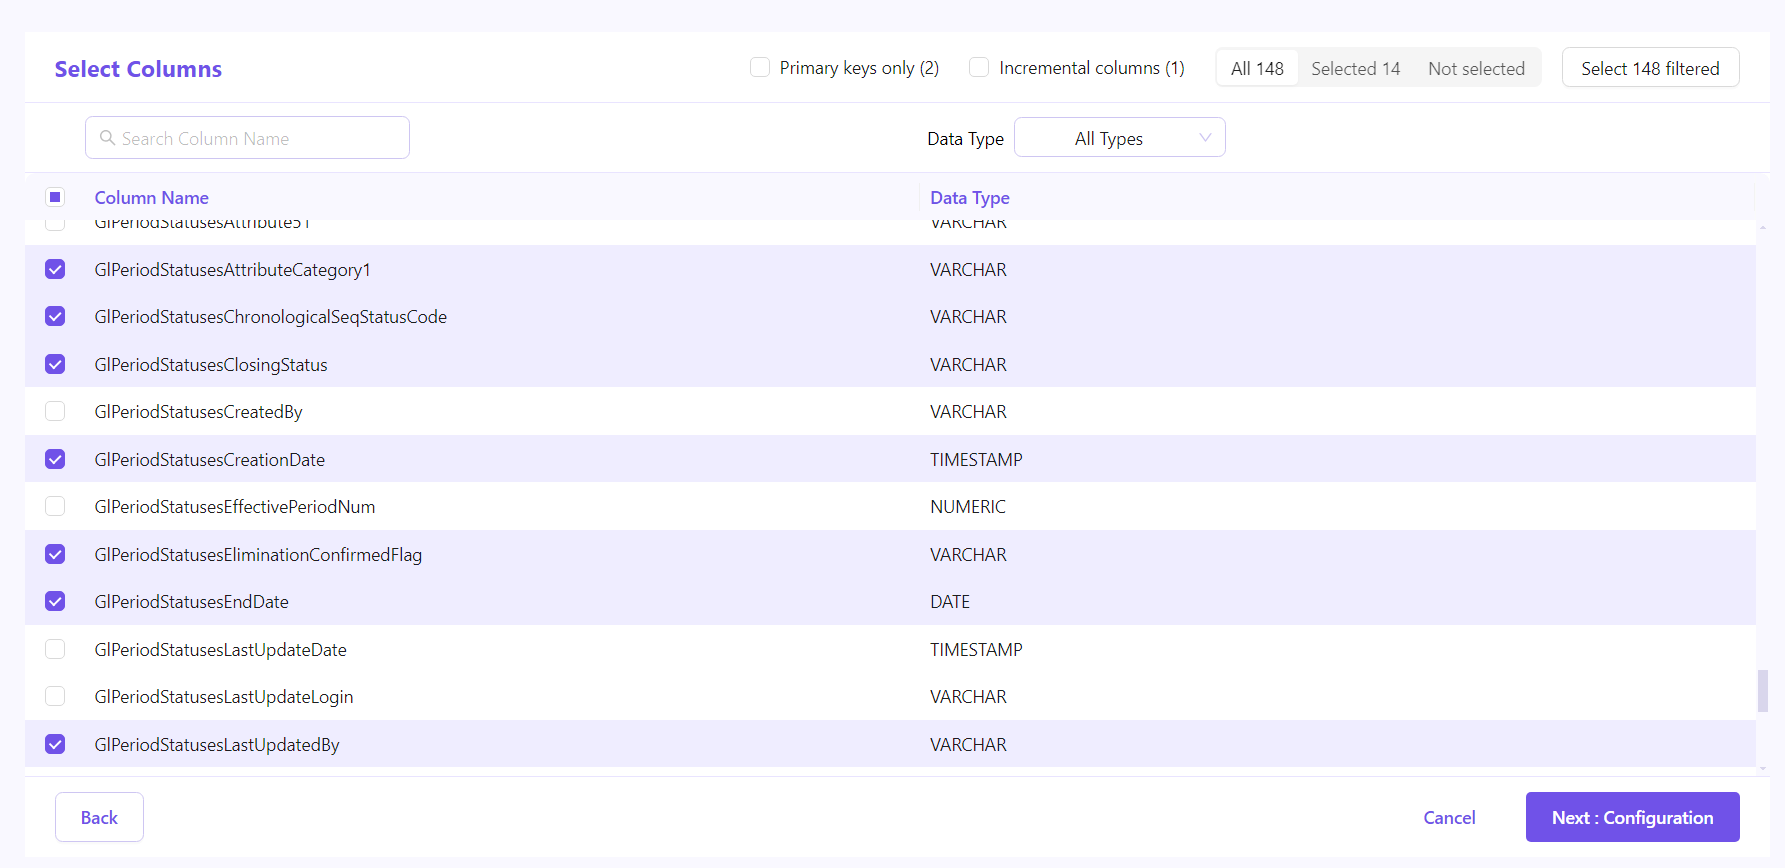
After selecting the columns, click Next: Configuration.
Step 10 — Configure Storage Type and Filters
In the Configuration step, you can select the storage configuration and define filters for the selected PVO
External Storage Type: Select the storage location where the extracted PVO data will be stored by Oracle Fusion during the BICC extraction process. For example, when UCM (Universal Content Management) is selected, the extracted PVO data is stored in UCM and can then be accessed by BI Connector.
For detailed instructions on how to configure OCI External Storage in BI Connector, refer to Configure OCI Object Storage for BICC Data Extraction
Filters:
- Any query filters already configured for the selected PVO in the Oracle Fusion BICC job are displayed here by default. You can review and modify the available filter conditions as required.
- If additional filtering is required, you can add new conditions or filter groups using the options provided.
- Filter Conditions:
- Add Condition — Add an individual condition to filter records based on a specific column and its value.
- Add Group — Create a group of multiple conditions to build more complex filter logic.
- Add Exclusion Group — Define a group of conditions to exclude matching records from the extraction.
- Filter Logic
- ALL — A row is included only when all conditions defined in the filter are satisfied.
- ANY — A row is included when at least one condition defined in the filter is satisfied.
- You can also use Advanced (Raw) to define or modify the filter using a raw filter expression.
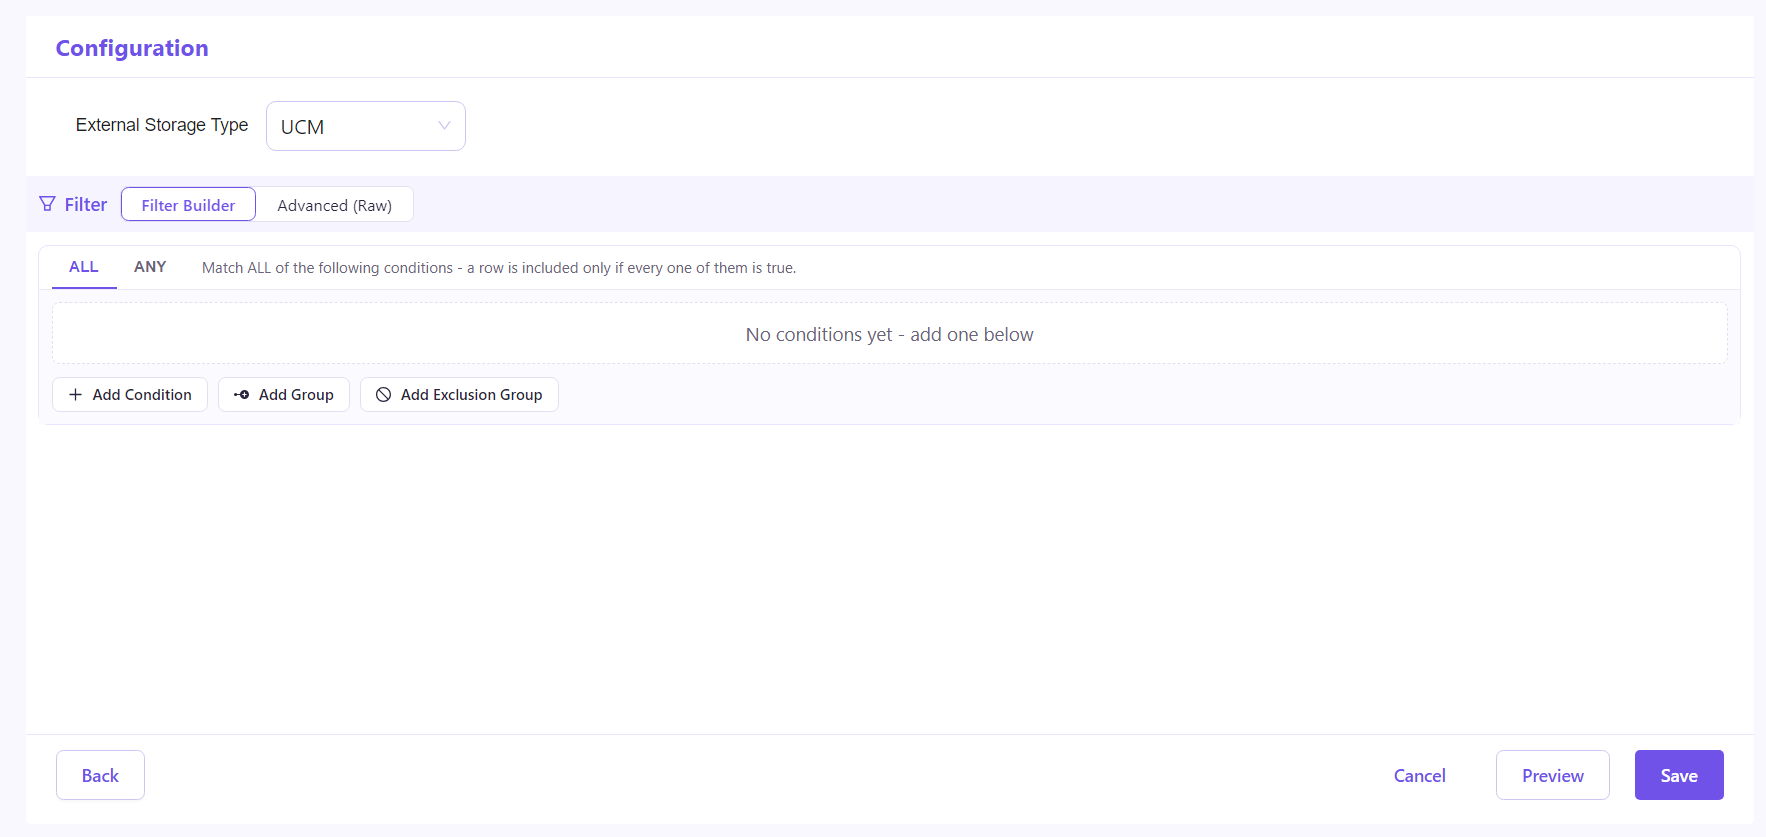
After configuring the required filters, click Preview to validate the results or Save to save the configuration.
Step 11 — Preview Data
- The Preview option allows you to validate the data returned by the selected PVO. It is intended only for data validation and does not retrieve the complete PVO dataset.
- Since the PVO does not support directly limiting the data retrieval to a specific number of records, such as 50 rows, the Preview option provides date/time-based filters to help retrieve a limited and relevant set of records for validation.
- The Column field displays only columns with a date/time data type. Select the required Column, Operator, and Parameter Value(s) to define the time-based filter, and click Preview. The preview displays a maximum of 50 rows.
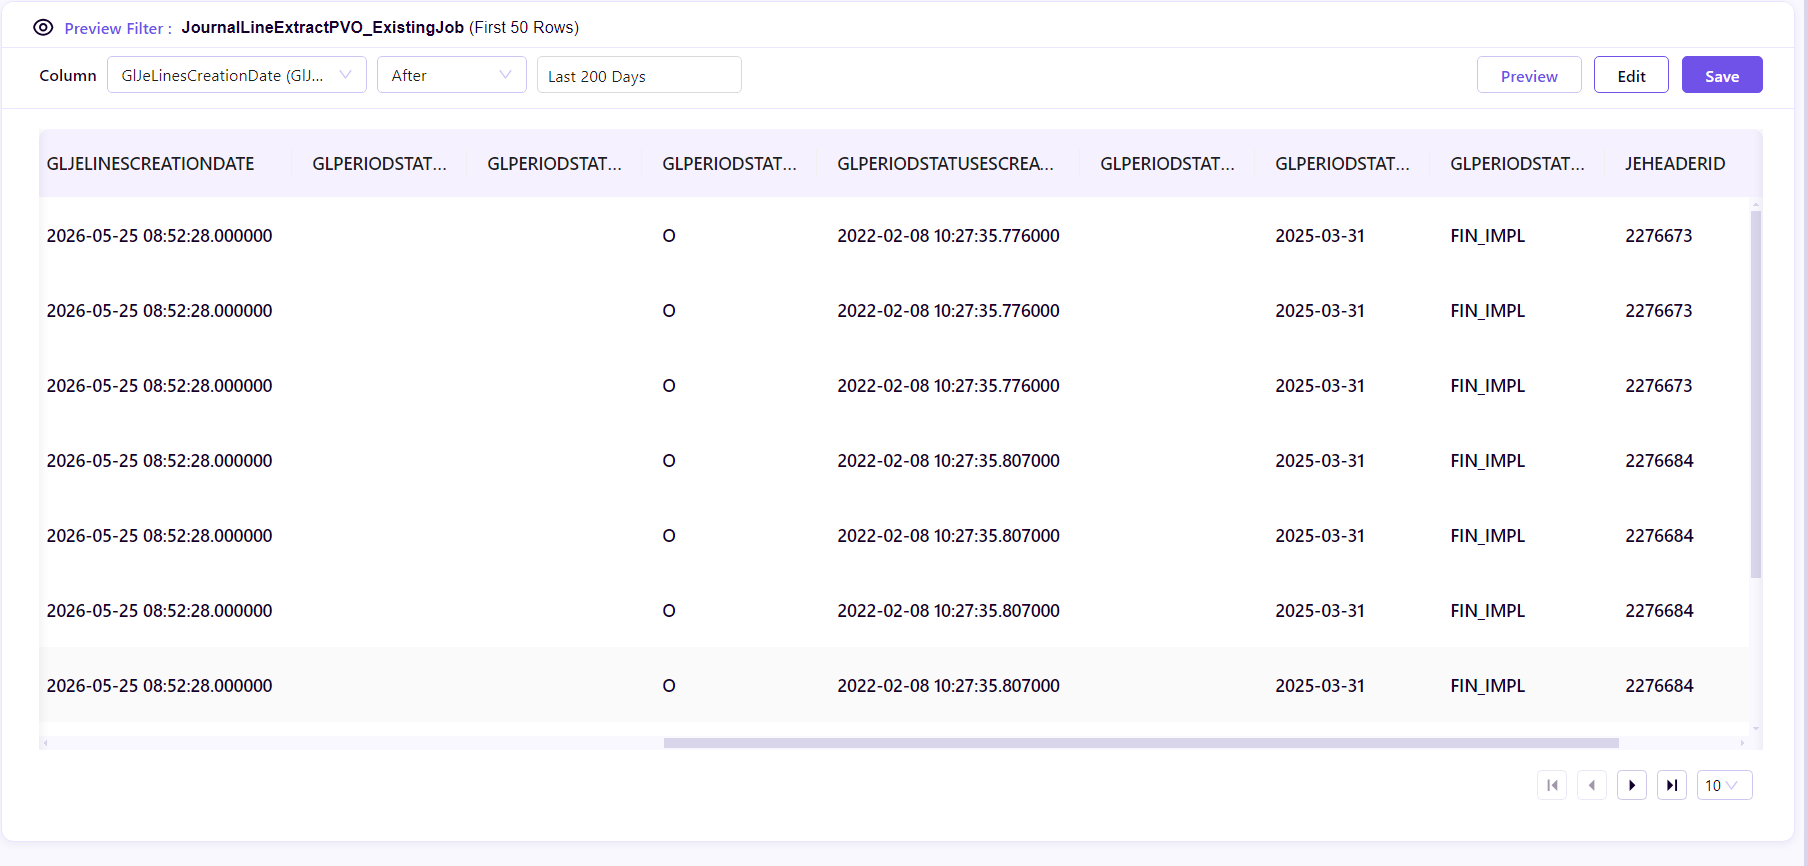
After validating the preview data, click Save.
Option 2 — Create New Job
Step 6 — Open the Tables section
Click Tables on the left pane, then click Add Table.
Step 7 — Name the Table and select the Data Source
Enter a name in the Table Name field.
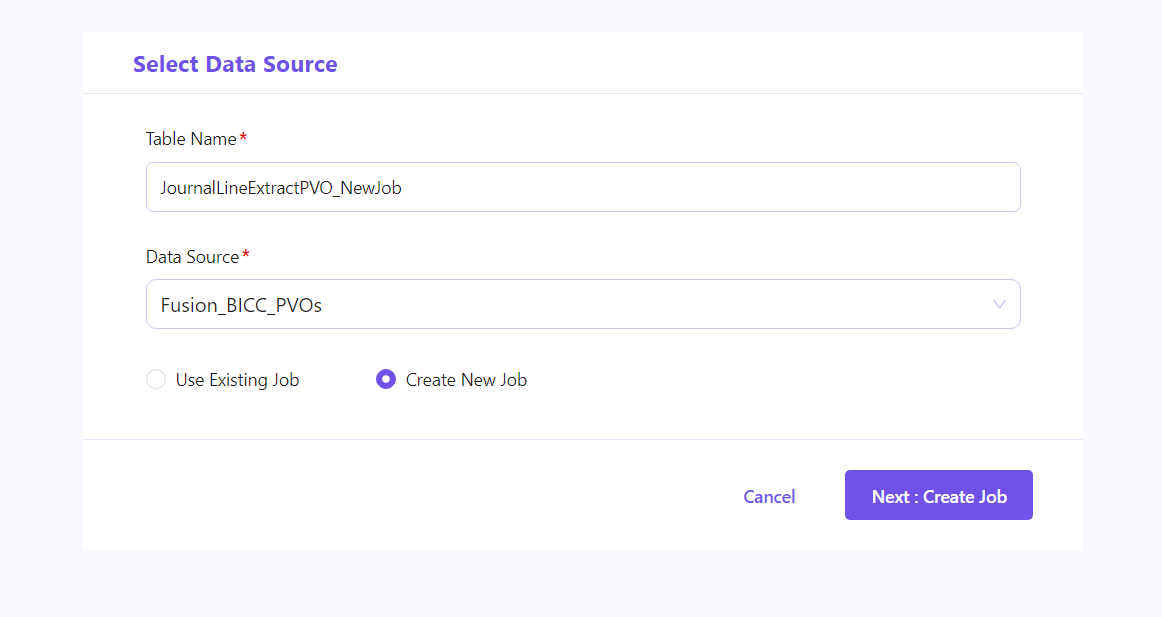
Pick the Data Source you created in Part A from the drop-down. Select Create New Job and click Next: Create Job
Step 8 — Select the Job and PVO
BI Connector displays the available PVOs that can be used to create the new BICC job.
You can narrow down the list using the following filters:
- Business Object — Filter PVOs based on the associated business object.
- Data Store — Search for a specific PVO/Data Store by name.
- Base Table — Search for PVOs based on the underlying base table from which the PVO is created.
The Base Table column in the UI shows the list of underlying Oracle Fusion database tables associated with the PVO. This can help you identify the appropriate PVO when you know the Fusion base table that contains the data you want to extract.
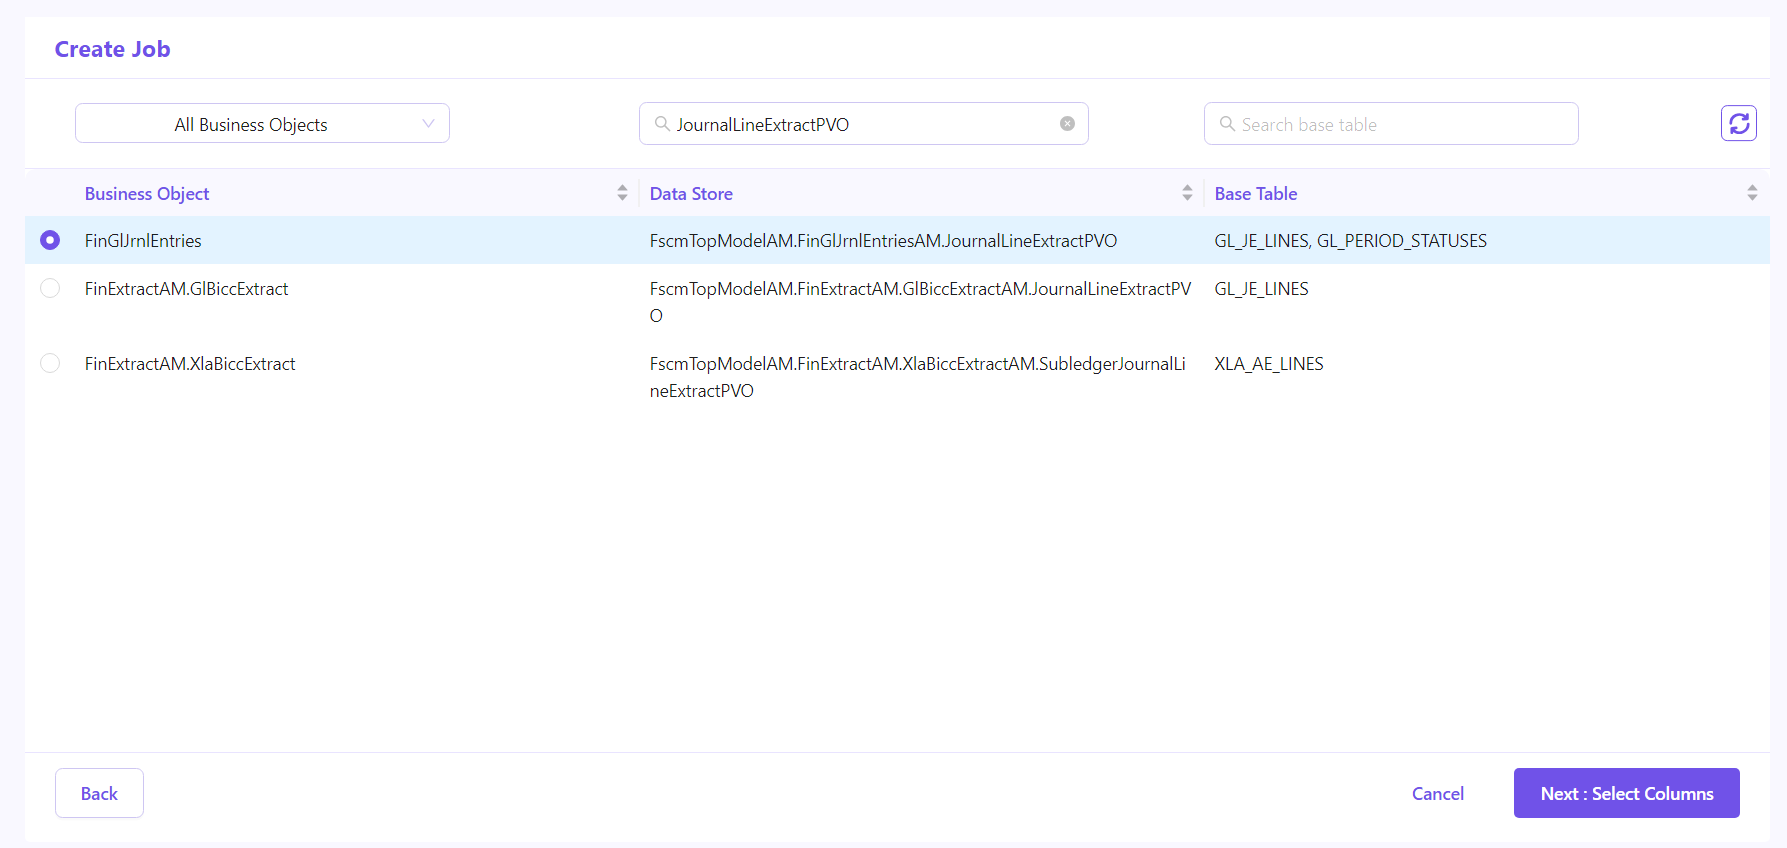
Select the required PVO and click Next: Select Columns.
Step 9 — Select the Columns
All columns available for the selected PVO are displayed in this step. You can select the columns that you want to extract and make available through the BI Connector table. The column selection screen provides several options to help identify and select the required columns.
Column Details:
The table displays the following information for each column:
- Column Name — The name of the column exposed by the selected PVO and available for extraction.
- Data Type — The data type of the PVO column.
- Base Table — The name of the underlying Oracle Fusion database table from which the PVO column is sourced. This identifies the Fusion database table associated with the PVO column.
- Base Table Column Name — The name of the column in the underlying Oracle Fusion database table that corresponds to the PVO column. This helps you identify which source column in the base table provides the data for the PVO column.
Column Filters:
- Primary keys — Select this option to display only the columns identified as Primary Key columns for the PVO.
- Incremental columns — Select this option to display columns that can be used for incremental data extraction.
- Search Column Name — Search for a specific PVO column by entering its name.
- Data Type — Filter columns based on their data type, such as NUMERIC, VARCHAR, or other supported types.
- Search Base Table — Search and filter the columns based on the name of the underlying Fusion base table from which the PVO columns are derived. This is useful when you know the base table associated with the data you want to extract.
- Search Base Table Column Name — Search and filter the columns based on the column name in the underlying Fusion base table. This helps you find the corresponding PVO column when you know the name of the source column in the base table.
Column Selection:
- By default, BI Connector pre-selects only the columns that are pre-selected for the PVO in Oracle BICC, rather than selecting the entire list of available PVO columns.
- BI Connector follows the same column-selection pattern as Oracle BICC. When you select a PVO while creating a new BICC job in Oracle, Oracle pre-selects certain columns for that PVO. BI Connector follows this same selection and pre-selects those columns when configuring the PVO.
- You can select or deselect columns based on your extraction requirements.
- Use the available filters to quickly identify and select specific columns.
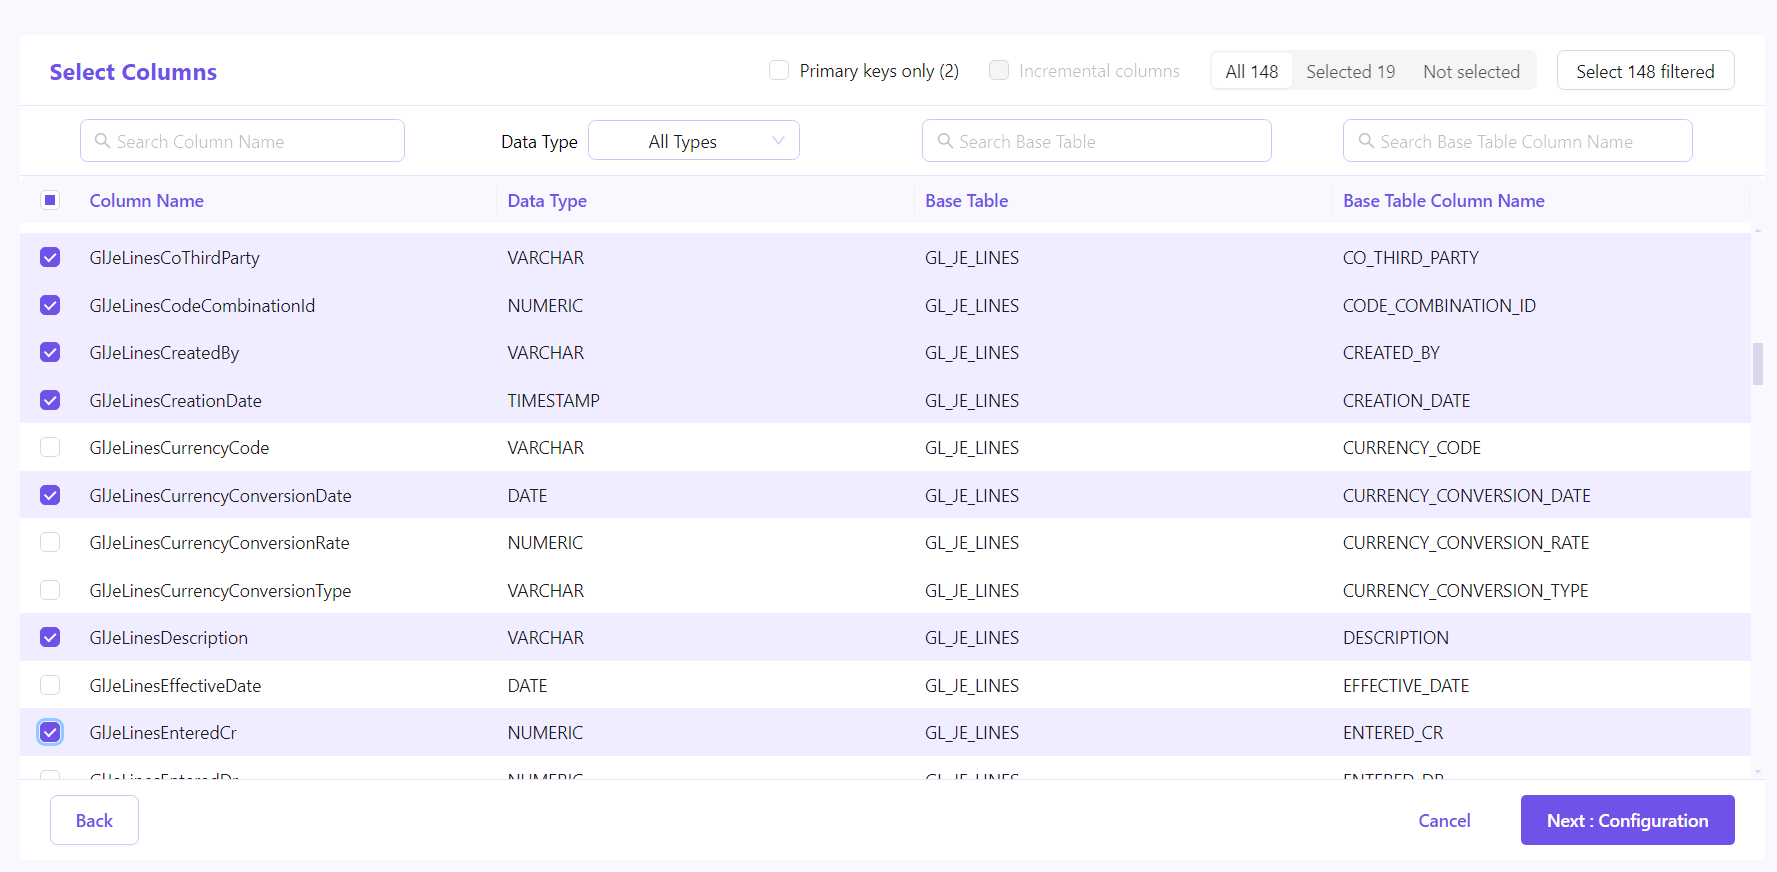
After selecting the required columns, click Next: Configuration to continue.
Step 10 — Configure Storage Type and Filters
In the Configuration step, you can review the storage configuration and define filters for the selected PVO
External Storage Type: Select the storage location where the extracted PVO data will be stored by Oracle Fusion during the BICC extraction process. For example, when UCM (Universal Content Management) is selected, the extracted PVO data is stored in UCM and can then be accessed by BI Connector.
For detailed instructions on how to configure OCI External Storage in BI Connector, refer to Configure OCI Object Storage for BICC Data Extraction
Filters:
- If filtering is required, you can add new conditions or filter groups using the options provided.
- Filter Conditions:
- Add Condition — Add an individual condition to filter records based on a specific column and its value.
- Add Group — Create a group of multiple conditions to build more complex filter logic.
- Add Exclusion Group — Define a group of conditions to exclude matching records from the extraction.
- Filter Logic
- ALL — A row is included only when all conditions defined in the filter are satisfied.
- ANY — A row is included when at least one condition defined in the filter is satisfied.
- You can also use Advanced (Raw) to define or modify the filter using a raw filter expression.
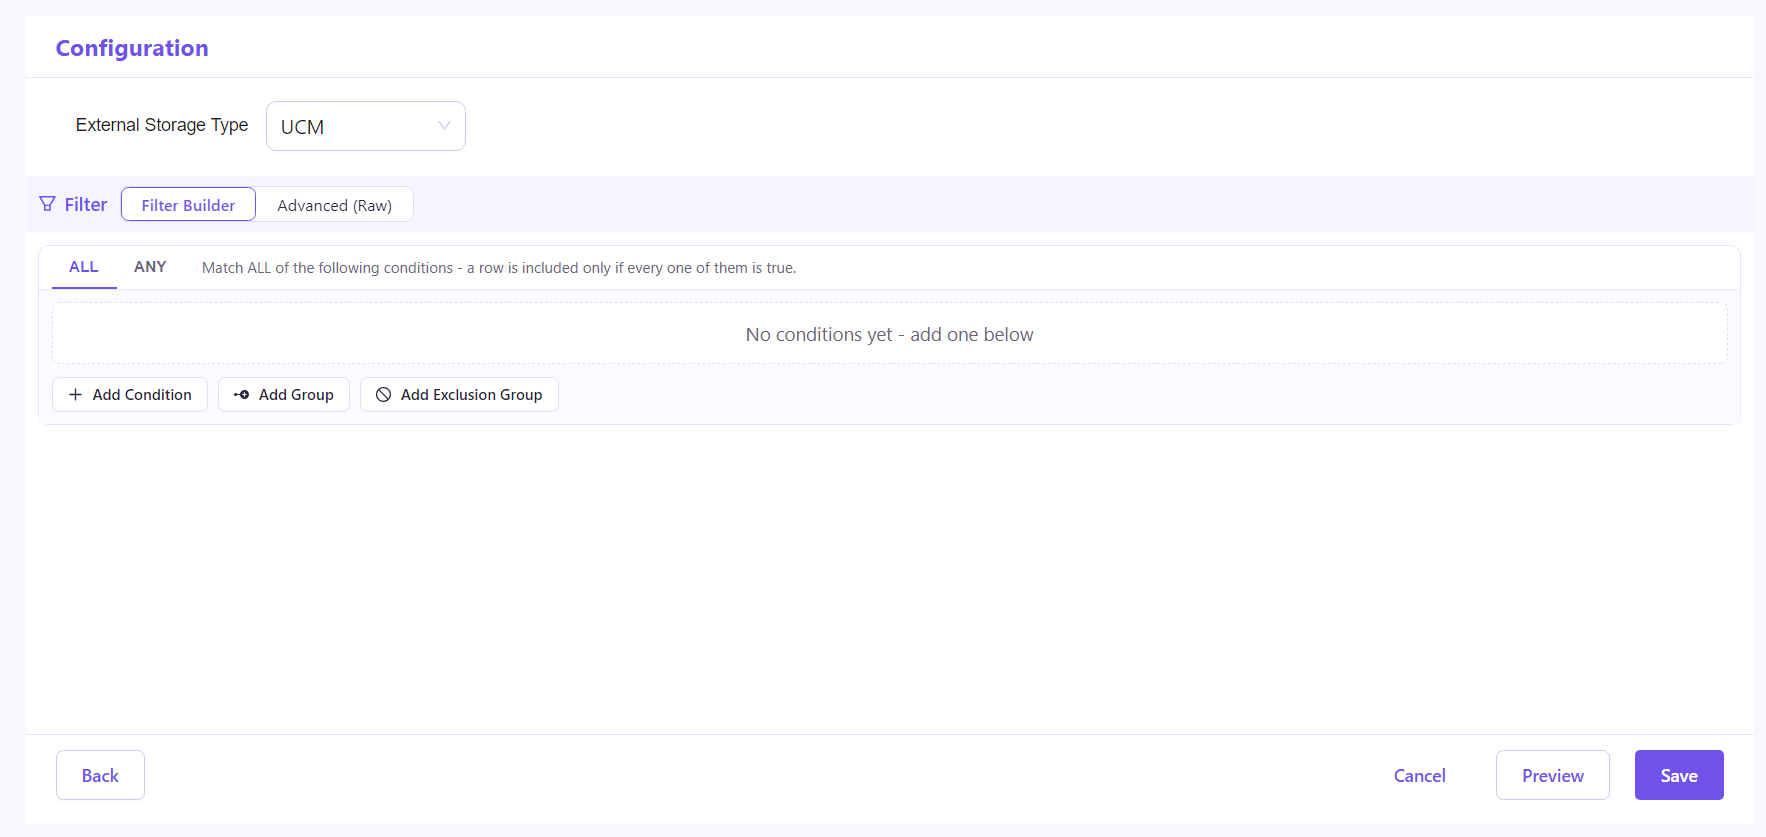
After configuring the required filters, click Preview to validate the results or Save to save the configuration.
Step 11 — Preview Data
- The Preview option allows you to validate the data returned by the selected PVO. It is intended only for data validation and does not retrieve the complete PVO dataset.
- Since the PVO does not support directly limiting the data retrieval to a specific number of records, such as 50 rows, the Preview option provides date/time-based filters to help retrieve a limited and relevant set of records for validation.
- The Column field displays only columns with a date/time data type. Select the required Column, Operator, and Parameter Value(s) to define the time-based filter, and click Preview. The preview displays a maximum of 50 rows.
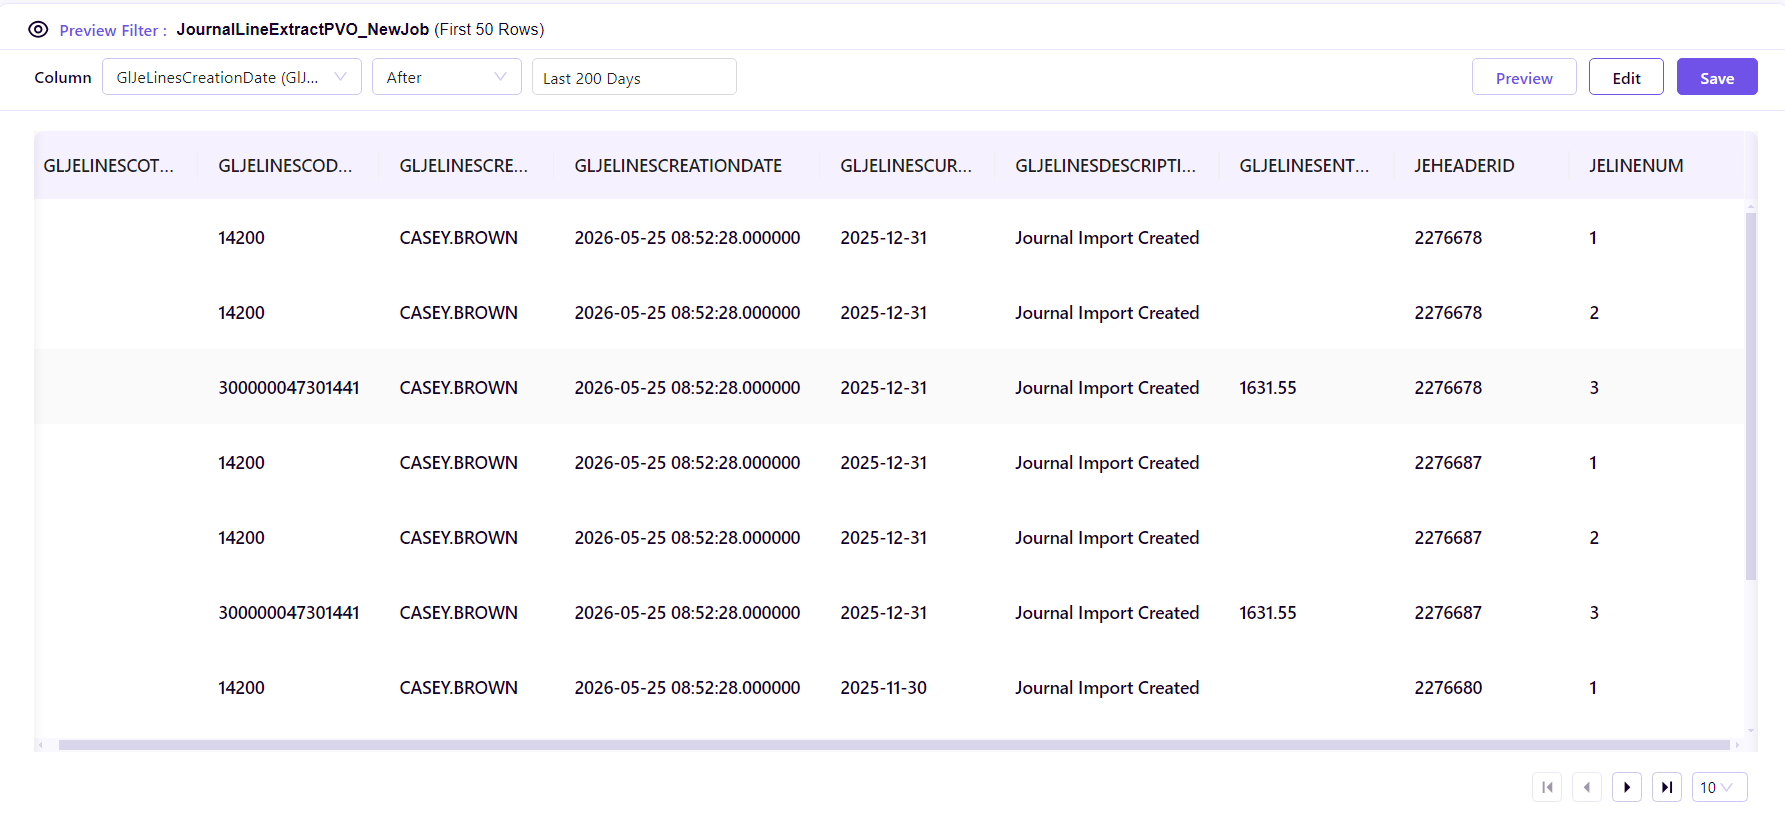 After validating the preview data, click Save.
What would you like to do next?
| Your use case | Go to |
|---|---|
| Run Data Pipelines in Microsoft Fabric | Create a Lookup Table for Fabric Pipeline |
| Run Data Pipelines in ADF or Azure Synapse | Create a Lookup Table for ADF/Synapse Pipeline |