Overview
BI Connector supports JWT (JSON Web Token) authentication for connecting to Oracle Fusion / OAC data sources. Setting up a JWT data source requires several sensitive details: Identity Domain URL, Client Id, Client Secret, Scope, Key Alias, Private Key, and Token Fingerprint.
These values should never be shared directly with end users (Power BI, Tableau, or Dataflow consumers). Instead, BI Connector lets an administrator create the JWT data source once, then export an encrypted JWT Configuration File that other users can use to create their own data source, without ever seeing the underlying JWT credentials.
This guide covers three parts:
Part 1: Create the JWT data source (administrator, one-time setup)
Part 2: Download the encrypted JWT Configuration File
Part 3: Share the file so users can create their own data source without full JWT details
Note: The JWT Configuration File is encrypted. Anyone who receives it cannot view or extract the private key, client secret, domain URL, scope, or key alias from it.
Primary use case: Server admin sharing access with Desktop users
The main scenario this flow is built for is an administrator on BI Connector Server creating the JWT data source once, with the full JWT credential set. Rather than handing that credential set to every individual using BI Connector Desktop, the administrator exports the encrypted JWT Configuration File from Server and shares only that file plus the Client Secret.
Each Desktop user then creates their own data source using the configuration file. The person doing that setup on Desktop only enters a Username and Folder Path; the Identity Domain URL, Client Id, Scope, Key Alias, and Private Key are never visible to them in plain text.
Note: This applies to both BI Connector editions (Server and Desktop). The configuration-file flow works the same way regardless of which edition creates the data source, so Desktop users never handle the underlying JWT details as plain text.
Part 1: Create the JWT Data Source
This part is done once by an administrator on BI Connector Server, who has the full JWT credential set for the Oracle Fusion / OAC environment.
Step 1: Start a new data source
1.Go to Data Sources in the left navigation.
2.Click New Data Source, highlighted in the screenshot below.
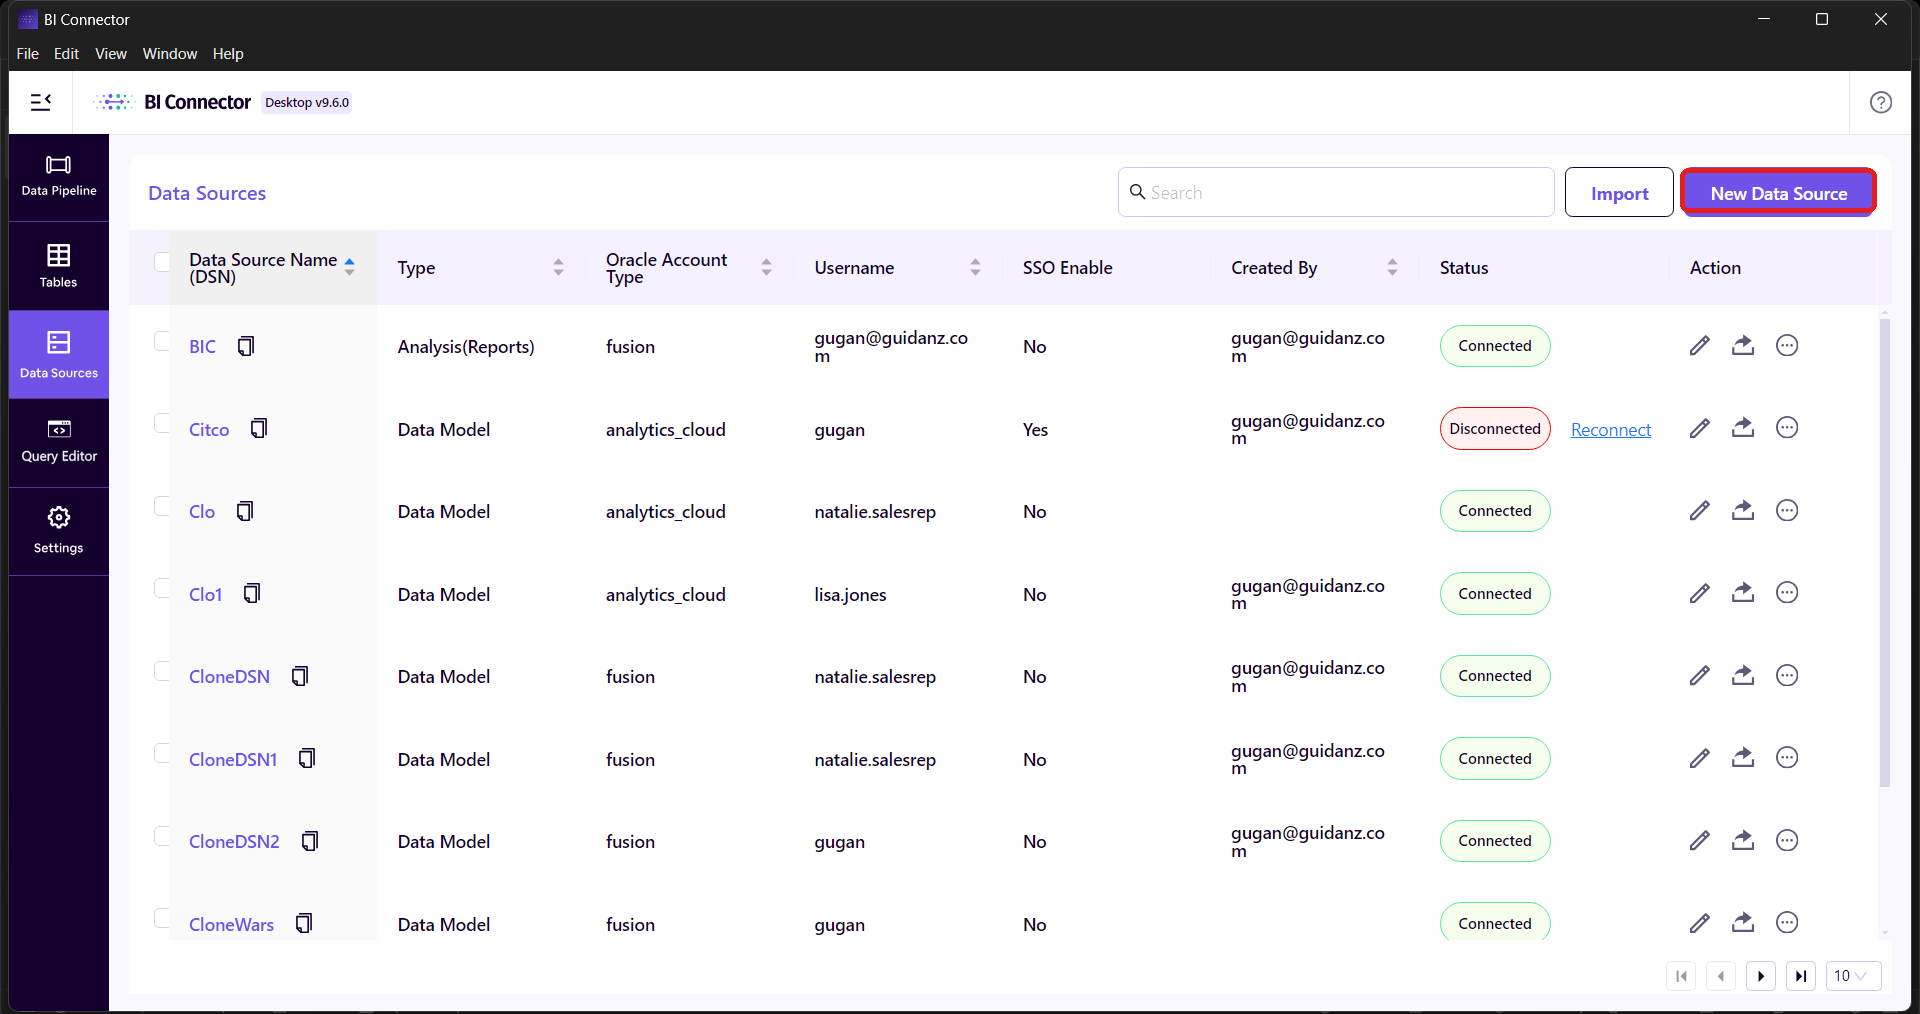
Figure 1: Data Sources listing page. Click "New Data Source" (highlighted) to begin.
Step 2: Enter basic connection details
1.Enter a Data Source Name (e.g. JWT_FUSION).
2.Choose the Data Source Type: Data Model, Analysis (Reports), or Subject Area.
3.Enter the Oracle Account URL for the Fusion/OAC environment.
4.Under Authentication Type, select JWT (highlighted below).
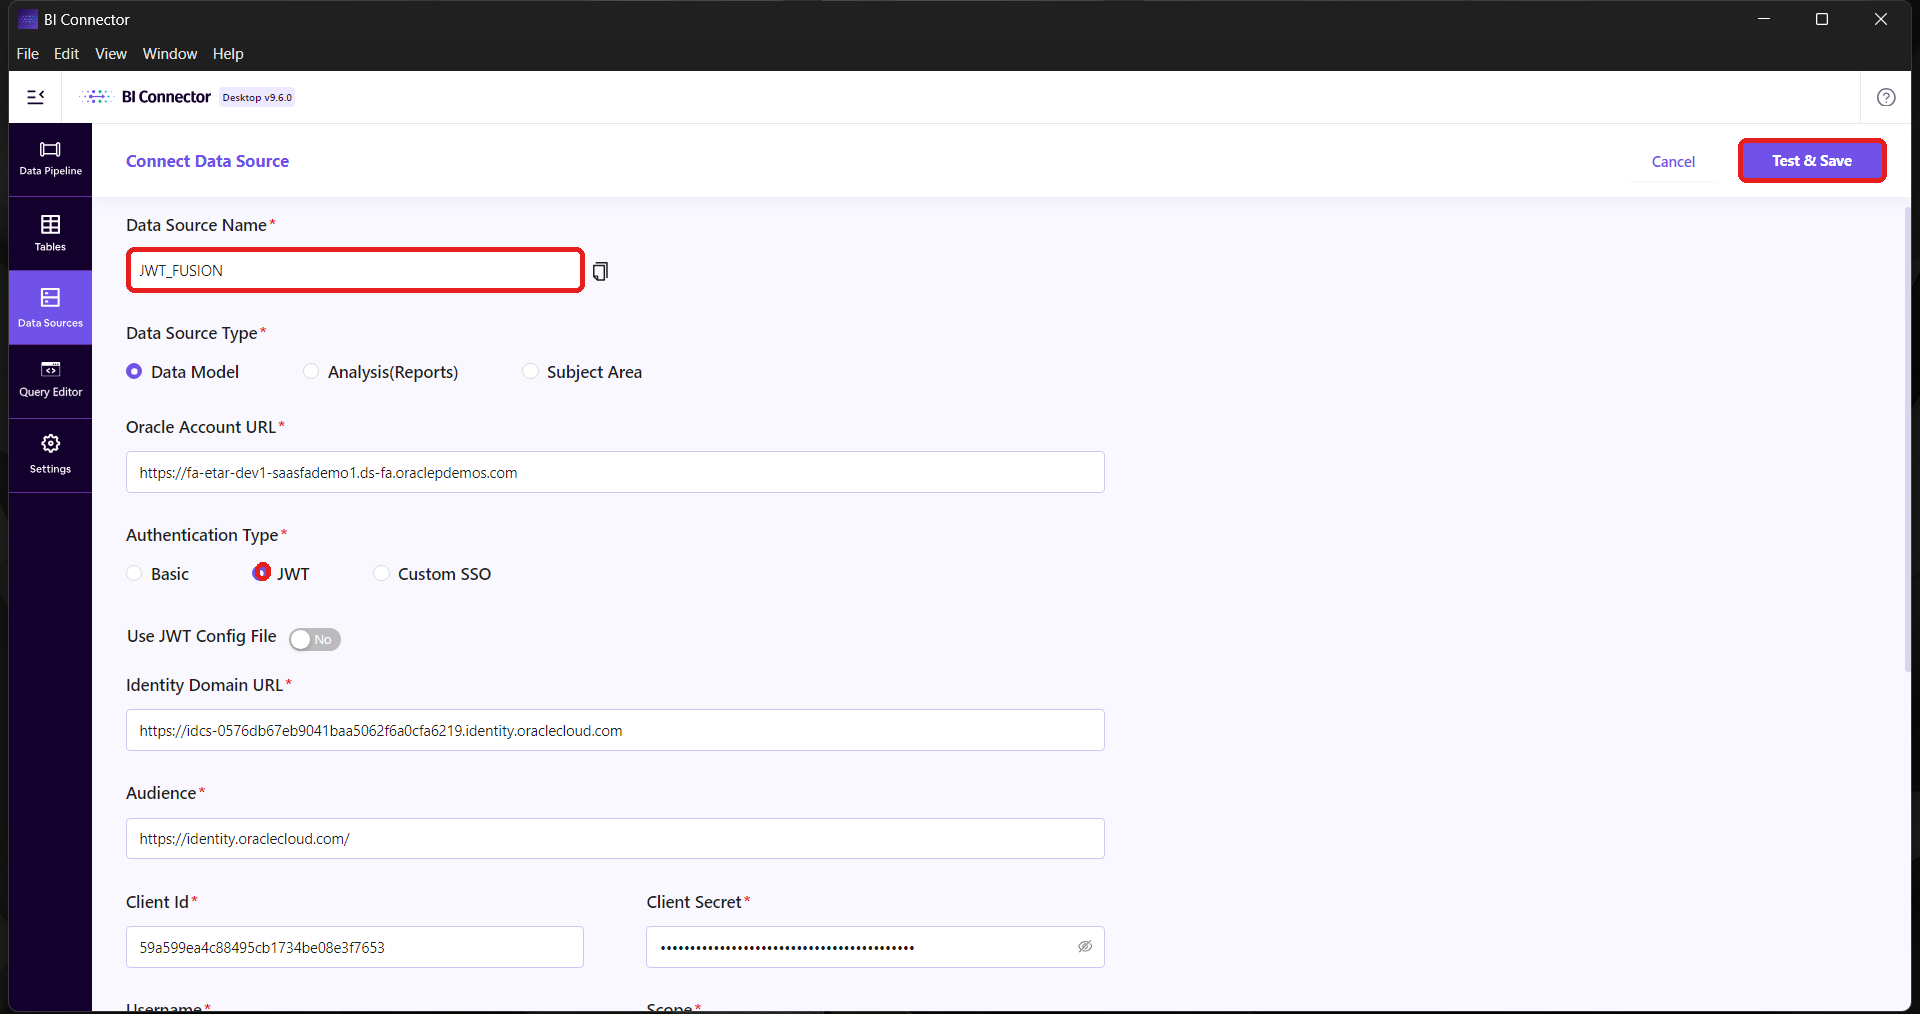
Figure 2: Basic details and Authentication Type. Select "JWT" to reveal the credential fields.
Step 3: Enter the JWT credential details
Scrolling down reveals the full set of JWT fields. These are the sensitive values that must never be shared directly with end users; they are highlighted below only to identify them, not as an instruction to distribute them.
Identity Domain URL and Audience: the IDCS tenant details
Client Id and Client Secret: the confidential application credentials
Username: the service or named user the token is issued for
Scope: the OPC resource scope string
Key Alias: the alias used to sign the JWT
Private Key: the .pem signing key, uploaded via Upload
Token Fingerprint: the fingerprint associated with the signing certificate
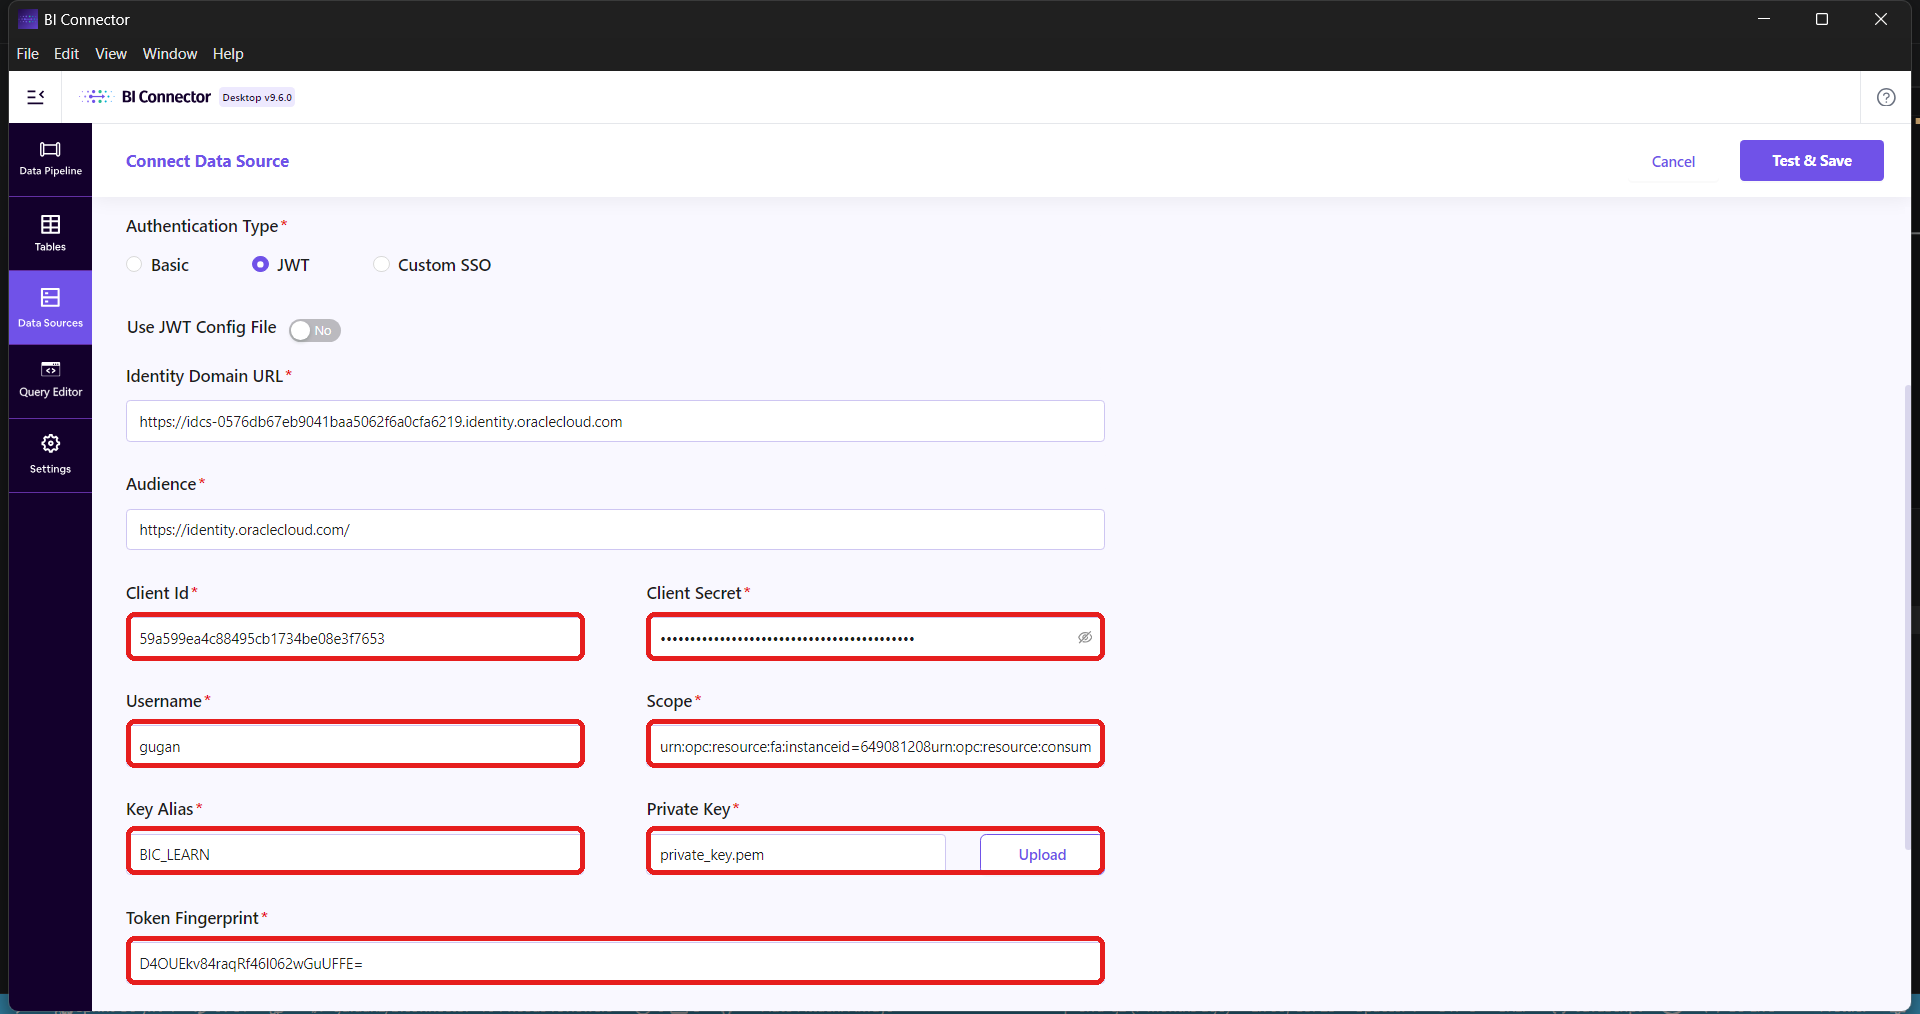
Figure 3: JWT credential fields (highlighted). These values stay with the administrator and are never shared directly.
Step 4: Add the folder path and save
1.Enter the Data Model folder path and click Verify & Add (highlighted).
2.Confirm the path appears under Added Folder Paths.
3.Click Test & Save (top right, highlighted) to validate and save the data source.
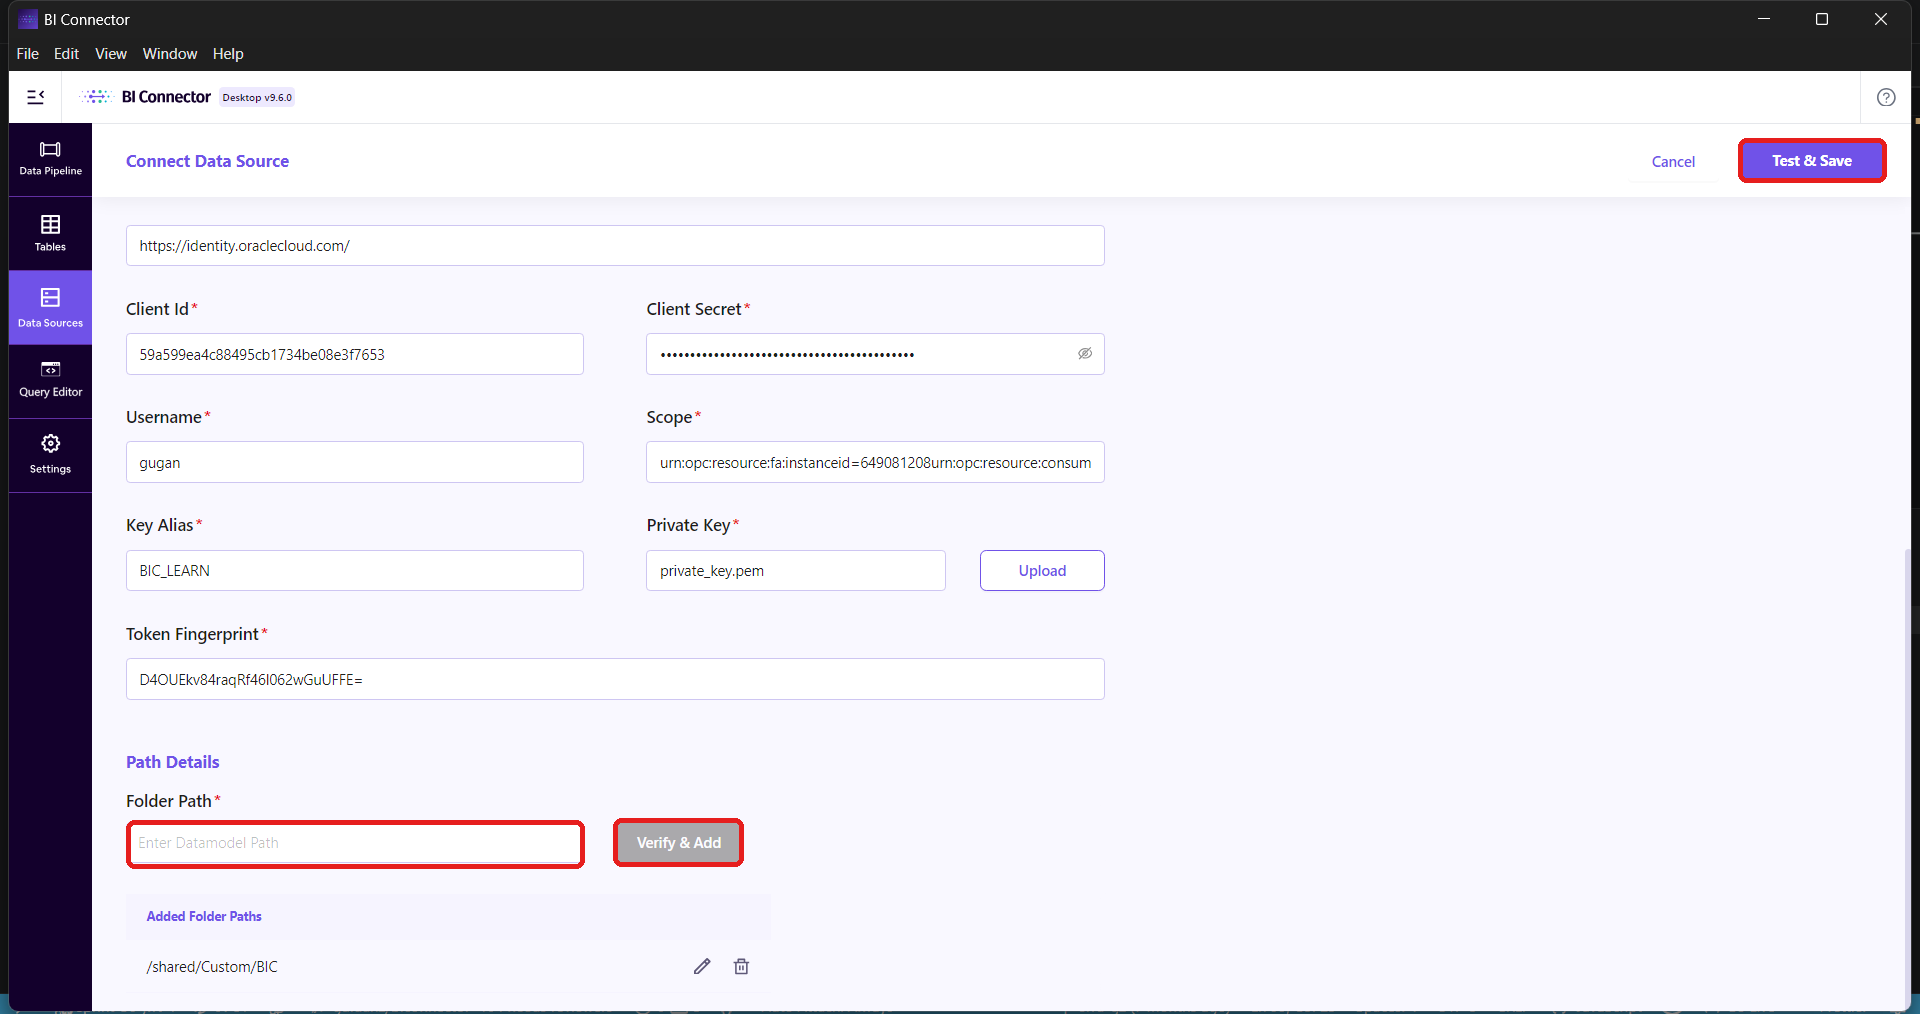
Figure 4: Folder path setup. Click "Verify & Add", then "Test & Save" to finish creating the data source.
Note: Once "Test & Save" completes successfully, the data source appears in the Data Sources list with a Connected status.
Part 2: Download the JWT Configuration File
Once the JWT data source is tested and saved, an encrypted configuration file can be exported for sharing.
1.From the Data Sources list, locate the JWT data source (e.g. JWT_FUSION).
2.Click the ⋯ (more actions) icon in the Action column for that row.
3.Select Download JWT Config from the menu (highlighted).
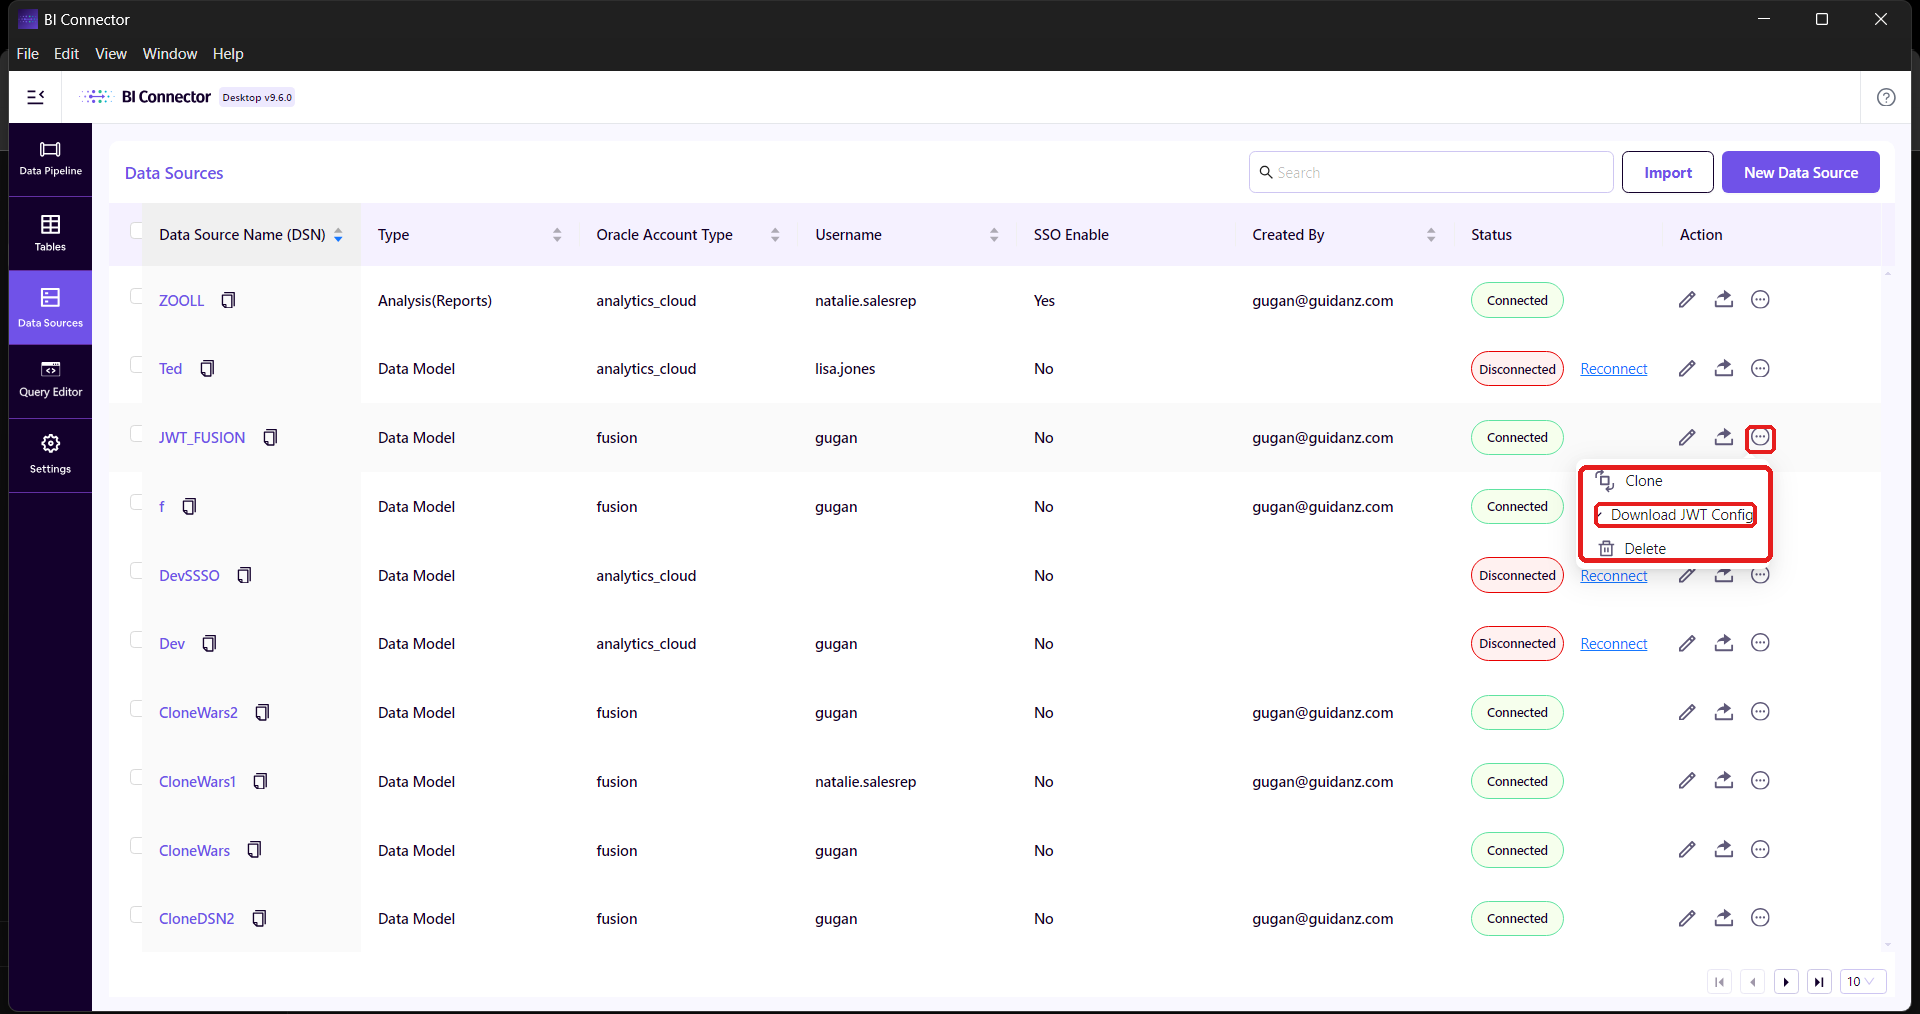
Figure 5: Data Sources listing. Open the ⋯ menu and choose "Download JWT Config" to export the encrypted configuration file.
Important: The downloaded file only needs to be shared together with the Client Secret, via a secure channel (e.g. a password manager or secrets vault), not the full credential set. The file itself is encrypted, so the private key, domain URL, scope, and key alias are not exposed even if the file is intercepted.
Part 3: Create a Data Source from the Configuration File
This is typically done by a user on BI Connector Desktop, to consume the data source for Power BI, Tableau, or Dataflows, using only the configuration file and the Client Secret, and without needing the private key, Identity Domain URL, Client Id, Scope, or Key Alias.
1.Go to Data Sources and click New Data Source.
2.Enter a Data Source Name, choose the Data Source Type, and select JWT as the Authentication Type.
3.Toggle Use JWT Config File to Yes (highlighted).
4.Click Upload and select the JWT configuration file received from the administrator (highlighted).
5.Enter the Username (highlighted).
6.Enter the Folder Path and click Verify & Add (highlighted), then Test & Save to finish.
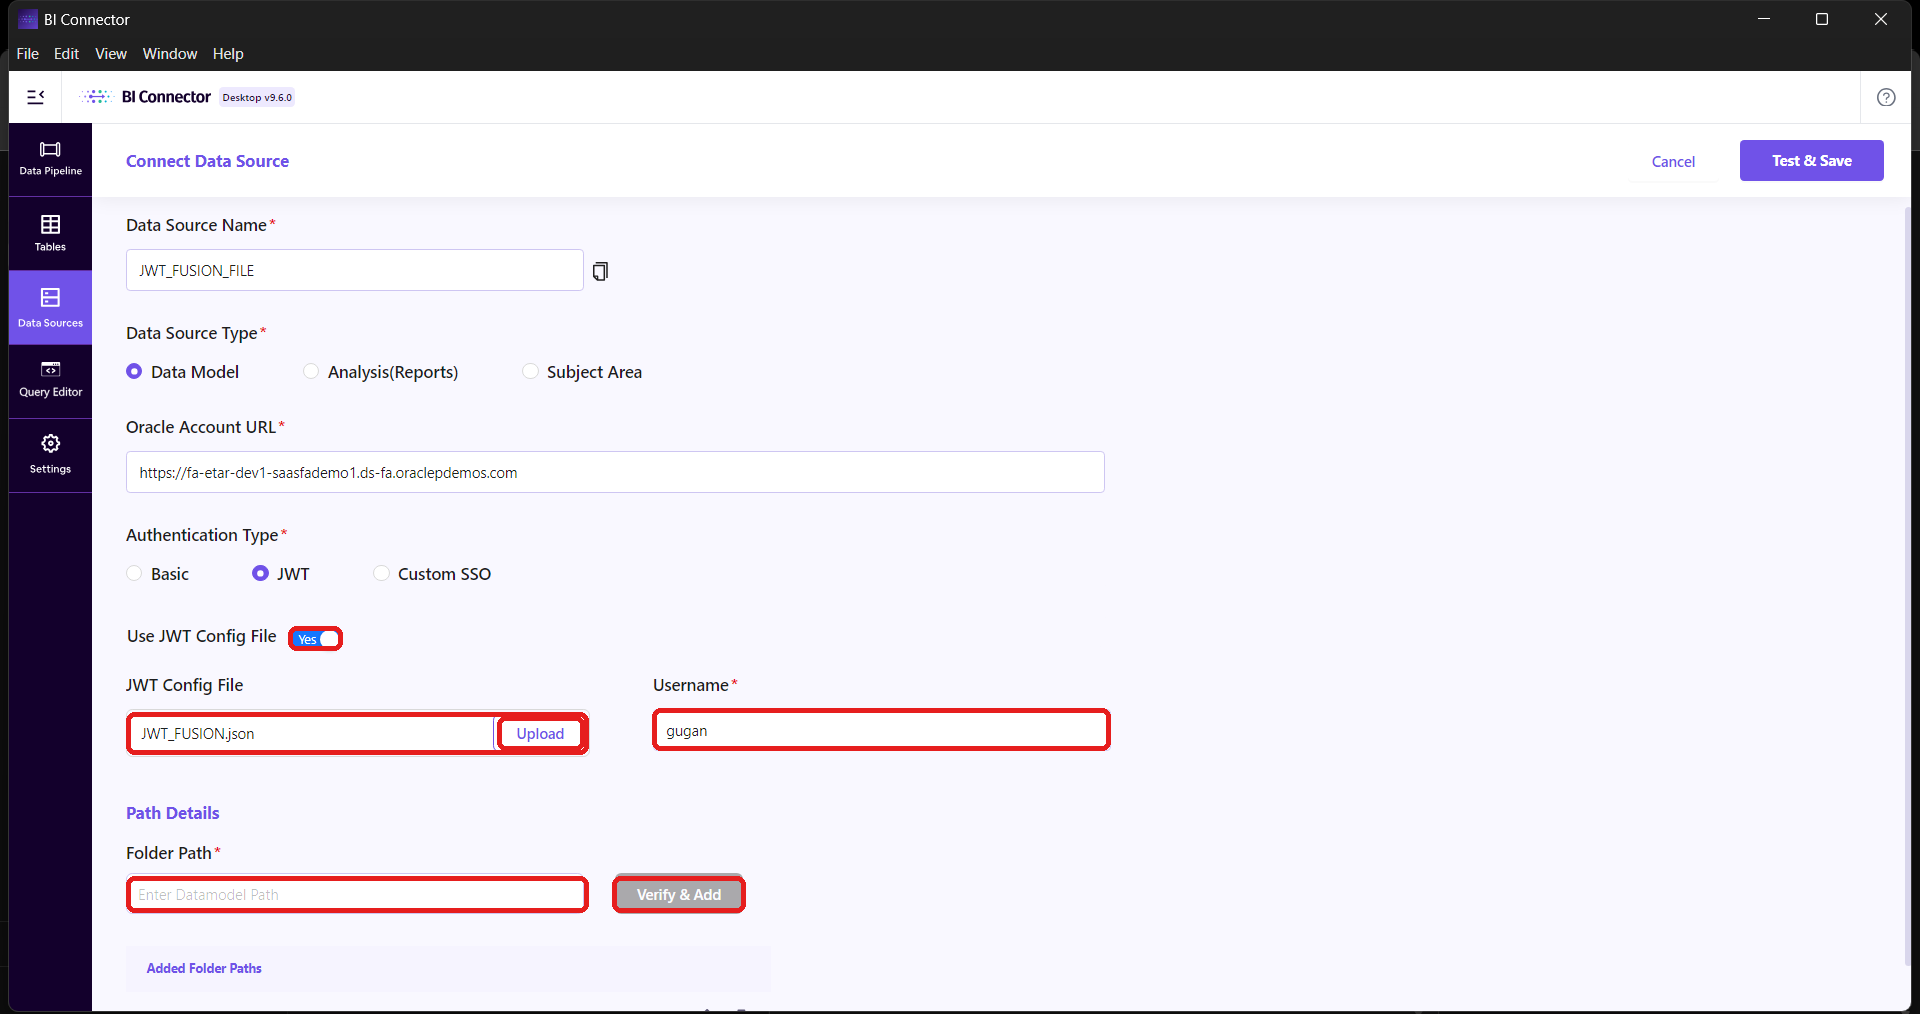
Figure 6: Creating a data source from the config file. Toggle "Use JWT Config File" to Yes, upload the file, and enter the username and folder path.
Note: With this method, the user never enters or sees the Identity Domain URL, Client Id, Scope, Key Alias, or Private Key; those remain encrypted inside the configuration file.
Summary
Main use case: an admin on BI Connector Server sharing JWT access with Desktop users without exposing plaintext JWT details.
Administrators create the JWT data source once, using the full credential set, typically on Server.
The encrypted JWT Configuration File is downloaded from the ⋯ menu on the Data Sources page.
The file is shared with Desktop users along with the Client Secret only.
Each Desktop user then creates the data source using the file, entering only a Username and Folder Path.
Sensitive JWT details (private key, domain, client id, scope, key alias) are never exposed as plain text.
Applies to both BI Connector editions (Server and Desktop).