This guide explains how to configure Single Sign-On (SSO) for BI Connector using Microsoft Entra ID. Once configured, users can sign in with their Microsoft Entra ID credentials by selecting Sign in with Microsoft on the BI Connector login page.
1. Prerequisites
Before configuring SSO, make sure the following prerequisites are met:
- BI Connector Server Edition 9.5.0 or later is installed.
- A Microsoft Entra ID application and its corresponding service principal are available.
- The BI Connector user performing the configuration must have the Administrator role.
- You must have access to the Microsoft Entra ID application configuration.
If you haven't created one yet, refer to Microsoft's documentation: Microsoft Entra ID documentation.
Once all prerequisites are ready, proceed with the steps below.
2. Configure the Microsoft Entra ID Application
In this step, you'll collect the required information from Microsoft Entra ID and configure the BI Connector redirect URI.
Step 2.1 — Get the Application (Client) ID
- Sign in to the Microsoft portal.
- Open the Microsoft Entra ID application created for BI Connector.
- Go to the application's Overview page.
- Locate Application (client) ID.
- Copy the Application (client) ID.
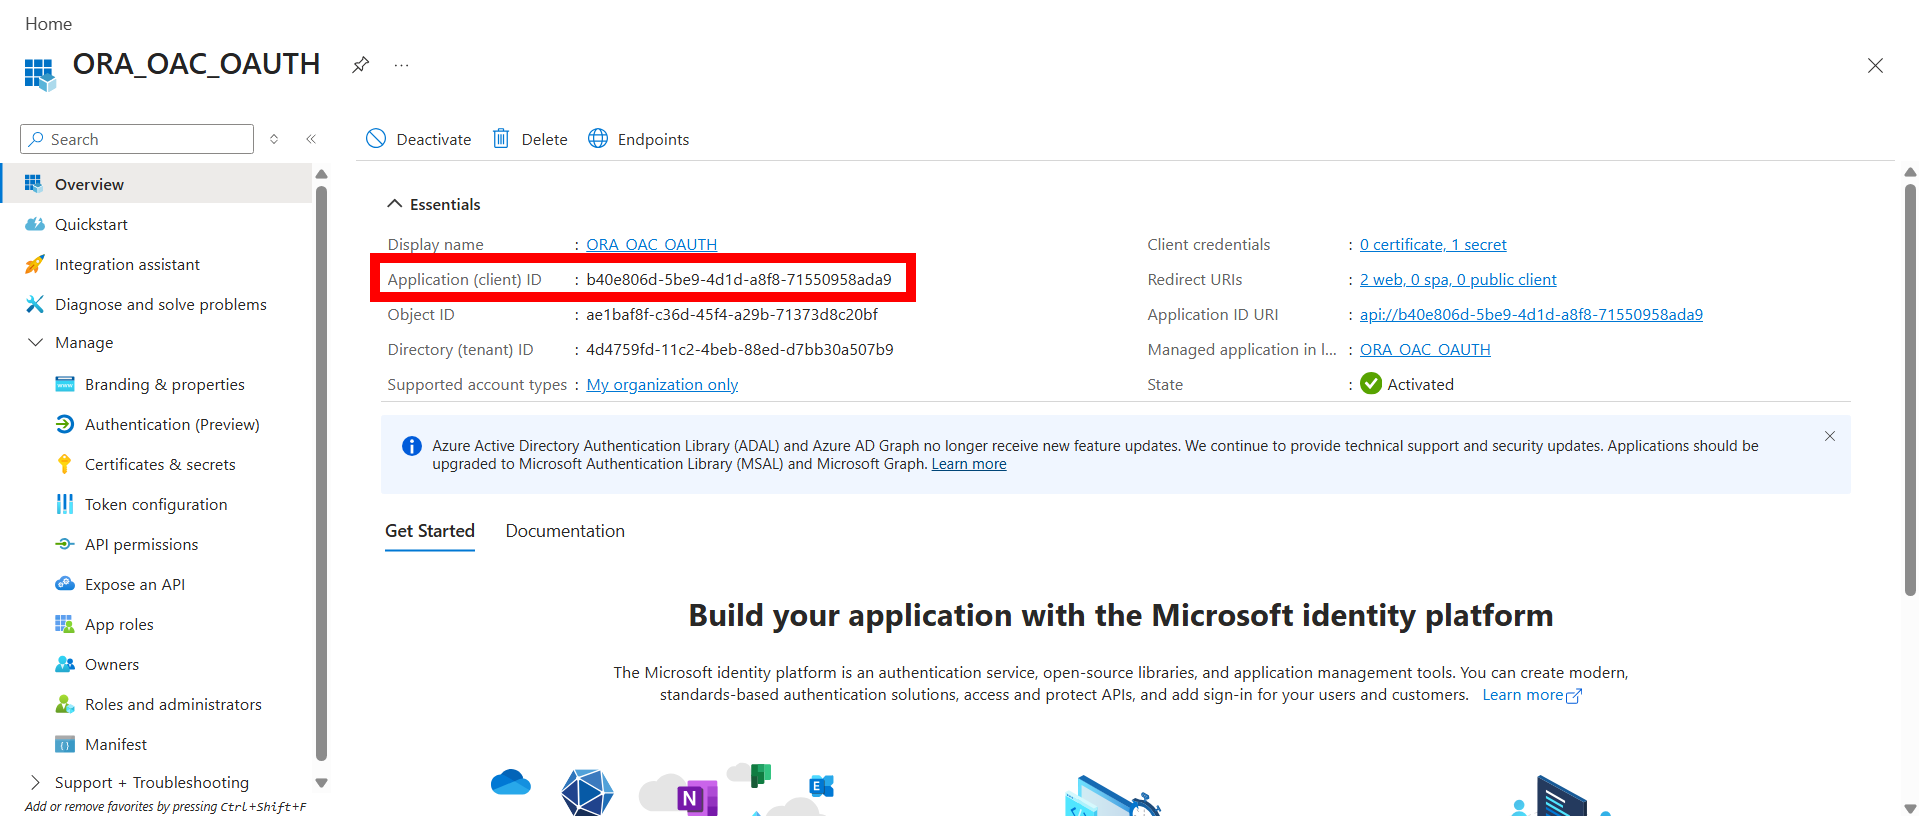
Step 2.2 — Get the OAuth 2.0 Authorization Endpoint
- From the same application, open Endpoints.
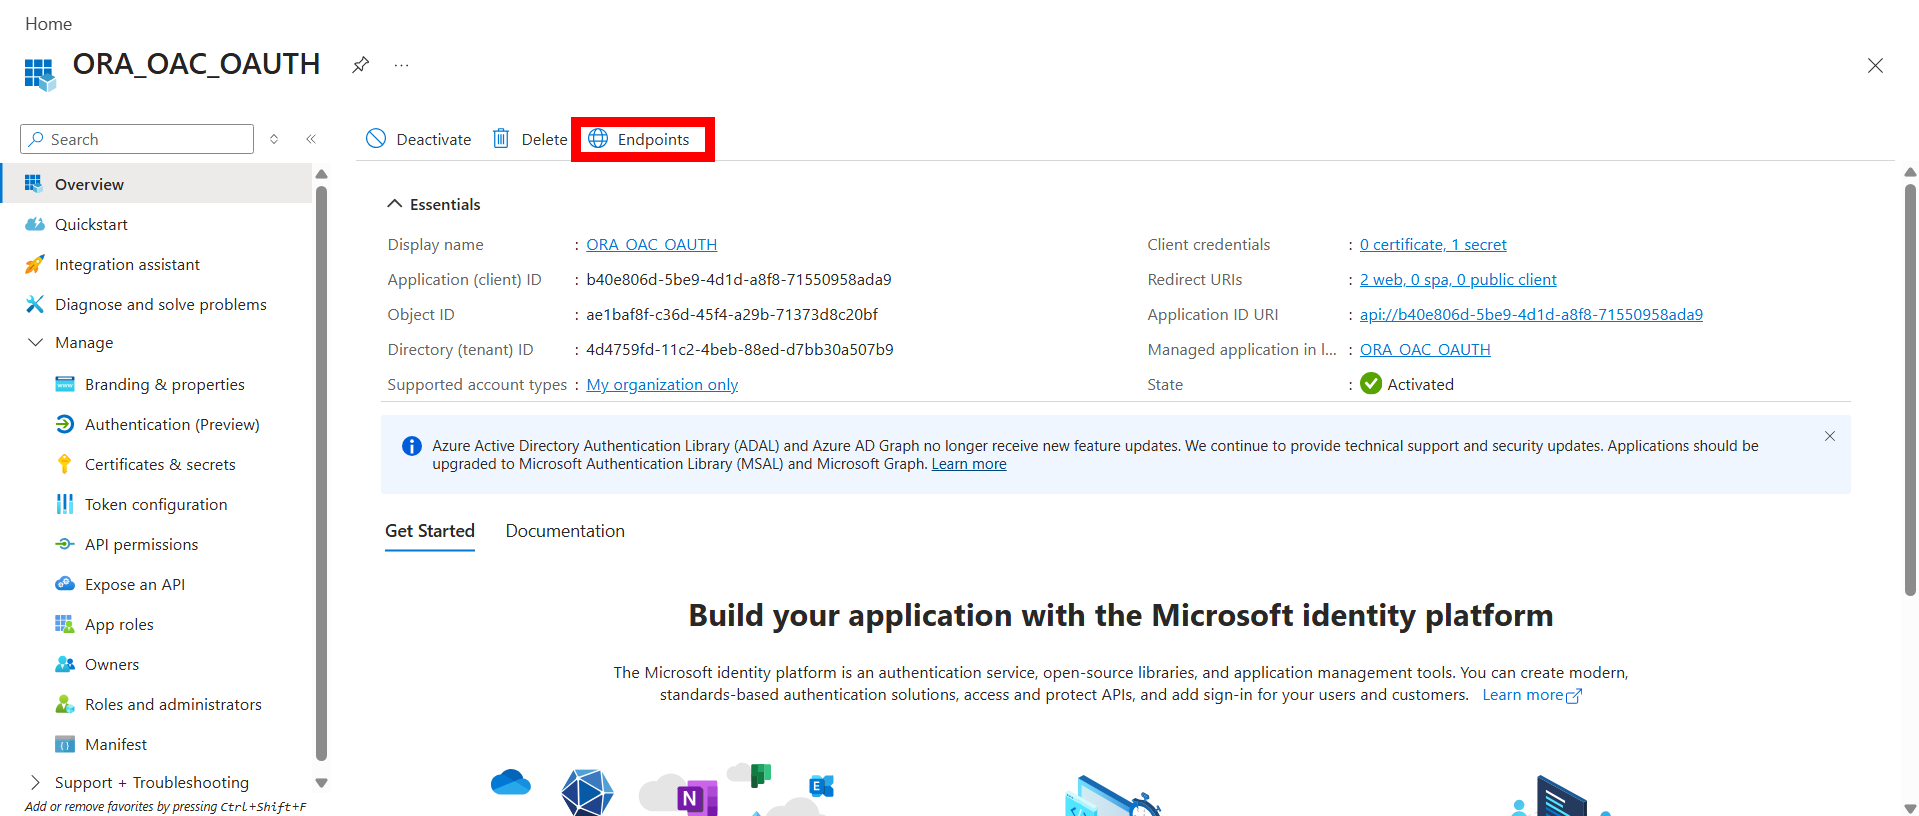
- Locate OAuth 2.0 authorization endpoint (v2).
- Copy the URL.
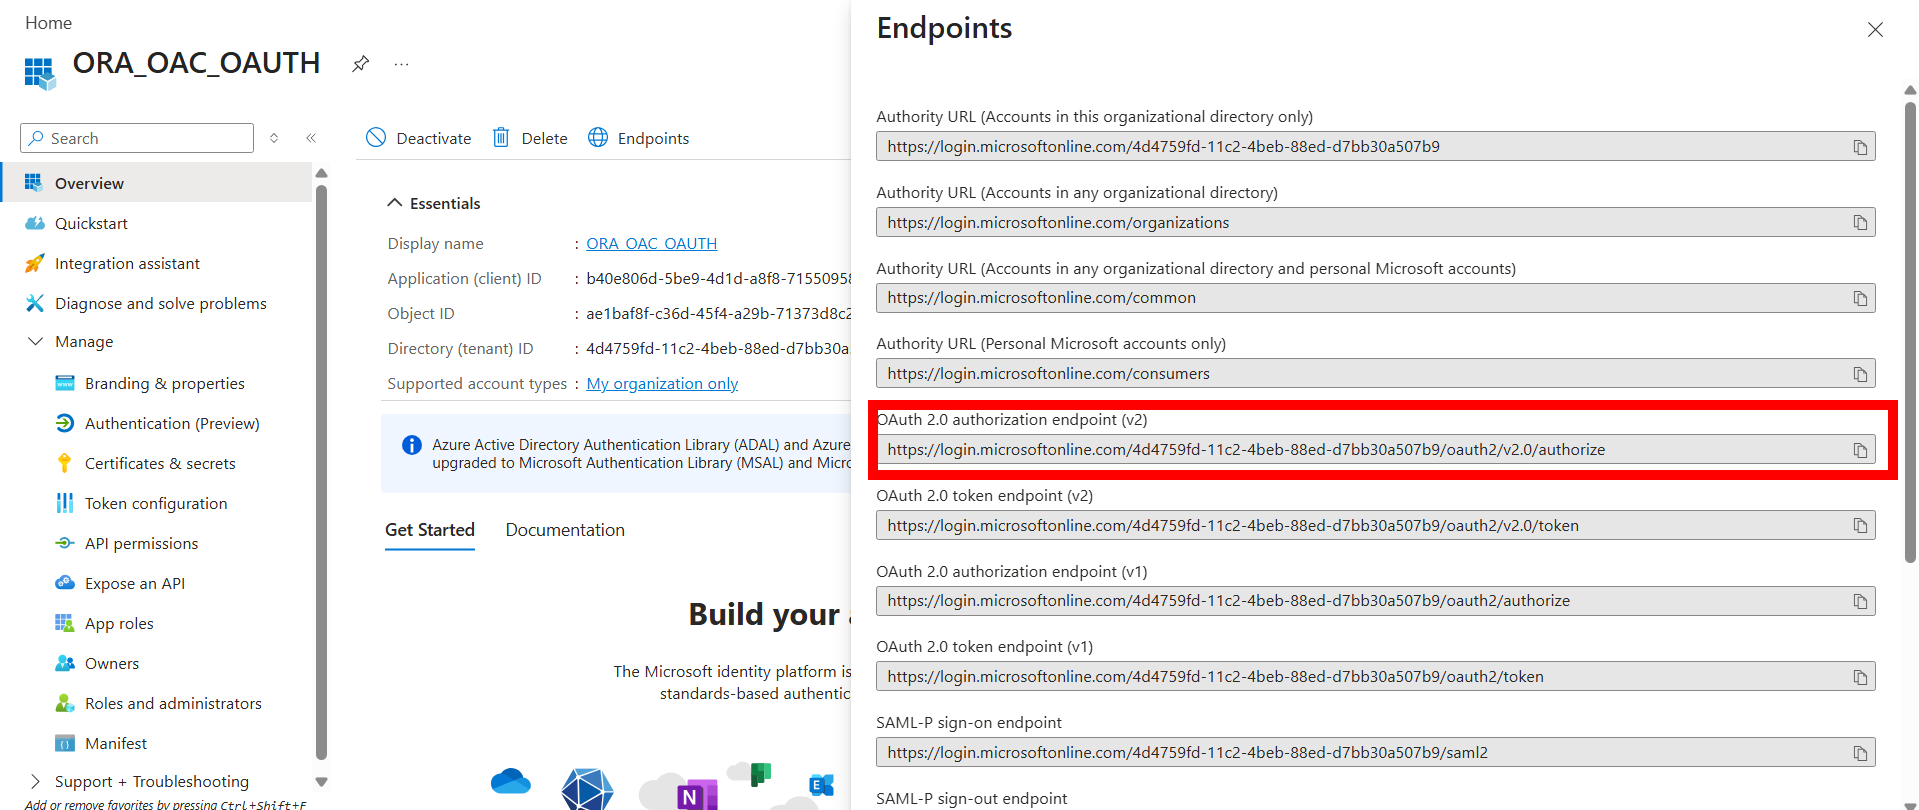
Click Close to close the Endpoints window.
Step 2.3 — Configure the Redirect URI
The redirect URI allows Microsoft Entra ID to redirect the user back to BI Connector after successful authentication.
- In the Microsoft Entra ID application, locate Redirect URIs.
- Click the link under Redirect URIs.
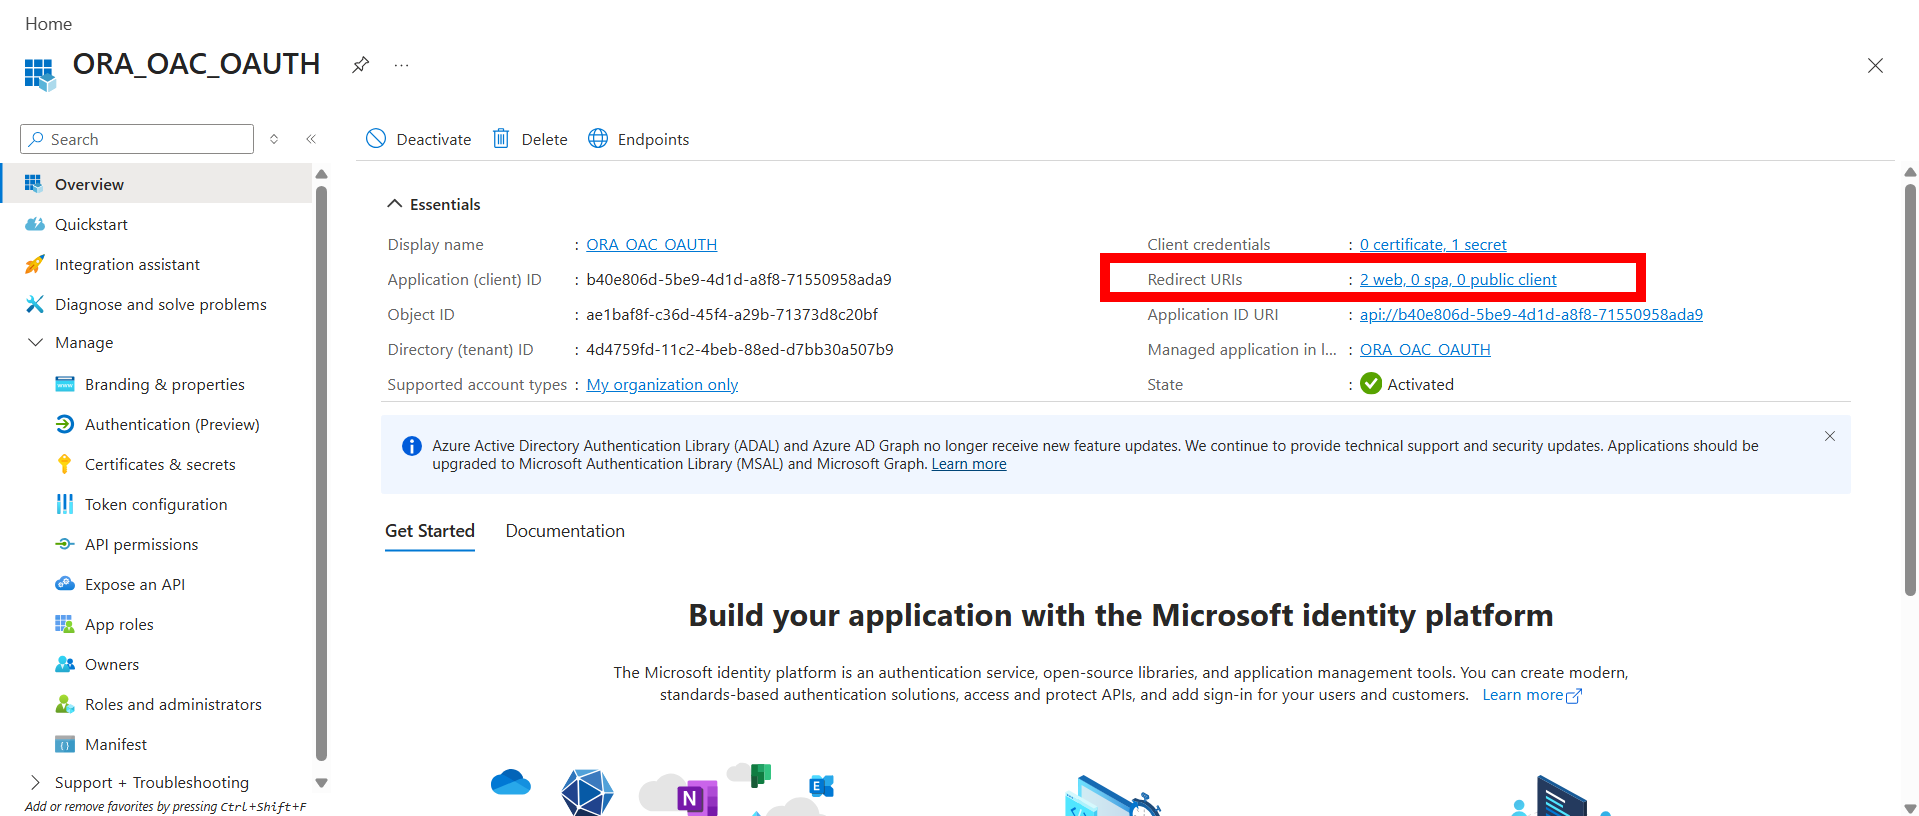
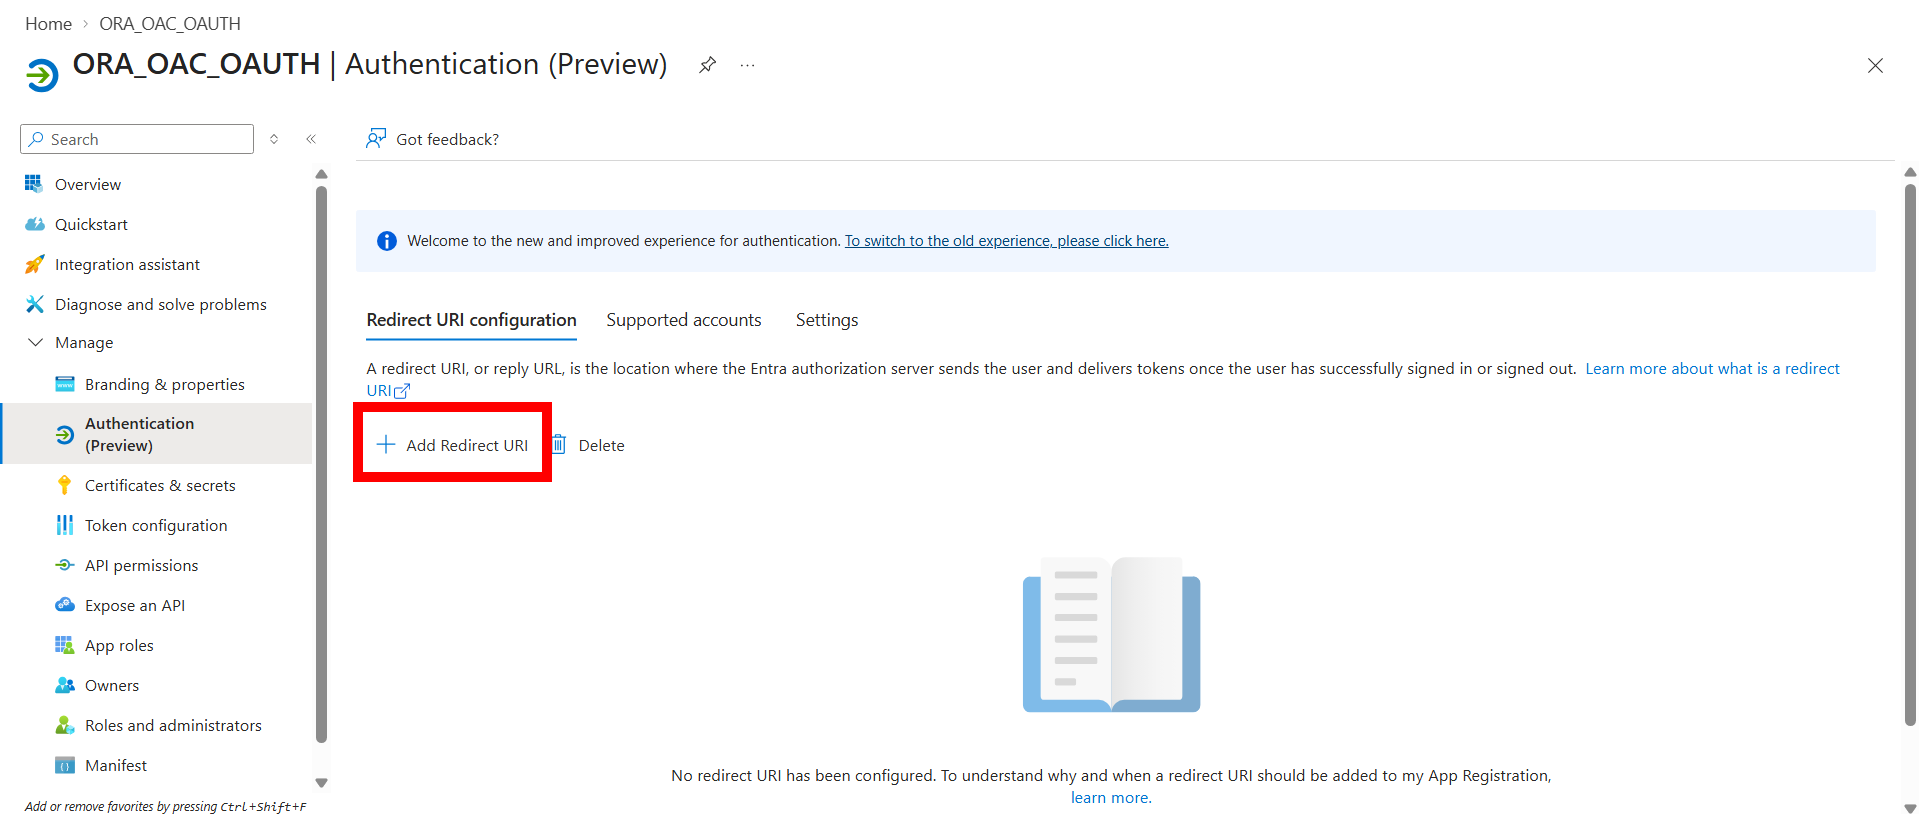
- Click Add Redirect URI.
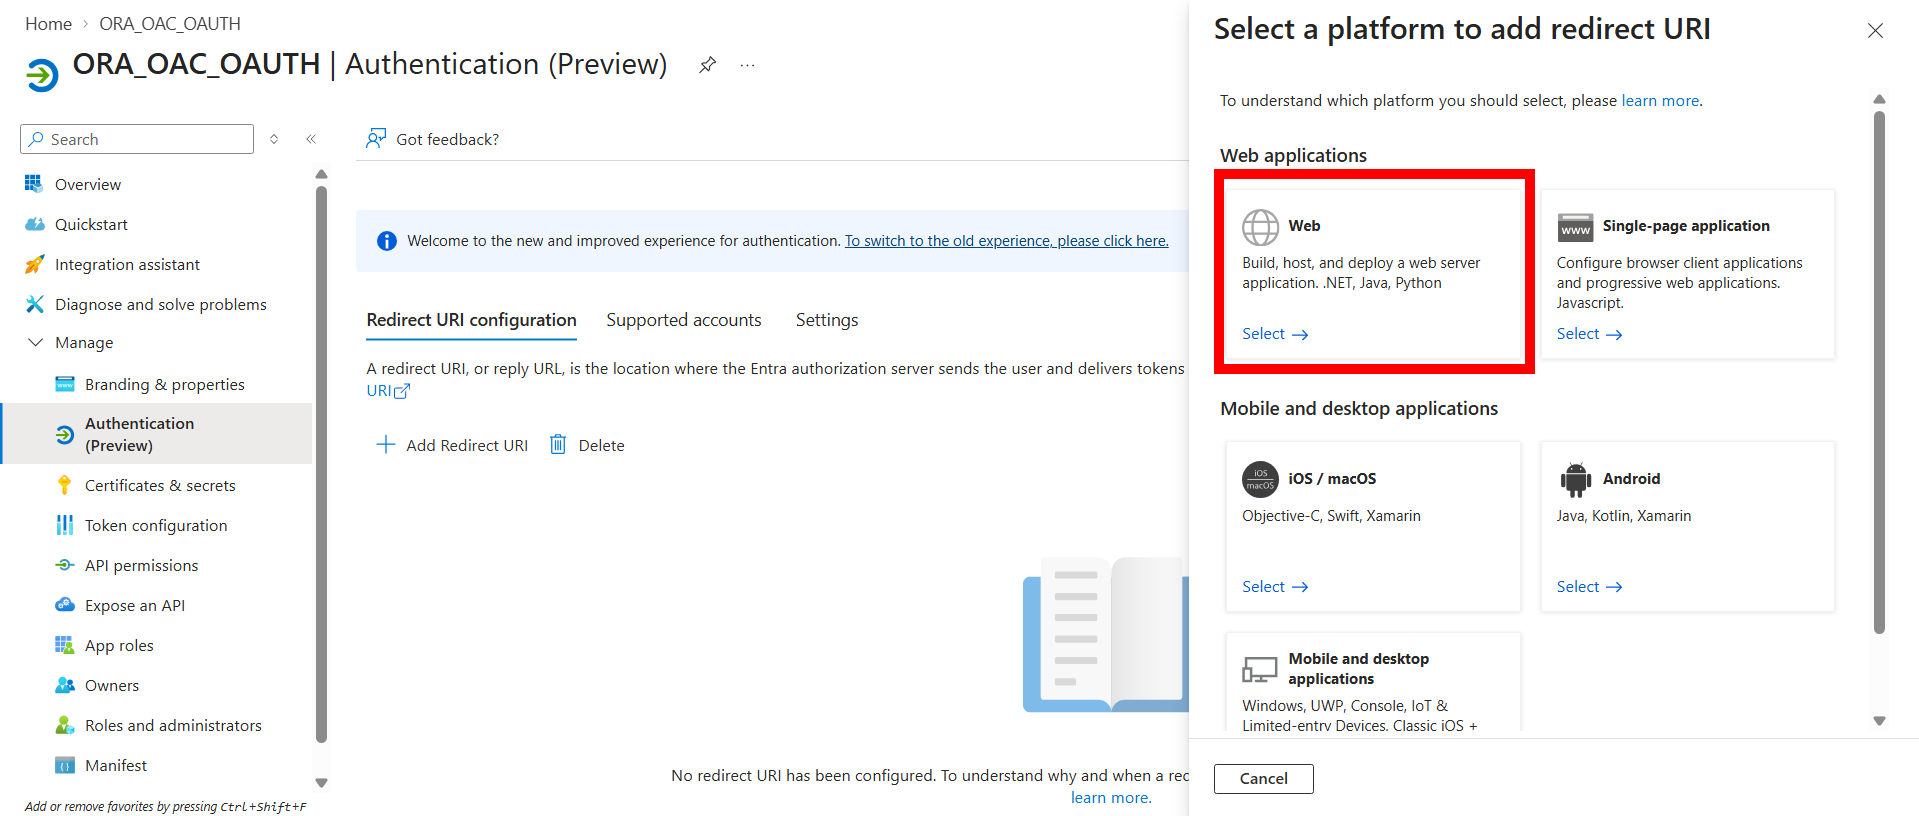
- Select Web as the platform.
- In the Redirect URI field, enter:https://<your-bi-connector-domain>/api/v1/users/oauth-callbackReplace
<your-bi-connector-domain>with the domain where BI Connector is hosted.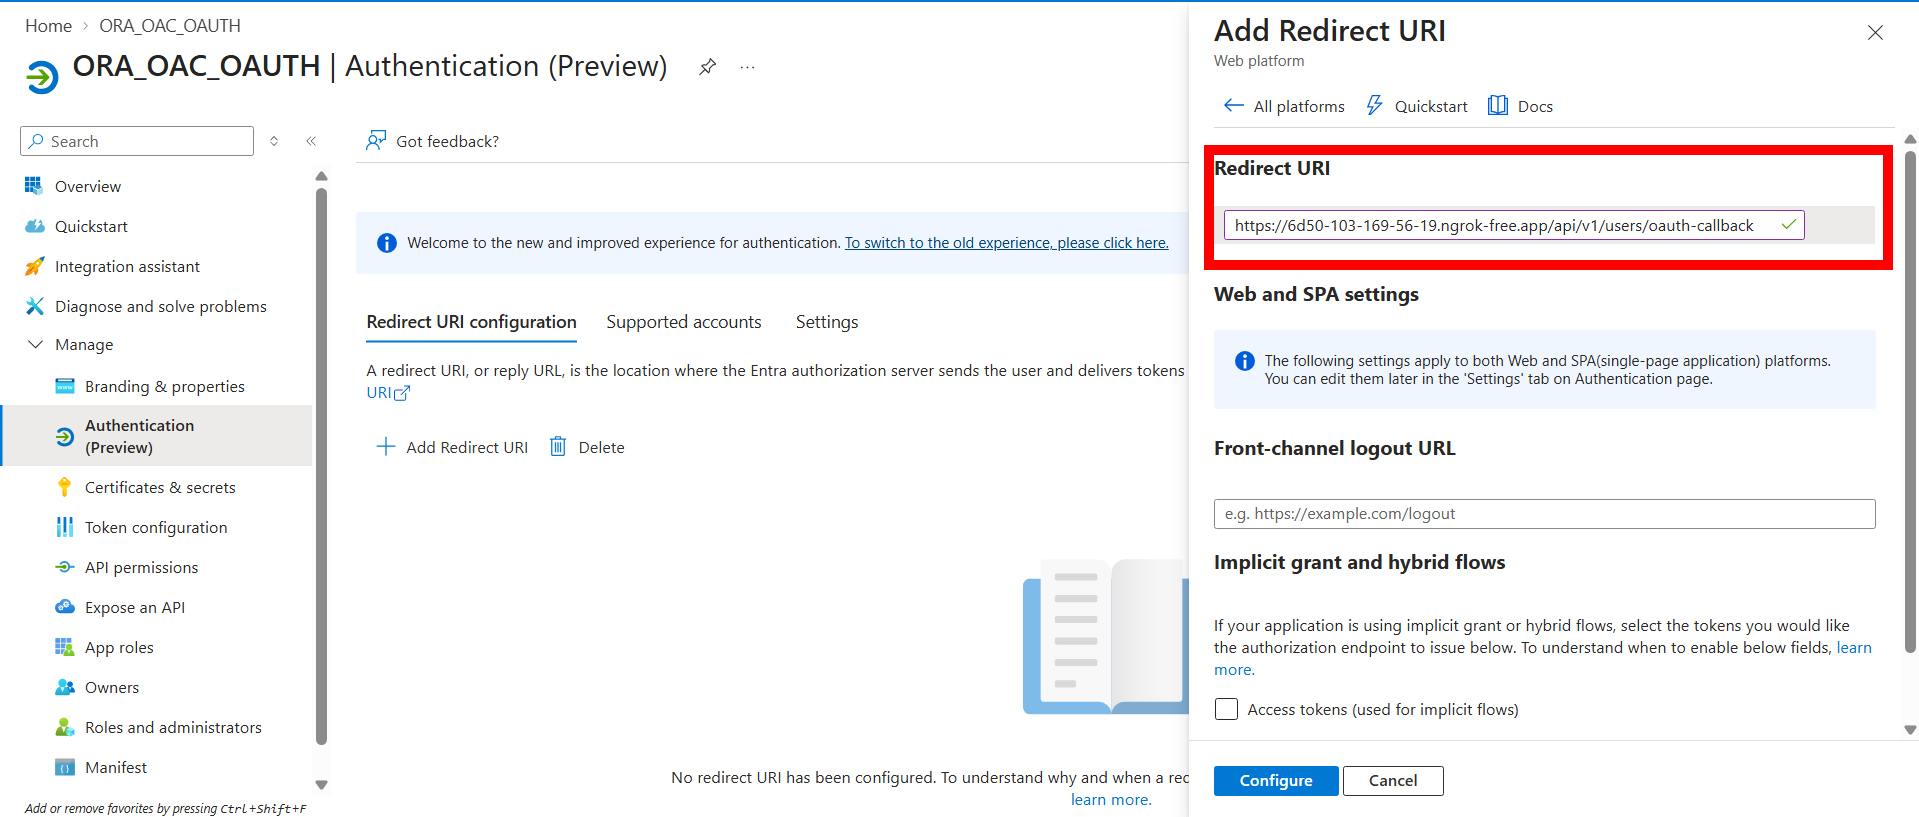
If BI Connector is hosted at
https://bi-connector.example.com, the redirect URI will be:https://bi-connector.example.com/api/v1/users/oauth-callbackClick Configure.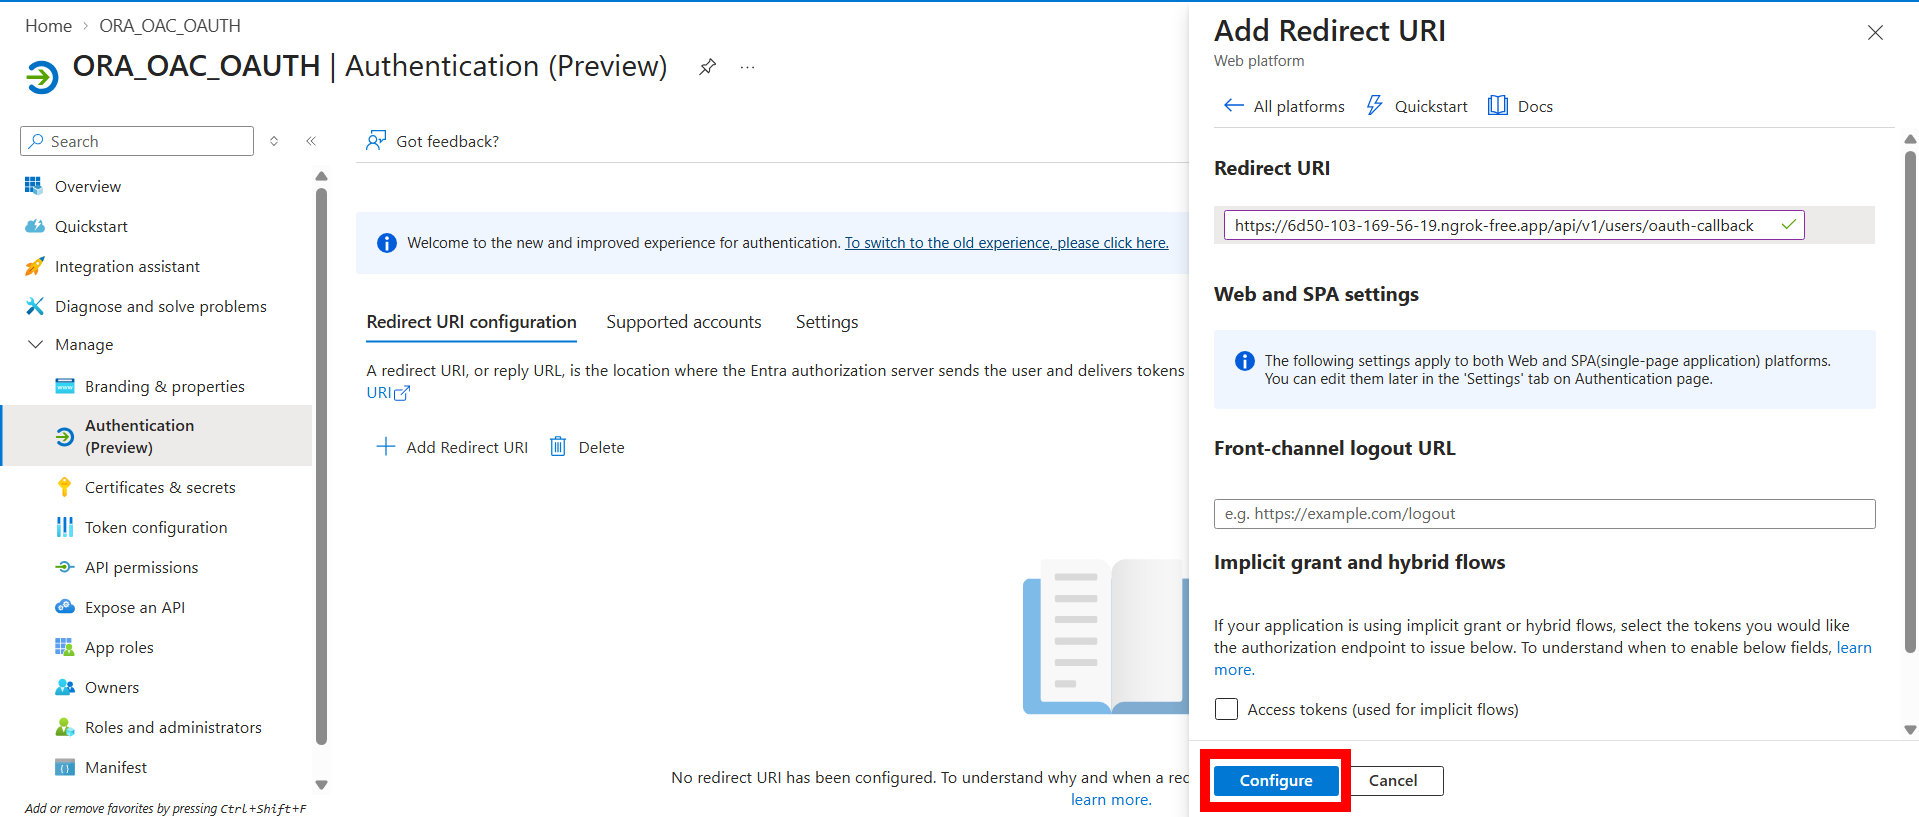
3. Configure SSO in BI Connector
After completing the Microsoft Entra ID configuration, configure the corresponding SSO settings in BI Connector.
Step 3.1 — Open SSO Configuration
- Open BI Connector.
- Sign in using a BI Connector user with the Administrator role.
- From the left-side navigation menu, click Settings.
- Click Configure SSO.
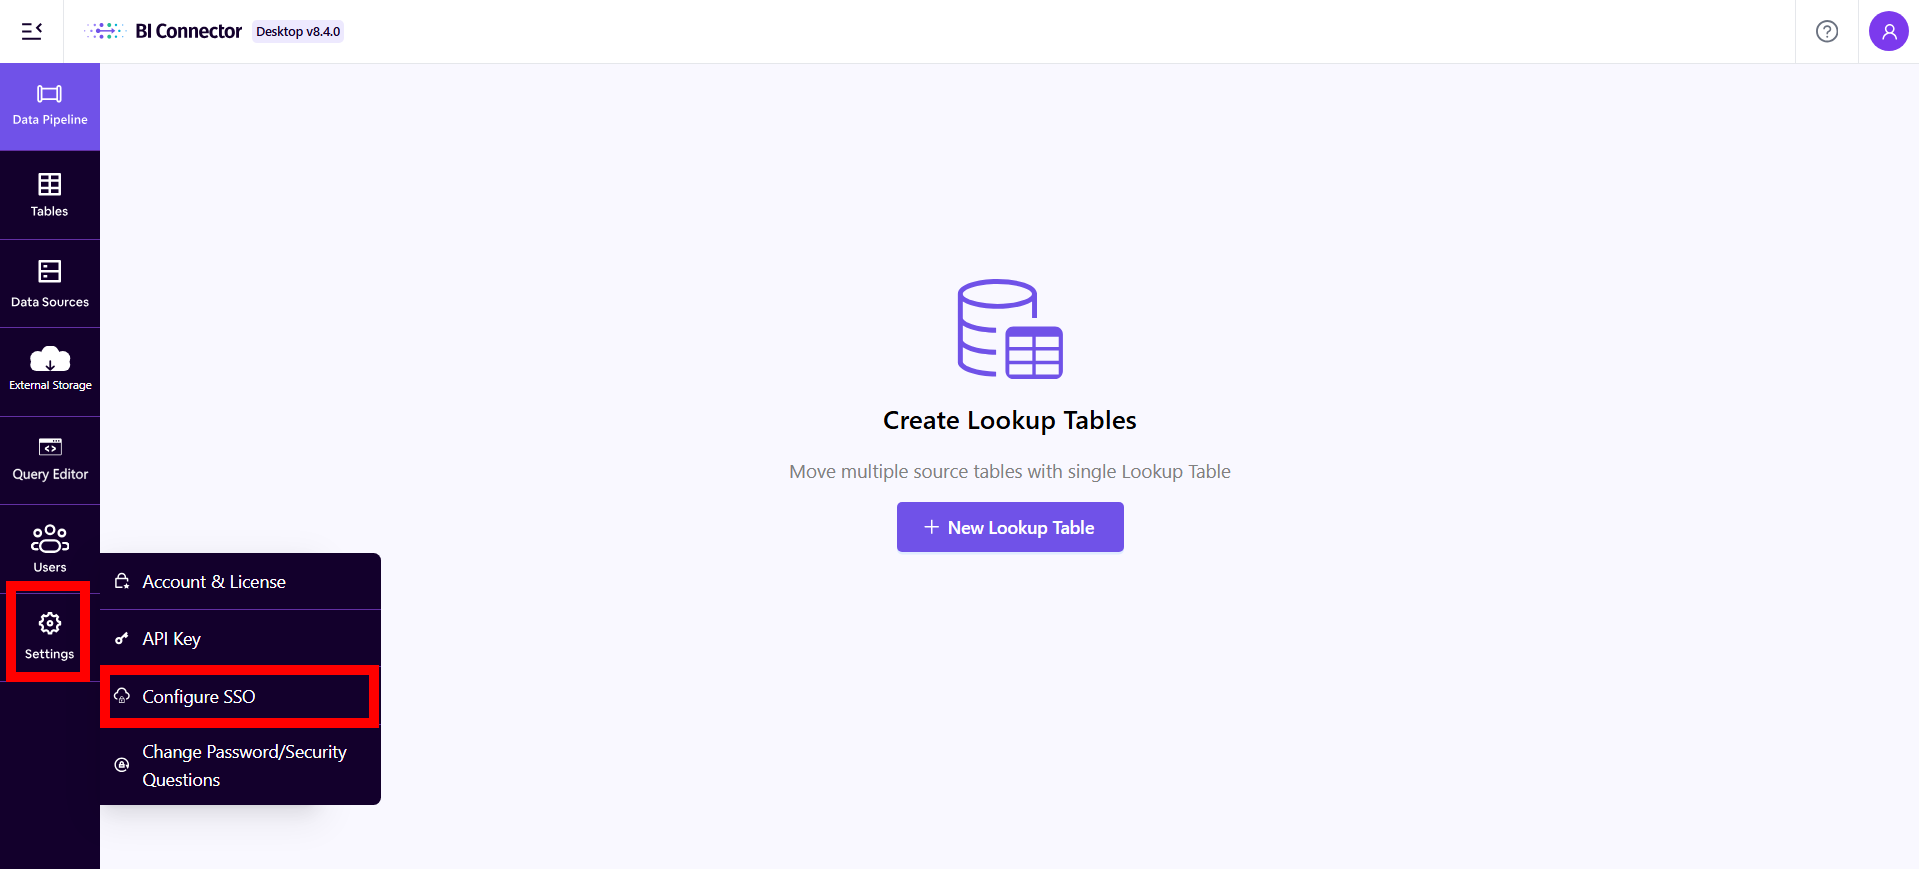
Step 3.2 — Enter the SSO Configuration
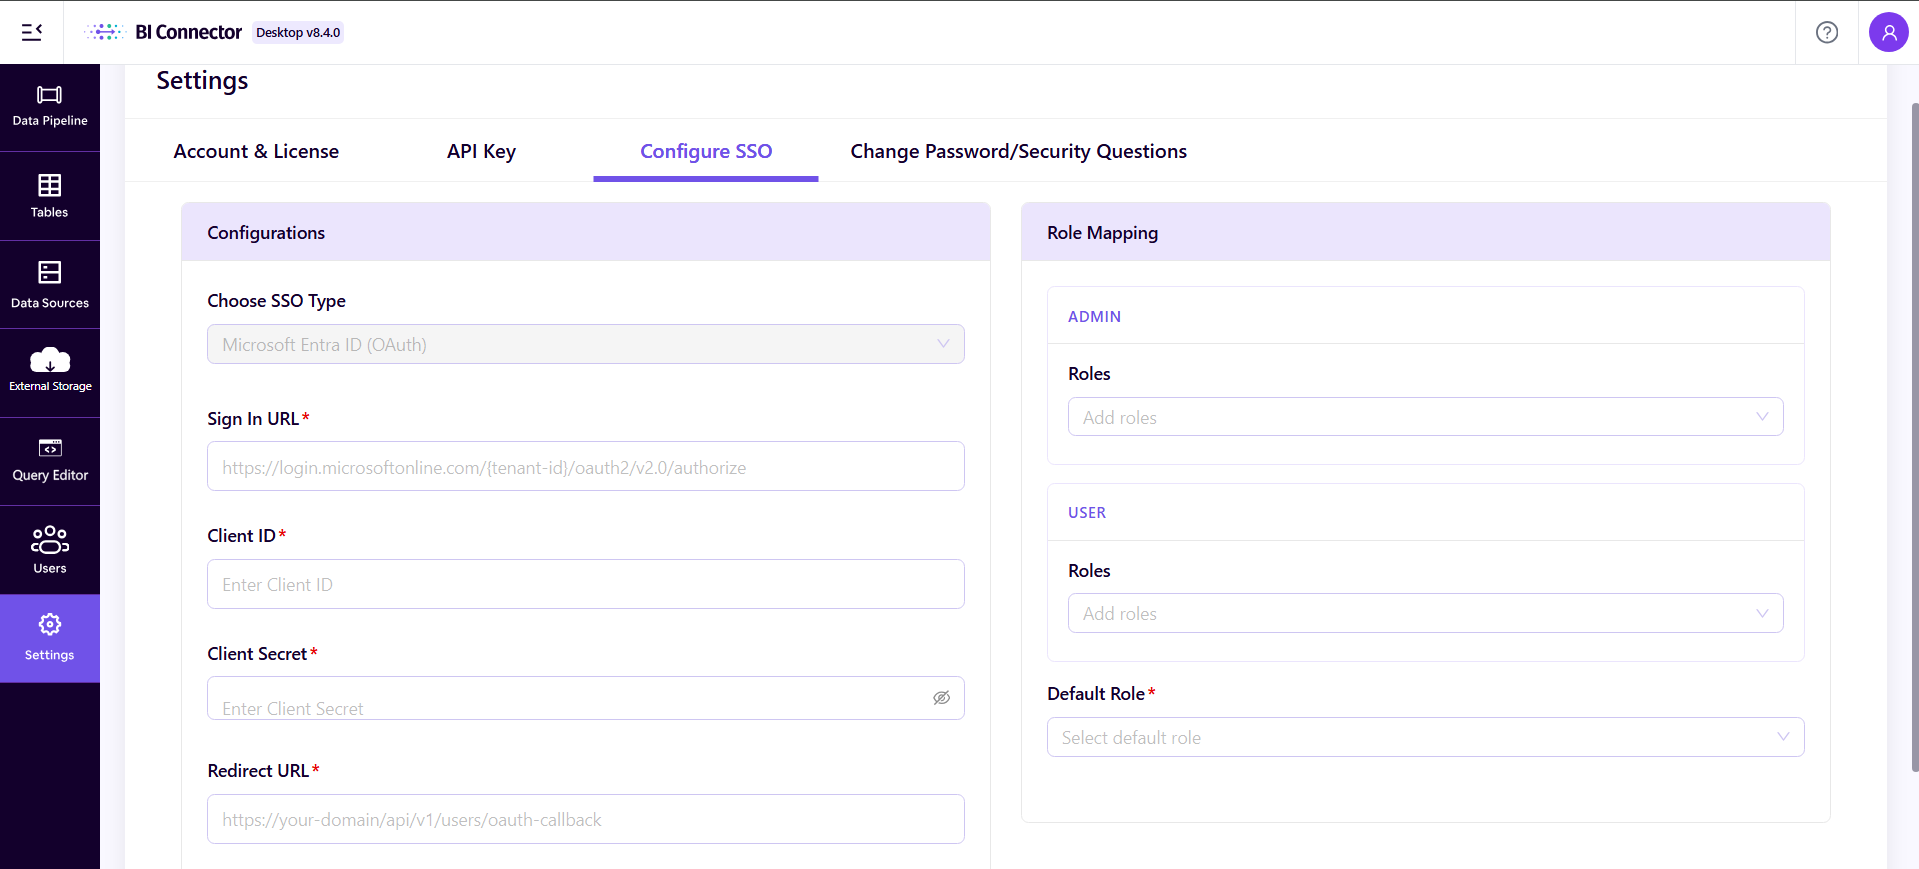
| Field | Value |
|---|---|
| Sign-in URL | Paste the URL copied in Step 2.2 |
| Client ID | Paste the value copied in Step 2.1 |
| Client Secret | Enter the Client Secret created for the Microsoft Entra ID application |
| Redirect URL | Enter the redirect URI configured in Step 2.3 |
4. Configure Role Mapping
BI Connector allows you to map Microsoft Entra ID roles to BI Connector roles. This determines whether a user signing in through Microsoft Entra ID is treated as an Administrator or a User in BI Connector.
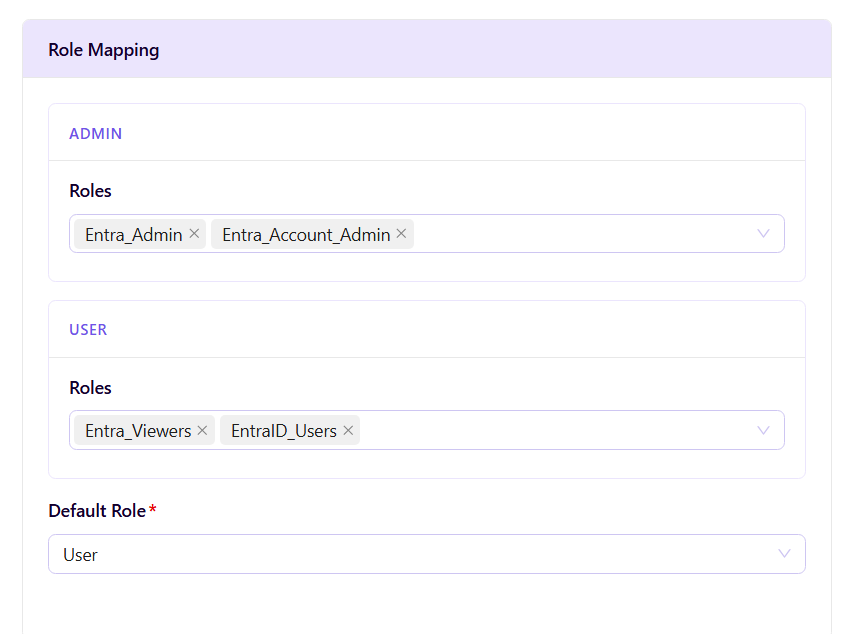
Step 4.1 — Map Administrator Roles
In the Role Mapping section on the right side of the SSO configuration page, locate the Admin field and enter the Microsoft Entra ID roles that should be treated as Administrator roles, for example:
Entra_AdminEntra_Account_Admin
Step 4.2 — Map User Roles
Locate the User field and enter the Microsoft Entra ID roles that should be treated as User roles, for example:
Entra_ViewersEntraID_Users
Step 4.3 — Configure the Default Role
The Default Role determines which BI Connector role is assigned when a user signs in with a Microsoft Entra ID role that has not been explicitly mapped:
- USER — treated as a standard BI Connector user.
- ADMIN — treated as a BI Connector administrator.
| Microsoft Entra ID Role | BI Connector Role |
|---|---|
| Entra_Admin | ADMIN |
| Entra_Account_Admin | ADMIN |
| Entra_Viewers | USER |
| EntraID_Users | USER |
If Default Role is set to USER: any unmapped role → BI Connector USER.
Step 4.4 — Save the Configuration
After entering all SSO and role mapping details:
- Review the configuration.
- Verify that the Sign-in URL, Client ID, Client Secret, and Redirect URL are correct.
- Verify that the role values are correctly mapped.
- Click Save.
5. Sign in Using Microsoft Entra ID
- Open the BI Connector login page.
- Click Sign in with Microsoft.
- Microsoft Entra ID will open the authentication page.
- Sign in using the user's Microsoft account.
- After successful authentication, the user is redirected back to BI Connector.
- BI Connector assigns the appropriate role based on the configured role mapping.
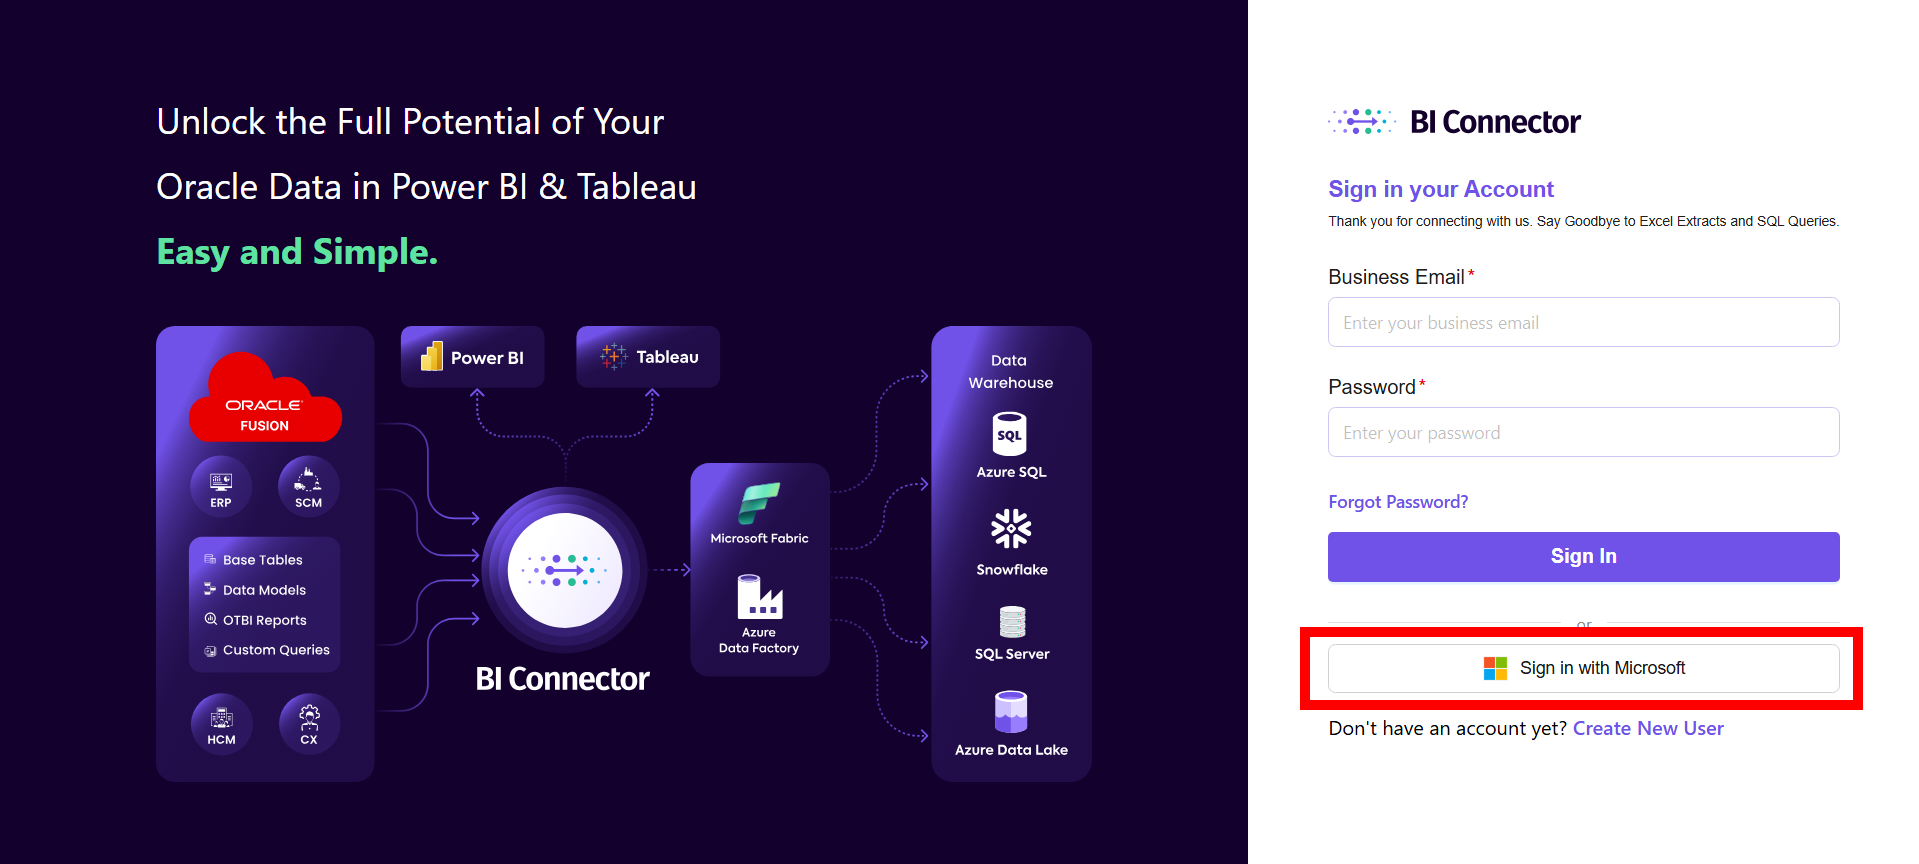
6. Verify the SSO Configuration
To verify that SSO is working correctly:
- Open the BI Connector login page.
- Click Sign in with Microsoft.
- Complete the Microsoft Entra ID authentication.
- Verify that the user is successfully redirected to BI Connector.
- Verify that the user receives the expected BI Connector role based on their Microsoft Entra ID role.
| Entra ID Role | Expected BI Connector Role |
|---|---|
| Entra_Admin | Administrator |
| Entra_Account_Admin | Administrator |
| Entra_Viewers | User |
| EntraID_Users | User |
| Unmapped role | Default Role |
7. Configuration Summary
The following values are required to configure SSO:
| BI Connector Setting | Source |
|---|---|
| Sign-in URL | Microsoft Entra ID → Endpoints → OAuth 2.0 authorization endpoint (v2) |
| Client ID | Microsoft Entra ID → Application (client) ID |
| Client Secret | Microsoft Entra ID application |
| Redirect URL | Microsoft Entra ID → Redirect URIs |
| Admin Roles | Microsoft Entra ID role Value |
| User Roles | Microsoft Entra ID role Value |
| Default Role | Selected in BI Connector |
8. Important Notes
- BI Connector 9.5.0 or later is required for this functionality.
- The user configuring SSO must have the Administrator role in BI Connector.
- The Microsoft Entra ID role value must be used for role mapping — not the role display name.
- The Redirect URI configured in Microsoft Entra ID must exactly match the Redirect URL configured in BI Connector.
- Make sure the Client Secret is available when configuring SSO in BI Connector.
- The Default Role determines the BI Connector role assigned to users whose Microsoft Entra ID roles are not explicitly mapped.