Most companies using Oracle Fusion Cloud often need to move data from Fusion OTBI Analysis Reports into Fabric SQL DB to maintain a centralized single source of truth. These companies typically come across any of the following combinations of Data Migration/ETL needs for each analysis report they want to pull from Oracle Fusion:
- Type of data pull from source table - Full data pull or Incremental data pull
- Data insertion in target table - Insert new rows or update existing rows or both
- Frequency of automated refresh – Hour-based scheduling (runs every X hours based on FREQUENCY_IN_HOURS).
- Pipeline monitoring – Tracks execution status, start time, end time, and error description for each table run.
In some cases, they might have a composite primary key (a set of concatenated values from different columns of the table to uniquely identify each row). Some tables may not have time-based columns to facilitate incremental loads, for which the primary key is used as a reference to perform the incremental load. In other cases, the incremental column may be a derived/calculated timestamp (for example, a date built from a fiscal period) whose value does not change when a row is updated — for these, the pipeline uses a rolling-window approach that re-pulls the last X days of data on every run to capture any recent updates.
This article will help you to handle all of the above scenarios with a single Fabric pipeline (that refers to a Lookup table).
The lookup table acts as a configuration controller for Fabric pipelines. Each row in the table represents a data load job, including source/destination table details, load type, execution frequency, and watermark column information for incremental loads.
Prerequisites:
1. Required Setup:
- Windows Server with On-premises Data Gateway and BI Connector
- Install and configure On-premises Data Gateway from Microsoft
Note: It's possible to use an existing gateway as well - Install BI Connector Server edition and activate it using a license key.
- Install and configure On-premises Data Gateway from Microsoft
- Admin Access to Gateway Server
- Admin access is required to set up System DSNs in ODBC.
- Admin access is required to set up System DSNs in ODBC.
2. Recommended Configurations:
- Windows Server 2016 or above (can also be set up on a VM on the cloud)
- .NET Framework 4.7.2 or above installed
- Minimum of 8 CPU cores, 8 GB RAM, and 80 GB hard disk space
- Strongly recommended to disable hibernate/sleep on this server.
Note: The gateway wouldn't work when the server enters hibernate/sleep mode
Step 1: Download the Pipeline Template
Please Contact us or email support@biconnector.com to get our ready-to-deploy Fabric Pipeline template.
Step 2: Import the Fabric Pipeline using the template:
2a. Extract the ZIP Folder
After Downloading the provided ZIP folder.
Right-click the file and select Extract All.
After extraction, you will find the following two files:
Pipeline Template named FUSION_TO_FABRIC_SQL_DB_OTBI_REPORTS_USING_BIC (ZIP Folder)
→ Contains the Fabric pipeline template to be imported.- UPDATE_LOOKUP_STATUS_OTBI_REPORTS.txt
→ Contains the SQL script for the UPDATE_LOOKUP_STATUS_OTBI_REPORTS stored procedure.
This script must be executed in the Fabric SQL database before running the pipeline.
2b. Creating BI Connector ODBC Connection:
Note: Before proceeding, ensure that the BI Connector DSN is correctly configured and that the required BIC tables have been created by adding all relevant Oracle Fusion folder paths where the OTBI Analysis Reports are located. These are required for the ODBC Linked Service to successfully establish a connection and extract data.
For guidance on how to create a DSN and BIC tables, refer this article .
- Go to "Manage connections and gateways".
- Click "+ New" .
- Select "On-premise"
- Select your Gateway cluster (same as above).
- Enter a descriptive name for connection: Your_Connection_Name(e.g. Fusion_Reports).
- Select Connection type “ODBC”.
- Fill in details:
- Connection string: dsn=YOUR_DSN_NAME (replace YOUR_DSN_NAME with your actual BI Connector DSN)
- Authentication: Basic
- Username: Your Oracle Fusion username
- Password: Your Oracle Fusion password
- Click “Create”.
2c. Creating the Fabric SQL DB Connection
- Go to Manage connections and gateways.
- Click New.
- Select Cloud.
- Enter a connection name.
- Set the Connection type to SQL database in Fabric.
- Authenticate using OAuth 2.0 by clicking Edit credentials.
- Check the box "Allow this connection to be utilized with either on-premises data gateways or VNet data gateways."
- Click Create (or Save) to finish.
2d. Create Stored Procedure
- Open Fabric SQL Database.
- Click on New query at the top
- Open the file UPDATE_LOOKUP_STATUS_OTBI_REPORTS.txt (extracted earlier).
- Copy the SQL script from the file.
- Paste the script into the SQL editor window.
- Click Run to execute the script.
- Verify that the stored procedure UPDATE_LOOKUP_STATUS_OTBI_REPORTS is created successfully under:
- Database → Schema → Stored Procedures
2e. Update the BI Connector.config file
- Navigate to folder path C:\ProgramData\Guidanz\BI Connector and open BI Connector.config file.
- Set the following three values:
SuppressSelectStar=0
async=0
ShowFunction=0 - Save the file, then restart the on-premises gateway for the changes to take effect.
2f. Map the Fabric SQL DB Connection for Stored Procedure and Copy Data Sink
After importing the pipeline template, map the Fabric SQL DB connection in Copy data and Stored procedure activities as follows:
- Go to the GET_ALL_DATA_FROM_FUSION Copy data activity. On the Sink side, select the Fabric SQL cloud connection, then select the database name. Repeat the same for the GET_DELTA_DATA Copy data activity.
- Go to the UPDATE_LOOKUP_STATUS_FULL_LOAD Stored procedure activity. Under Settings, Click Refresh next to dropdown and select OTBI REPORTS Stored procedure UPDATE_LOOKUP_STATUS_OTBI_REPORTS. Repeat the same for the UPDATE_LOOKUP_STATUS_INCR_LOAD activity.
Note: Use the dropdown to switch connections — don't click the ✕ mark icon, that clears everything including the query.
Step 3: Create the Lookup Table in the BI Connector
3a. Create New Lookup Table
In BI Connector , Navigate to the Data Pipelines section.
Click + New Lookup Table.
Enter the desired Lookup Table Name.
Select the Data Source (Analysis Report) created in BI Connector.
Enter the Destination Schema Name.
Select the Destination Warehouse as SQL Server.
Click Next.
3b. Select Analysis Reports
- In the Analysis Report section:
You can manually select required analysis reports from searchable drop down
OR- Bulk paste report names if needed.
- You must manually provide: Primary Key, Watermark Column, IS_WATERMARK_COL_TIMESTAMP, USE_ROLLING_WINDOW, ROLLING_WINDOW_DAYS
Note: If the OTBI Analysis Report does not contain a native date/timestamp column to use as the watermark, you can derive one from an existing column (such as a fiscal period) by creating a calculated timestamp column in the report. Please refer this article for step-by-step instructions.
Click Save after configuration.
3c. Download and Execute Table Scripts
In the Actions column, select the required option:
Download CREATE TABLE statement
Download INSERT statement
Download as CSV
Download as Excel
Use the downloaded CREATE TABLE and INSERT queries to create and populate the lookup table in the Fabric SQL database.
3d. Set the Lookup Table Name in Pipeline
- Add the Lookup Table Schema name in Pipeline under Parameters schema_name , where lookup tables was created
- Add the Lookup Table name in Pipeline under Parameters table_name
- Save the changes.
To learn more about lookup table, please refer this article.
Step 4: Configure Pipeline Schedule:
- Navigate to pipeline.
- Click on "Schedule" in the top ribbon/menu
- Turn on "Scheduled run" (toggle to "On")
- Configure Repeat interval: Select from dropdown options like Daily, Weekly or Monthly
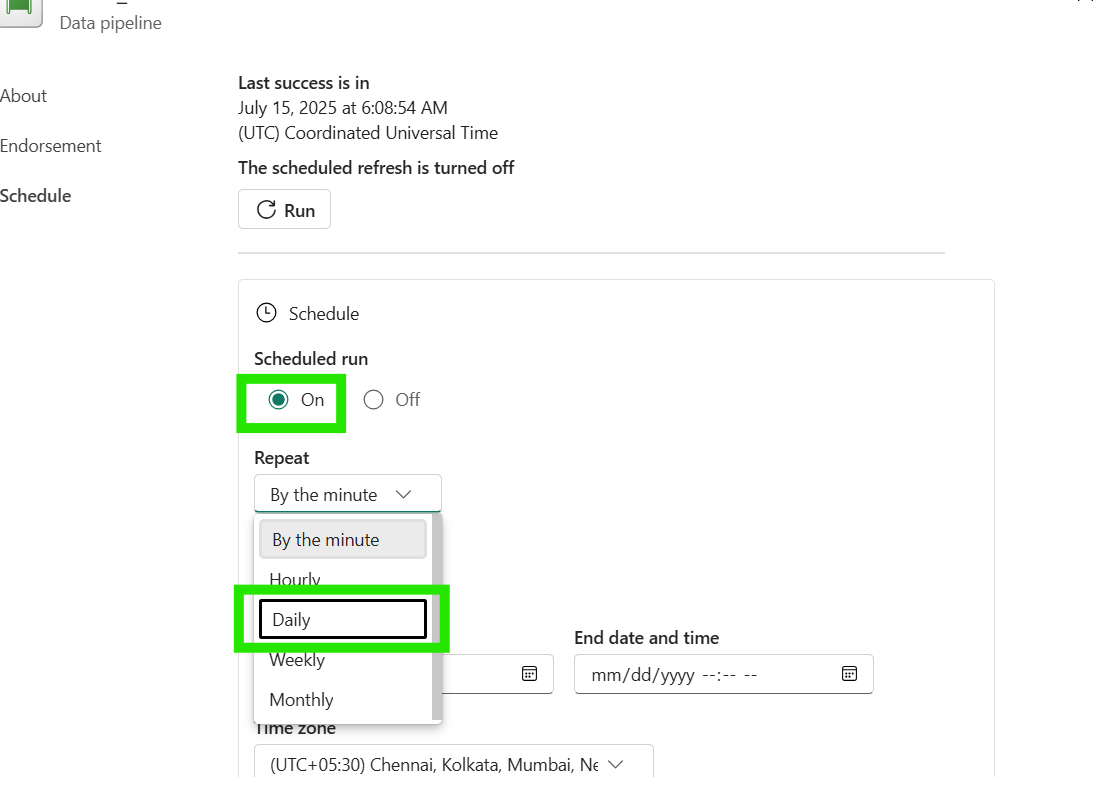
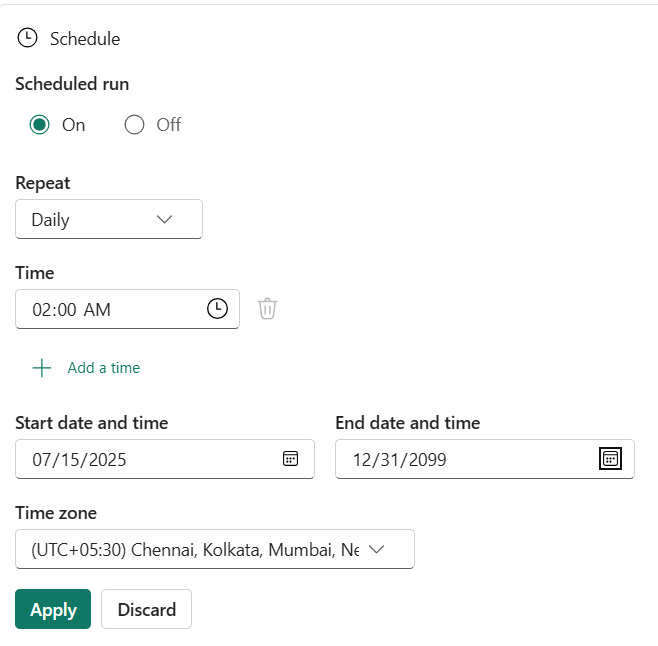
- Set Execution Time: Choose optimal time (e.g., 2:00 AM)
- Set Start date: When scheduling should begin
- Set End date: Far future date (12/31/2099) for continuous running
Note: This field is mandatory and cannot be left empty, so we use a distant future date to ensure the pipeline runs indefinitely without manual intervention - Select Time zone: Your regional time-zone (UTC+05:30 for India)
- Then click "Apply" to save the changes.
Note: You can also run the pipeline on-demand anytime by clicking the "Run" button in the top ribbon, regardless of the schedule.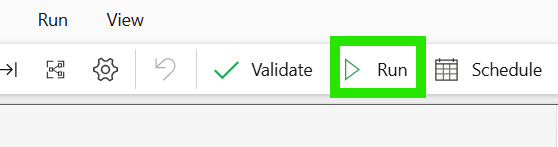
To see more on frequently asked question, please refer this article.