Most companies using Oracle Fusion Cloud have a pressing need to push the Fusion data to their Databricks warehouse to maintain a single source of truth. These companies typically come across any of the following combinations of Data Migration/ETL needs for each table they want to pull from Oracle Fusion:
- Type of data pull from source table - Full data pull or Incremental data pull
- Data insertion in target table - Insert new rows or update existing rows or both
- Frequency of automated refresh - daily/weekly/bi-weekly or once in x days
In some cases, they might have a composite primary key (a set of concatenated values from different columns of the table to uniquely identify each row). Some tables may not have time-based columns to facilitate incremental loads, for which the primary key is used as a reference to perform the incremental load.
This article will help you to handle all of the above scenarios with Power BI Fabric Data Pipeline (that refers to a Lookup table).
The lookup table acts as a configuration controller for Power BI Fabric Data Pipelines. Each row in the table represents a data load job, including source/destination table details, load type, execution frequency, and watermark column information for incremental loads.
Prerequisites:
1. Required Setup:
- Windows Server with On-premises Data Gateway and BI Connector
- Install and configure On-premises Data Gateway from Microsoft
Note: It's possible to use an existing gateway as well - Install BI Connector Server edition and activate it using a license key.
- Install and configure On-premises Data Gateway from Microsoft
- Admin Access to Gateway Server
- Admin access is required to set up System DSNs in ODBC.
2. Recommended Configurations:
- Windows Server 2016 or above (can also be set up on a VM on the cloud)
- .NET Framework 4.7.2 or above installed
- Minimum of 8 CPU cores, 8 GB RAM, and 80 GB hard disk space
- Strongly recommended to disable hibernate/sleep on this server.
Note: The gateway wouldn't work when the server enters hibernate/sleep mode
Step 1: Install and Configure Simba Spark ODBC Driver:
1a. Installing Simba Spark ODBC Driver:
- Download Simba Spark ODBC Driver [link to download](choose 64-bit or 32-bit version according to your system architecture)
- Run the installer as Administrator
- Follow the installation wizard to complete the setup
1b. Create Databricks ODBC DSN :
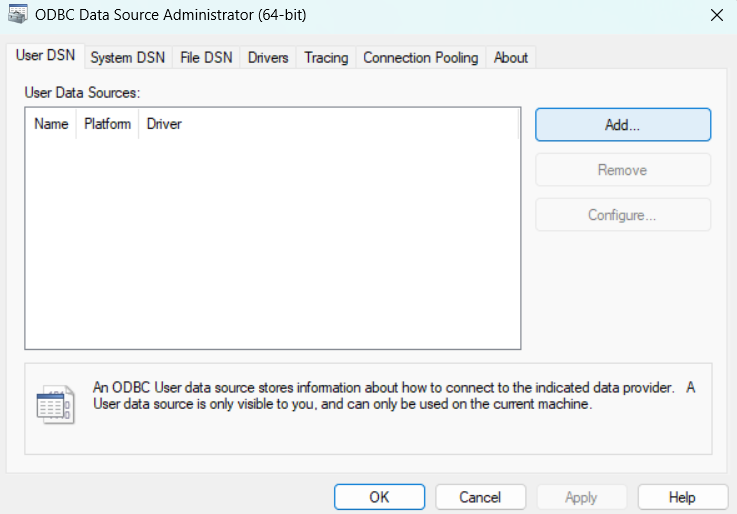
- Open ODBC Data Source Administrator (64-bit) from Windows Start Menu
- Go to System DSN tab and Click "Add"
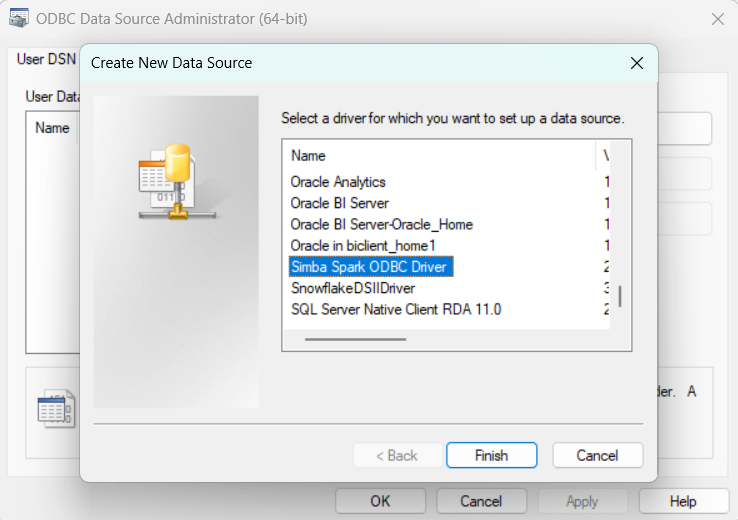
- Select "Simba Spark ODBC Driver" from the list and Click "Finish
1c. Configure Databricks DSN :
- Data Source Name: Enter descriptive name (e.g. Databricks_Prod)
- Host(s): Your Databricks account URL (e.g. dbc-1234-abcd.cloud.databricks.com)
- Port: 443
- Username: token
- Password: Personal Access Token of Warehouse
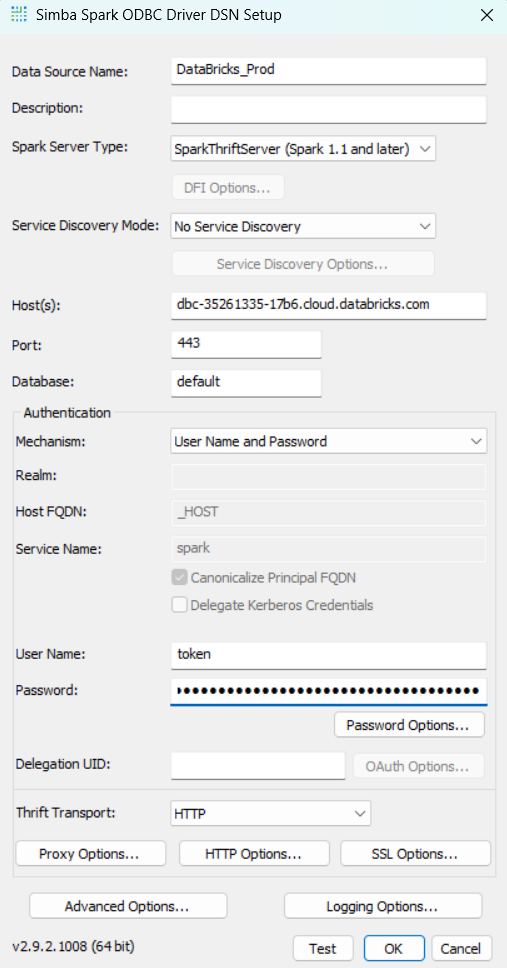
- Click "HTTP Options"
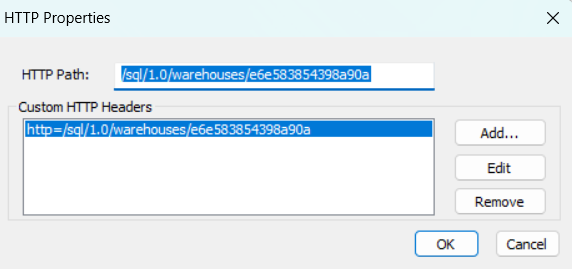
- HTTP Path: Your warehouse HTTP Path (e.g. /sql/1.0/warehouses/abcd1234)
- Click "OK" to save HTTP Options
- Click "SSL Options"
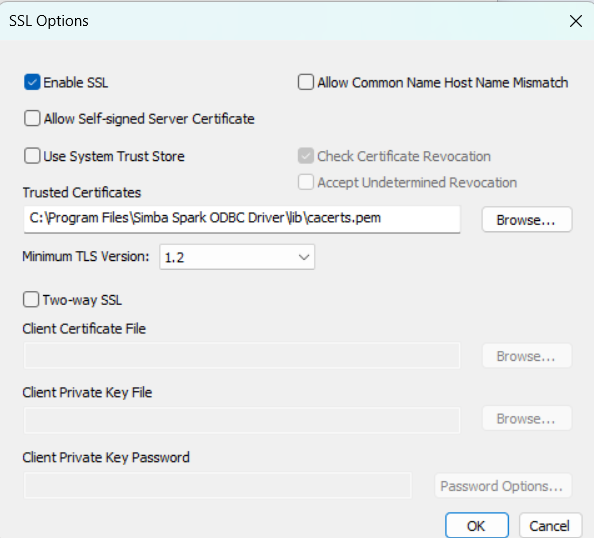
- Enable SSl: Enable the option
- Click "OK" to save SSL Options
- Click "Test" to verify connection
- Click "OK" to save DSN
Note: Remember the DSN name as you'll need it for creating the Databricks ODBC connection in Fabric.
Step 2: Setting Up Connections in Power BI Fabric:
Note: Ensure that the Databricks ODBC connections are set up before importing the pipeline. If already configured, you can skip ahead to Step 2.
2a. Creating Databricks Connection (ODBC):
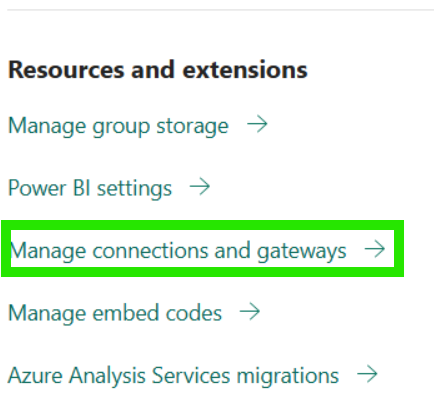
- In your Power BI Fabric, go to Settings option and Select "Manage connections and gateways":

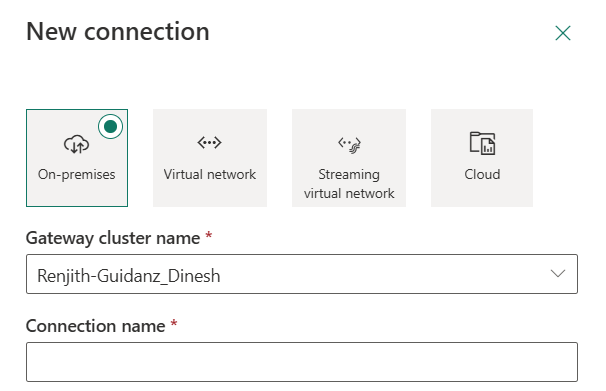
- Select "+ New":
- Select your Gateway cluster.
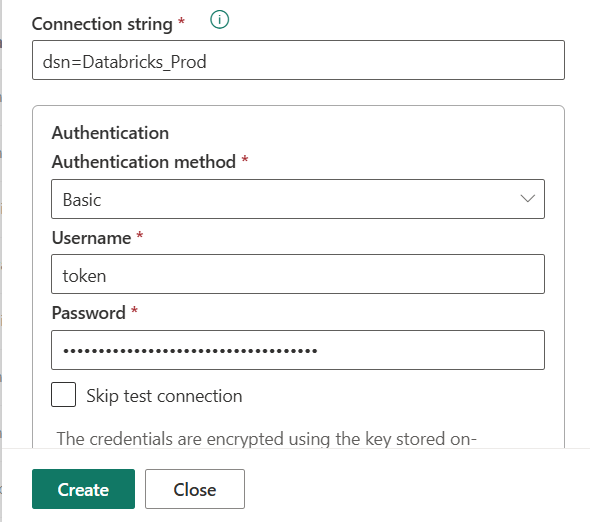
- Enter a descriptive name for connection: Your_Connection_Name (e.g. Databricks_Prod):
- Select Connection type “ODBC”.
- Fill in the connection details:
- Connection string: dsn=YOUR_DATABRICKS_DSN_NAME (replace YOUR_DATABRICKS_DSN_NAME with your actual Databricks ODBC DSN name we created in step 1)
- Authentication: Basic
- Username: token
- Password: Your Databrick Personal Access Token
- Click "Create".

2b. Creating Databricks Connection (Web V2):
- Stay in "Manage connections and gateways".
- Click "+ New" again
- Select your Gateway cluster (same as above).
- Enter a descriptive name: Databricks_Web
- Select Connection type "Web V2"
- Fill in details:
- Base Url: Your Databricks account url
- Authentication: Basic
- Username: token
- Password: Warehouse personal access token
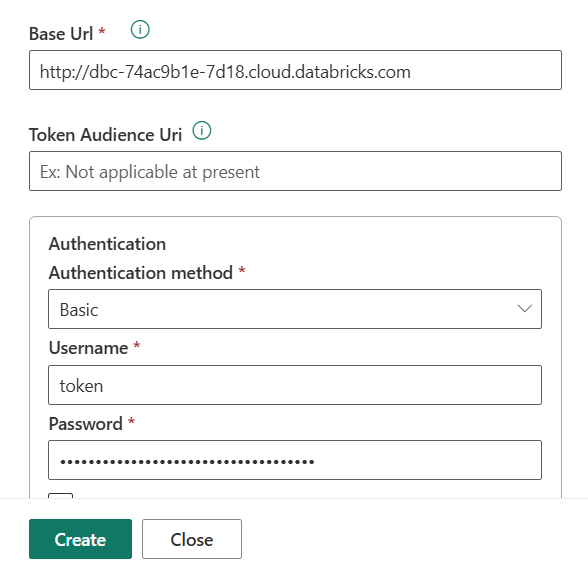
- Click “Create”.
2c. Creating BI Connector ODBC Connection:
Prerequisites
- Ensure the BI Connector DSN is configured and the required BIC tables (source tables created in BI Connector) are already available. These are essential for the BI Connector ODBC connection.
- For further assistance on creating the DSN and BIC tables, refer this article.
⚠️ CRITICAL: Timestamp Column Formatting
When creating BIC tables, you MUST use proper timestamp formatting like: TO_CHAR(CREATION_DATE,'YYYY-MM-DD HH24:MI:SS') AS CREATION_DATE. This prevents timestamp conflicts.
Sample Query:
SELECT
    PERSON_ID,
    PERSON_NUMBER,
    DISPLAY_NAME,
    TO_CHAR(CREATION_DATE,'YYYY-MM-DD HH24:MI:SS') AS CREATION_DATE,
    TO_CHAR(LAST_UPDATE_DATE,'YYYY-MM-DD HH24:MI:SS') AS LAST_UPDATE_DATE,
    CREATED_BY
FROM
    per_persons_f
ORDER BY LAST_UPDATE_DATE ASC;
Connection Setup Steps: :
- Stay in "Manage connections and gateways".
- Click "+ New" again.
- Select your Gateway cluster (same as above).
- Enter a descriptive name for connection: Your_Connection_Name(e.g. Oracle_BIC_Source).
- Select Connection type “ODBC”.
- Fill in details:
- Connection string: dsn=YOUR_DSN_NAME (replace YOUR_DSN_NAME with your actual BI Connector DSN)
- Authentication: Basic
- Username: Your Oracle Fusion username
- Password: Your Oracle Fusion password
- Click “Create”.
Step 3: Importing the Pipeline Files
Please Contact us or email support@biconnector.com to get our ready-to-deploy Power BI pipeline template.
After downloading, unzip the file — you will find two separate ZIP files inside:
- FUSION_TO_DATABRICKS_PARENT_PIPELINE_TEMPLATE
- FUSION_TO_DATABRICKS_WORKER_PIPELINE_TEMPLATE
- FUSION_TO_DATABRICKS_CREATE_DESTINATION_TABLE_TEMPLATE
3a. Importing FUSION_TO_DATABRICKS_CREATE_DESTINATION_TABLE_TEMPLATE
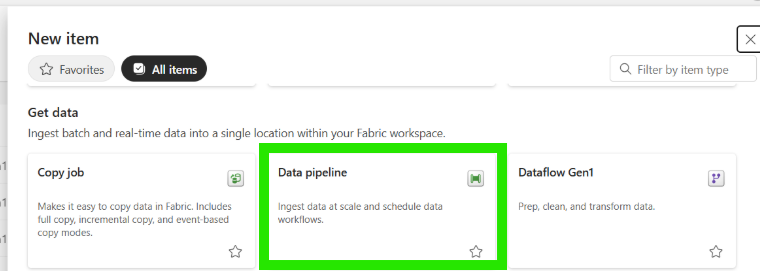
- In your workspace, Click "+ New items":
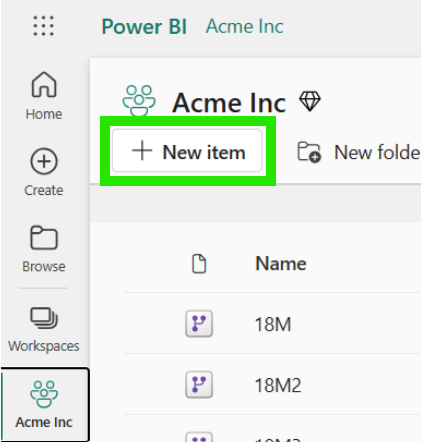
- Select "Data pipeline":
- Enter a descriptive name for your pipeline (e.g. FUSION_TO_DATABRICKS_CREATE_DESTINATION_TABLE_TEMPLATE) and click “Create”.
- Then choose "Import " option:
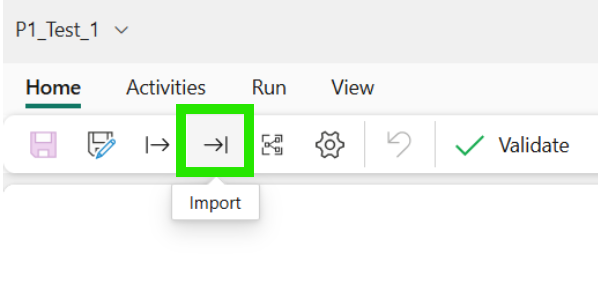
- Import pipeline (FUSION_TO_DATABRICKS_CREATE_DESTINATION_TABLE_TEMPLATE):
- Upload the FUSION_TO_DATABRICKS_CREATE_DESTINATION_TABLE_TEMPLATE.zip file.
- From the first dropdown, select the BI Connector ODBC connection configured in Step 2 (refer to the image below).
- From the second dropdown, select the Databricks Connection(Web V2) connection configured in Step 2 (refer to the image below).

- Click "Use this template".
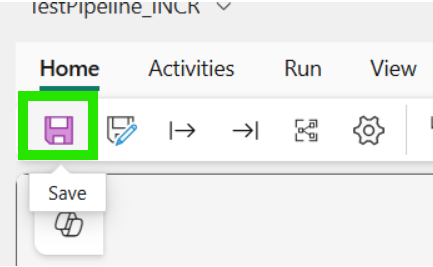
- Save the pipeline:
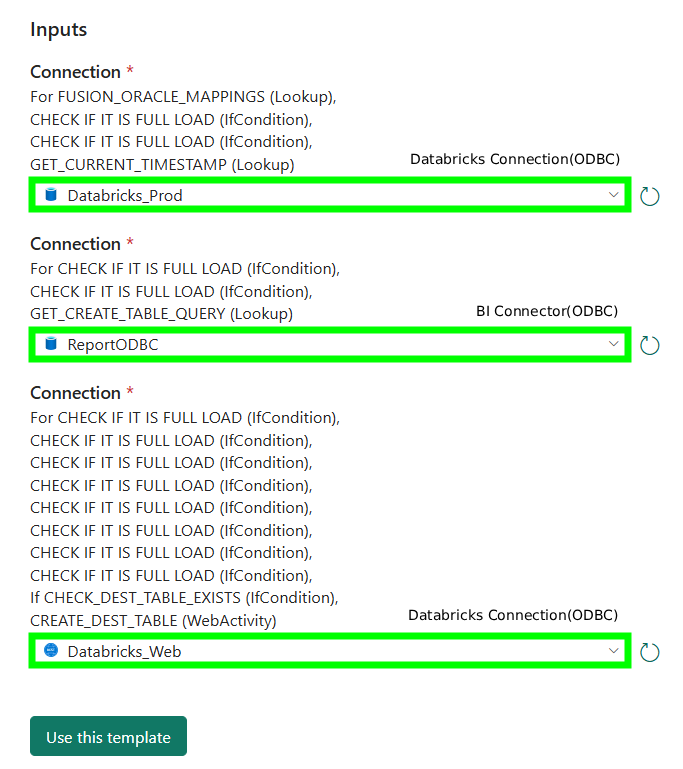
3b. Importing FUSION_TO_DATABRICKS_WORKER_PIPELINE_TEMPLATE
- In your workspace, Click "+ New items":
- Select "Data pipeline":
- Enter a descriptive name for your pipeline (e.g. FUSION_TO_DATABRICKS_WORKER_PIPELINE_TEMPLATE ) and click “Create”.
- Then choose "Import " option:
- Import pipeline (FUSION_TO_DATABRICKS_WORKER_PIPELINE_TEMPLATE):
- Upload the FUSION_TO_DATABRICKS_WORKER_PIPELINE_TEMPLATE.zip file.
- From the first dropdown, select the BI Connector ODBC connection configured in Step 2 (refer to the image below).
- From the second dropdown, select the Databricks Connection(ODBC) connection configured in Step 2 (refer to the image below).
- From the third dropdown, select the Databricks Connection(Web V2) connection configured in Step 2 (refer to the image below).
- Click "Use this template".
- Save the pipeline:
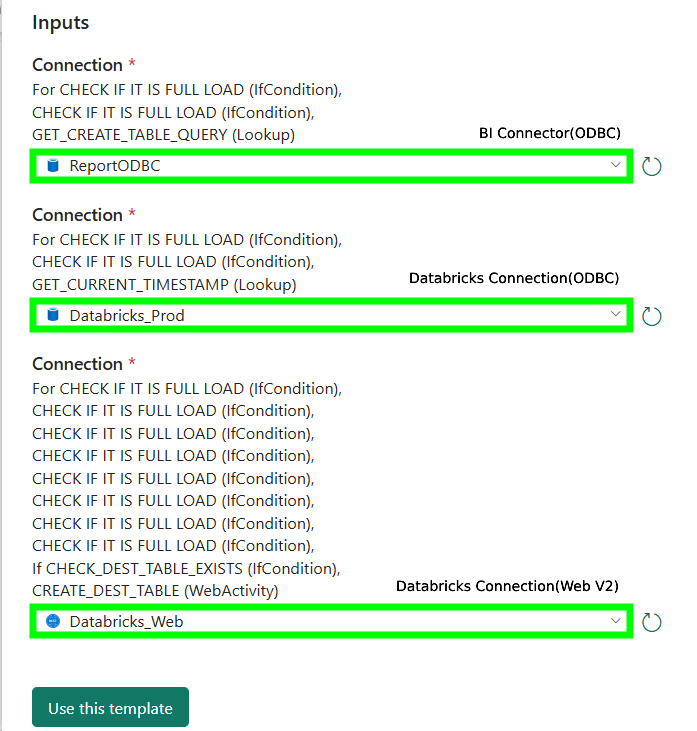
3c. Importing FUSION_TO_DATABRICKS_PARENT_PIPELINE_TEMPLATE
- In your workspace, Click "+ New items":
- Select "Data pipeline":
- Enter a descriptive name for your pipeline (e.g. FUSION_TO_DATABRICKS_PARENT_PIPELINE_TEMPLATE) and click “Create”.
- Then choose "Import " option:
- Import pipeline (FUSION_TO_DATABRICKS_PARENT_PIPELINE_TEMPLATE):
- Upload the FUSION_TO_DATABRICKS_PARENT_PIPELINE_TEMPLATE.zip file.
- From the first dropdown, select the Databricks Connection(ODBC) configured in Step 2 (refer to the image below).
- From the second dropdown, select the BI Connector ODBC connection connection configured in Step 2 (refer to the image below).
- From the third dropdown, select the Databricks Connection(Web V2) connection configured in Step 2 (refer to the image below).
- Click "Use this template".
- Save the pipeline:
Step 4: Create the Lookup Table in the Databricks Database
4a. Run the Table Creation Script:
CREATE OR REPLACE TABLE <your_schema_name>.<your_lookup_table_name>
(
   TABLE_SRC               VARCHAR(255),  -- Source table name from which data is extracted
   TABLE_DEST              VARCHAR(255),  -- Destination table name where data is loaded
   PRIMARY_KEY             VARCHAR(255),  -- Primary key column(s) used to uniquely identify records
   SCHEMA_DEST             VARCHAR(255),  -- Target schema for the destination table
   DATABASE_DEST           VARCHAR(255),  -- Target database for the destination table
   WATERMARK_COLUMN        VARCHAR(255),  -- Column used for incremental loading
   WATERMARK_COLUMN_FORMAT VARCHAR(255),  -- Format of the watermark column
   LAST_RUN_DATE           DATE,          -- Date when the data pipeline last ran successfully
   FREQUENCY_IN_DAYS       NUMBER(38,0),  -- Number of days between scheduled data refreshes
   REFRESH_TYPE            VARCHAR(50)    -- Type of data refresh: FULL_LOAD, INCR_LOAD
);
4b. Insert Rows into the Lookup Table using SQL INSERT Query:
Sample Query:
INSERT INTO <your_schema_name>.<your_lookup_table_name>
(
    TABLE_SRC,
    TABLE_DEST,
    PRIMARY_KEY,
    SCHEMA_DEST,
    DATABASE_DEST,
    WATERMARK_COLUMN,
    WATERMARK_COLUMN_FORMAT,
    LAST_RUN_DATE,
    FREQUENCY_IN_DAYS,
    REFRESH_TYPE
)
VALUES (
    'BIC_TABLE_NAME',                    -- Source table name
    'DATABRICKS_TABLE_NAME',              -- Destination table name
    'ID_COLUMN',                         -- Primary key column
    'TARGET_SCHEMA',                     -- Target schema
    'TARGET_DATABASE',                   -- Target database
    'LAST_UPDATE_DATE',                  -- Watermark column
    'YYYY-MM-DD"T"HH24:MI:SS',            -- Watermark format
    NULL,                                -- Last run date (NULL for first run)
    1,                                   -- Frequency (1 = daily)
    'INCR_LOAD'                          -- Refresh type
);
4c. (Optional) Updating and Deleting Rows in the Lookup Table
This step is required only if you want to make any changes to the Lookup table. If not, you can move to the next step.
To Update a Row:
Add the Update statement in the sql editor and execute it .
FREQUENCY_IN_DAYS = 1 → sets the pipeline to run every 1 day
To Delete a Row:
Use the DELETE statement with a proper condition:
- This condition ensures that only the row(s) where the TABLE_SRC column has the value 'BIC_TABLE_Name' will be deleted.
4d. Set the Lookup Table Name in Fabric Pipeline
- In the main pipeline (e.g., FUSION_TO_DATABRICKS_PARENT_PIPELINE_TEMPLATE) in Power BI Fabric, replace the existing default value of the table_name and schema parameter with the name of the lookup table and schema.
- Click Save to save your changes
To learn more about lookup table, please refer this article.
Step 5: Configure Pipeline Schedule:
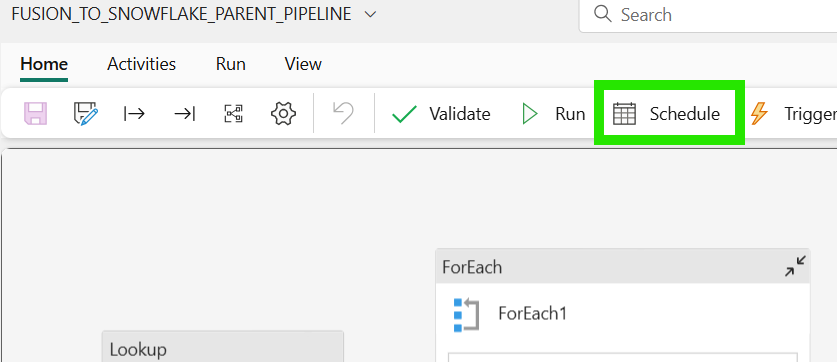
- Open your main pipeline (FUSION_TO_DATABRICKS_PARENT_PIPELINE_TEMPLATE)
- Click on "Schedule" in the top ribbon/menu
- Turn on "Scheduled run" (toggle to "On")
- Configure Repeat interval: Select from dropdown options like Daily, Weekly or Monthly
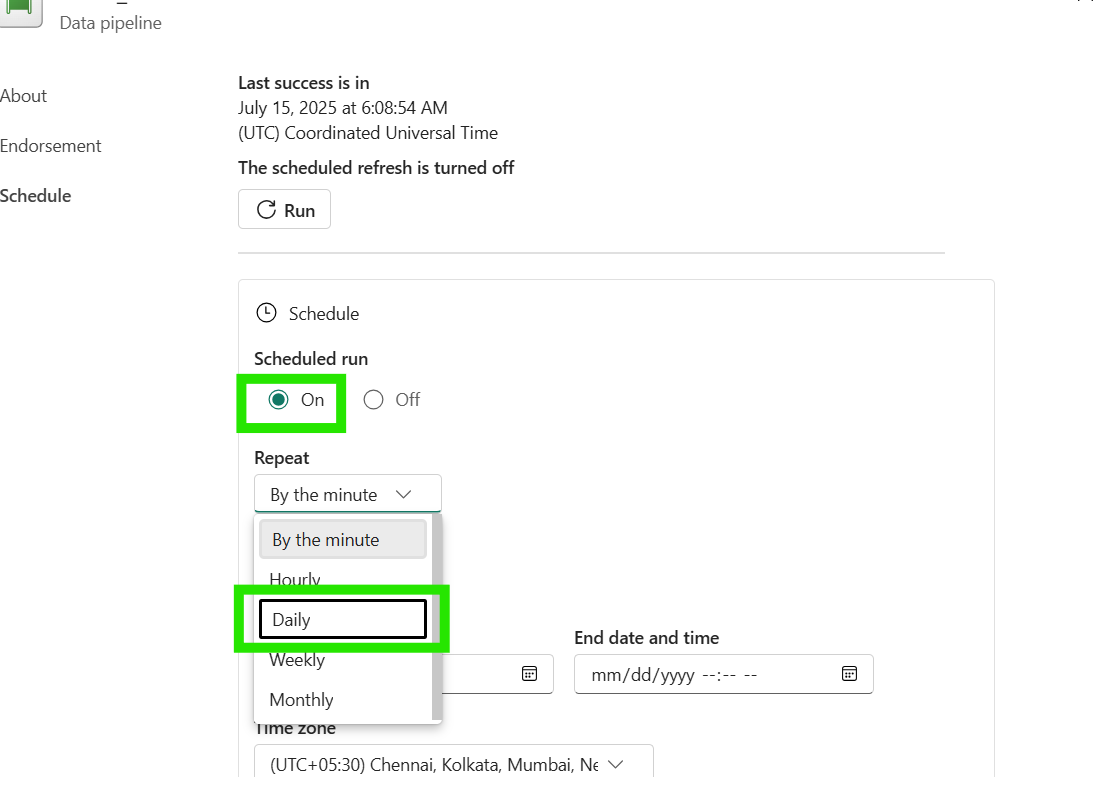
- Set Execution Time: Choose optimal time (e.g., 2:00 AM)
- Set Start date: When scheduling should begin
- Set End date: Far future date (12/31/2099) for continuous running
Note: This field is mandatory and cannot be left empty, so we use a distant future date to ensure the pipeline runs indefinitely without manual intervention - Select Time zone: Your regional time-zone (UTC+05:30 for India)
- Then click "Apply" to save the changes
 Note: You can also run the pipeline on-demand anytime by clicking the "Run" button in the top ribbon, regardless of the schedule.
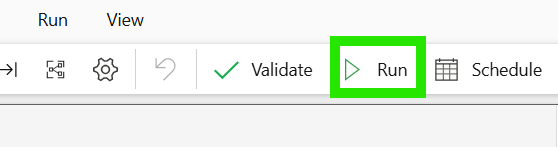
To see more on frequently asked question, please refer this article.