Most companies using Oracle Fusion cloud have a pressing need to push the Fusion data to their Synapse Dedicated SQL Pool to maintain a single source of truth. These companies typically come across any of the following combinations of Data Migration/ETL needs for each table they want to pull from Oracle Fusion:
- Type of data pull from source table - Full data pull or Incremental data pull
- Data insertion in target table - Insert new rows or update existing rows or both
- Frequency of automated refresh – Hour-based scheduling (runs every X hours based on FREQUENCY_IN_HOURS).
- Pipeline monitoring – Tracks execution status, start time, end time, and error description for each table run.
In some cases, they might have a composite primary key (a set of concatenated values from different columns of the table to uniquely identify each row). Some tables may not have time-based columns to facilitate incremental loads, for which the primary key is used as a reference to perform the incremental load.
This article will help you to handle all of the above scenarios with a single Azure Synapse pipeline (that refers to a Lookup table).
The lookup table acts as a configuration controller for Azure Synapse pipelines. Each row in the table represents a data load job, including source/destination table details, load type, execution frequency, and watermark column information for incremental loads.
Prerequisites:
1. Required Setup:
- Windows Server with Microsoft Integration Runtime and BI Connector
- Install and configure Microsoft Self-hosted Integration Runtime (SHIR) from Microsoft
Note: Its possible to use an existing SHIR as well - Install BI Connector Server edition and activate it using a license key.
- Install and configure Microsoft Self-hosted Integration Runtime (SHIR) from Microsoft
- Admin Access to Gateway Server
- Admin access is required to set up System DSNs in ODBC.
- The Self-hosted Integration Runtime (SHIR) server must be accessible from the Azure Synapse workspace.
- An Azure Synapse Dedicated SQL Pool must be available as the target database.
- The Dedicated SQL Pool must have write permission.
- Access to Azure Data Lake Storage Gen2 (ADLS Gen2) with write permissions is required.
2. Recommended Configurations:
- Windows Server 2016 or above (can also be set up on a VM on the cloud)
- .NET Framework 4.7.2 or above installed
- Minimum of 8 CPU cores, 8 GB RAM, and 80 GB hard disk space
- Strongly recommended to disable hibernate/sleep on this server.
Note: The SHIR wouldn't work when the server enters hibernate/sleep mode
Step 1: Download the Azure Synapse Pipeline Template
Please Contact us or email support@biconnector.com to get our ready-to-deploy Azure Synapse pipeline template.
Step 2: Import the Azure Synapse Pipeline using the template:
Note: Before proceeding, ensure the BI Connector DSN is configured and that the required BIC tables (in case of Custom SQL Queries or existing Data Models) are already available. These are essential for the ODBC Linked Service to connect successfully and retrieve data.
For guidance on how to create a DSN and BIC tables, refer this article. .
2a. Extract the ZIP Folder
After Downloading the provided ZIP folder.
Right-click the file and select Extract All.
After extraction, you will find the following two files:
Pipeline Template named FUSION_TO_DEDICATED_SQL_POOL_USING_BIC (ZIP Folder)
→ Contains the Azure Synapse pipeline template to be imported.- UPDATE_LOOKUP_STATUS.txt
→ Contains the SQL script for the UPDATE_LOOKUP_STATUS stored procedure.
This script must be executed in the Synapse Dedicated SQL Pool database before running the pipeline.
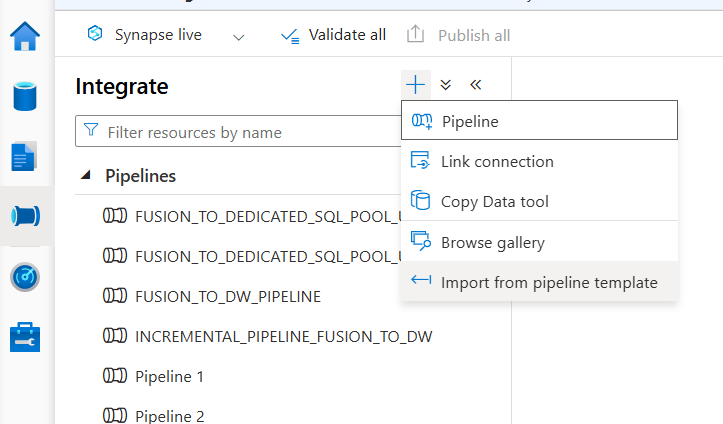
2b. Import the Pipeline Template
- Click the + (plus) icon under Integrate.
- Choose Import from pipeline template from the options shown.
- Add the ZIP folder containing your pipeline template
2c. Map the services
After importing the pipeline template, you need to map the linked services.
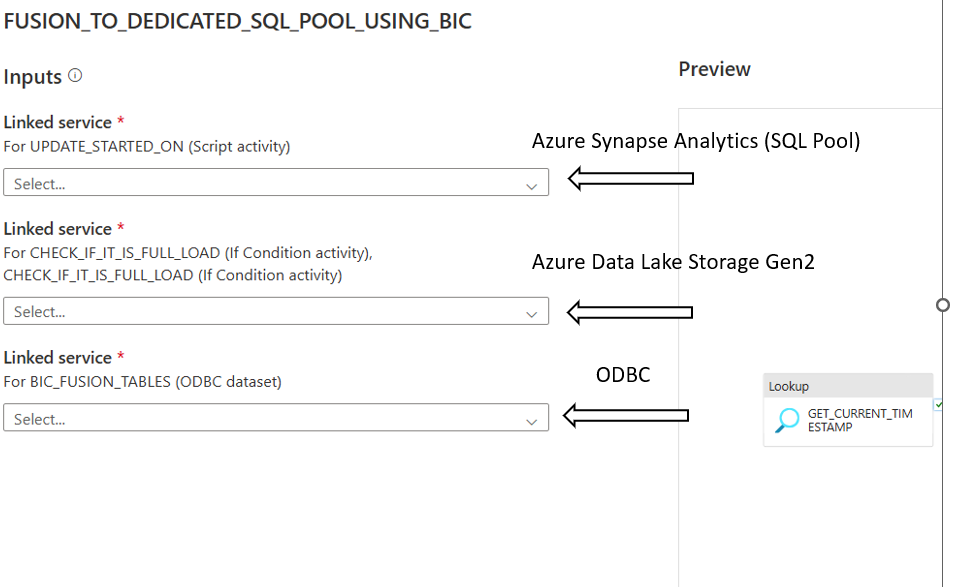
- Azure Synapse Analytics Linked Service
Either:- Select an existing Azure Synapse Analytics Linked Service configured to point to your Synapse Dedicated SQL Pool.
OR - Click + New to create a new one:
- In the New Azure Synapse Analytics Linked Service window:
- Give Name to Linked Service
- Under Connect via Integration Runtime, choose Auto Resolve Integration Runtime.
- Choose Version as 2.0
- Set Account selection method to From Azure subscription.
- Choose the appropriate:
Azure Subscription
Server name
Database name (Dedicated SQL Pool database)
- Select the required Authentication type (SQL Authentication / Managed Identity / Service Principal).
- Provide the necessary authentication details.
- Click Test Connection to ensure successful connectivity.
- Click Create.
- In the New Azure Synapse Analytics Linked Service window:
- Select an existing Azure Synapse Analytics Linked Service configured to point to your Synapse Dedicated SQL Pool.
- Azure Data Lake Storage Gen2 Linked Service
Either:- Select an existing Linked Service configured to point to your Azure Data Lake Storage Gen2.
OR - Click + New to create a new one:
- In the Linked Service window:
- Give Name to Linked Service
- Under Connect via Integration Runtime, choose Auto Resolve Integration Runtime.
- In the Linked Service window:
- Select the required Authentication type.
- Provide the necessary authentication details.
- Select Test Connection as To Linked Service.
- Click Test Connection to ensure successful connectivity.
- Click Create.
- Select an existing Linked Service configured to point to your Azure Data Lake Storage Gen2.
- ODBC Linked Service
Either:- Select an existing ODBC Linked Service that is already configured with the BI Connector DSN.
OR - Click + New to create a new one:
- In the New Linked Service window:
- Give Name to the ODBC Linked service.
- Select Self Hosted Integration Runtime under Connect via Integration Runtime.
- Under Connection String:
- Add the DSN name that was created using BI Connector, in the format:
dsn=<<your_dsn_name>>
- Add the DSN name that was created using BI Connector, in the format:
- Under Authentication type: Choose the appropriate method (Basic)
- Provide the username and password of your Oracle Fusion Account.
- Click Test Connection to verify.
- Click Create.
- In the New Linked Service window:
- Select an existing ODBC Linked Service that is already configured with the BI Connector DSN.
2d. Map the Dedicated SQL Pool for Stored Procedure and Dataset
After importing the pipeline template, map the Dedicated SQL Pool to the dataset and stored procedure activities as follows:
- On the right-side message panel, you will see Template validation output list for:
- SYNAPSE_DEDICATED_SQL_POOL_TABLES
- POST_PROCESSING_DELTA_DATA
- POST_PROCESSING_FULL_LOAD
- From the right-side Template Validation Output panel, click on the following items one by one:
- Click SYNAPSE_DEDICATED_SQL_POOL_TABLES
→ In the Dataset, select the Dedicated SQL Pool in the SQL Pool field. - Click POST_PROCESSING_DELTA_DATA
→ In the Stored Procedure activity, select the Dedicated SQL Pool in the SQL Pool field. - Click POST_PROCESSING_FULL_LOAD
→ In the Stored Procedure activity, select the Dedicated SQL Pool in the SQL Pool field.
2e. Create Stored Procedure
- Navigate to the Data hub in Azure Synapse Analytics .
- Connect to your Dedicated SQL Pool database.
- Click on New SQL Script.
- Open the file UPDATE_LOOKUP_STATUS.txt (extracted earlier).
- Copy the SQL script from the file.
- Paste the script into the SQL editor window.
- Click Run to execute the script.
- Verify that the stored procedure UPDATE_LOOKUP_STATUS is created successfully under:
- Database → Programmability → Stored Procedures
- Click Publish All.
Step 3: Create the Lookup Table in the BI Connector
3a. Create New Lookup Table
In BI Connector , Navigate to the Data Pipelines section.
Click + New Lookup Table.
Enter the desired Lookup Table Name.
Select the Fusion Data Source created in BI Connector.
Enter the Destination Schema Name.
Select the Destination Warehouse as Dedicated SQL Pool.
Click Next.
3b. Select Base Tables and BIC Tables
- In the Base Tables and BIC Tables section:
You can manually select required tables from searchable drop down
OR- Bulk paste table names if needed.
For Base Tables:
BI Connector will automatically:
Fetch the Primary Key
Retrieve all Column Names
Automatically select LAST_UPDATE_DATE as the watermark column (if available)
Assign the correct Watermark Format
For BIC Tables (Custom SQL Queries or Existing Data Models):
You must manually provide:
- Primary Key – Add if available; mandatory for incremental load. Without it, only full load is supported
- Watermark Column – Required for incremental load
- Watermark Format – Only needed if the Watermark Column is a timestamp; otherwise, leave blank
Click Save after configuration.
3c. Download and Execute Table Scripts
In the Actions column, select the required option:
Download CREATE TABLE statement
Download INSERT statement
Download as CSV
Download as Excel
Use the downloaded CREATE TABLE and INSERT queries to create and populate the lookup table in the Dedicated SQL Pool database.
3d. Set the Lookup Table Name in Synapse Pipeline
- Add the Lookup Table Schema name in Synapse Pipeline under Parameters schema_name , where lookup tables was created
- Add the Lookup Table name in Synapse Pipeline under Parameters table_name
- Publish the changes.
To learn more about lookup table, please refer this article.
Step 4: Run the Azure Synapse Pipeline
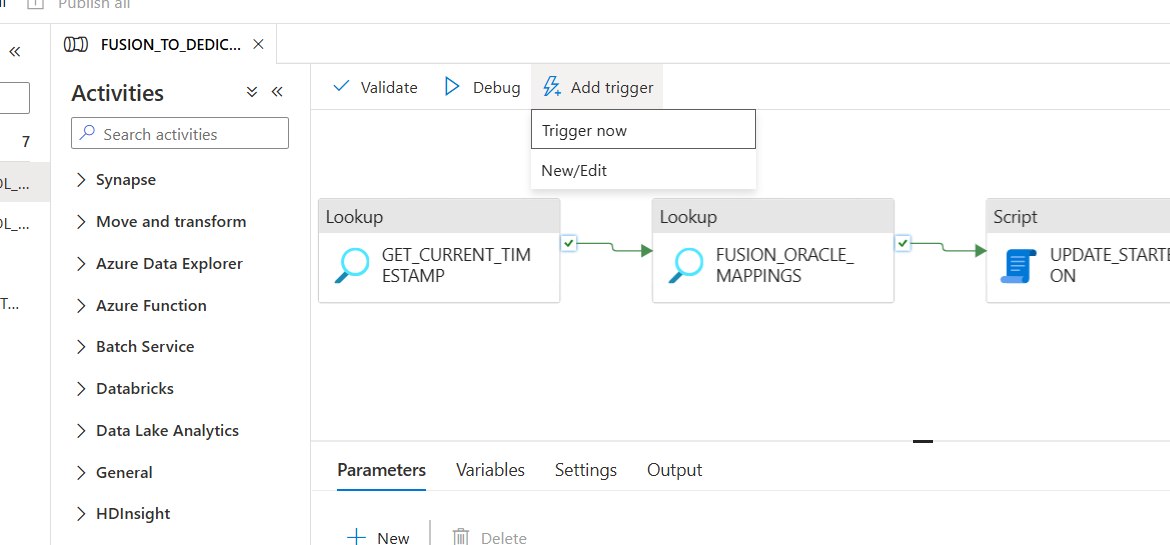
4a. To Run the pipeline Manually
- Click Add Trigger and then click Trigger now
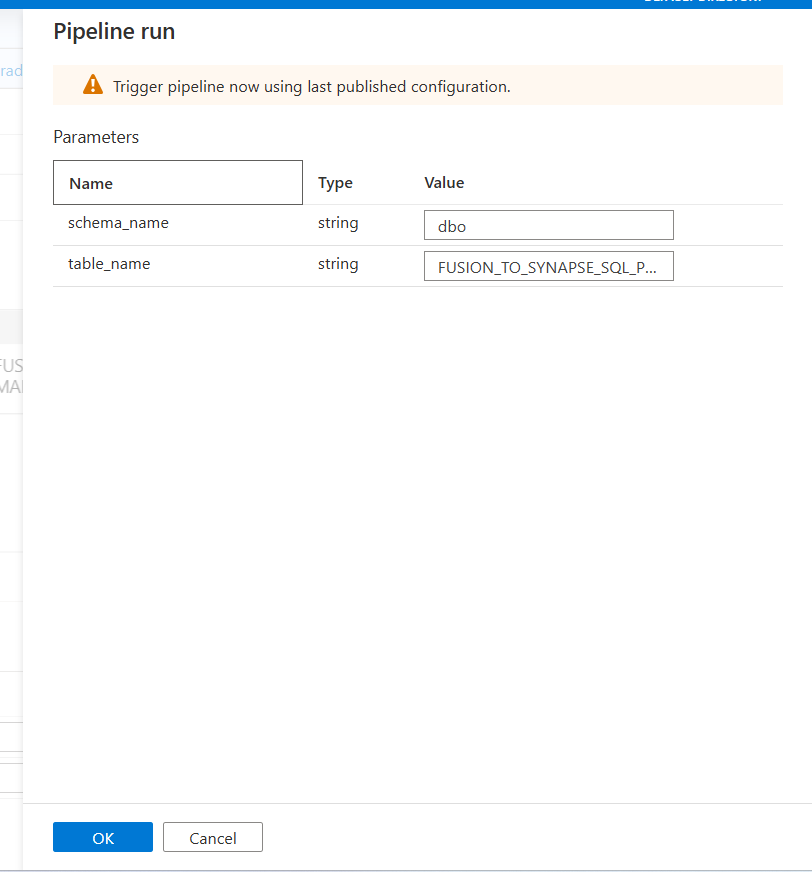
- Enter the Parameters
- Under schema_name: Enter the name of the schema where lookup table was created
- Under table_name: Enter the name of the lookup table you created
- Click OK
4b. To Run the Pipeline on a Schedule
- Add the Trigger
Click the Add Trigger and New/Edit

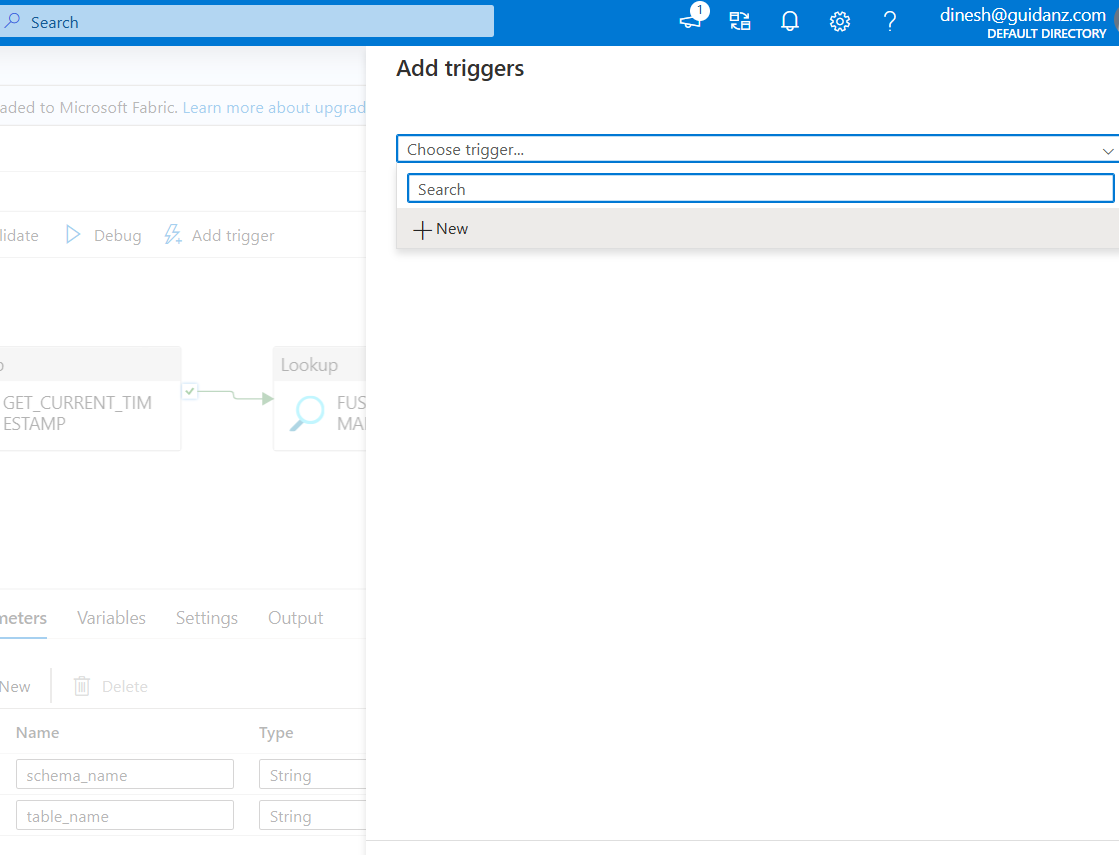
- Create the Trigger
Click Choose trigger and Click + New
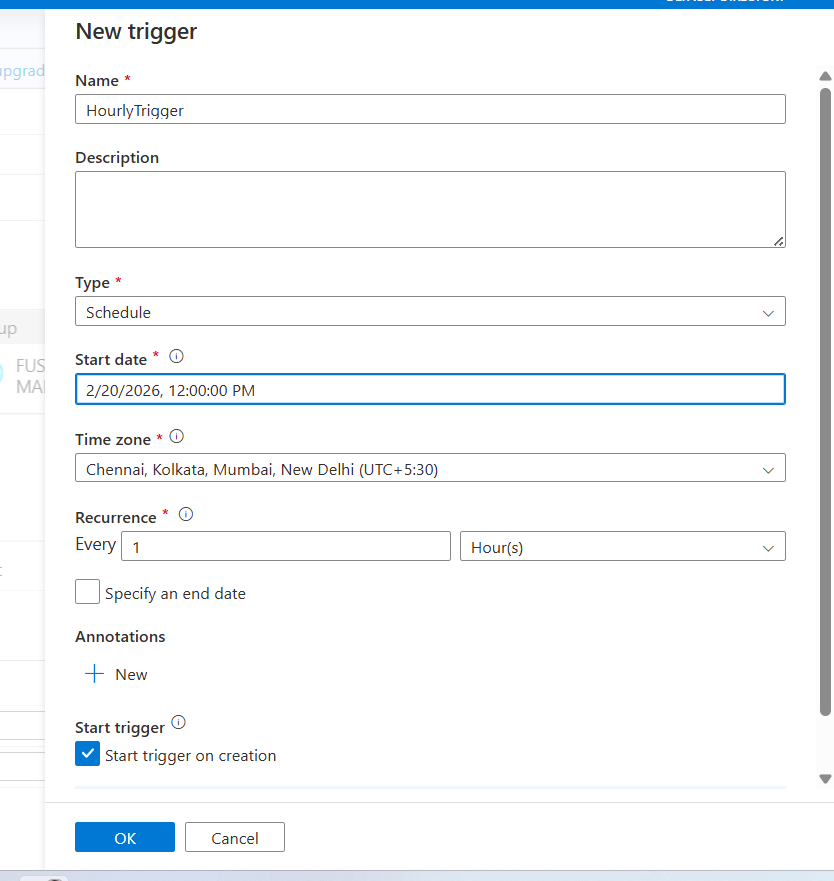
- Configure the Trigger
- Under Name: Enter trigger name
- Under Type: Choose Schedule
- Under Start date: Choose appropriate date with time
- Under Time zone: Choose appropriate time zone
- Under Recurrence: Choose Every 1 hour
- Click OK
- Enter the Parameters
- Under schema_name: Enter the name of the schema where lookup table was created
- Under table_name: Enter the name of the lookup table you created
- Click OK

- Publish the Pipeline
After creating the trigger, click Publish All.
To see more on frequently asked question, please refer this article.